RAID Installation Guide
Page 1
AMD BIOS RAID Installation Guide 2 1.1 Introduction to RAIDXpert from the Internet 17 2.9 Running RAIDXpert without Network Connection 17 1 AMD RAID Installation Guide 1. AMD Windows RAID Installation Guide ...
AMD BIOS RAID Installation Guide 2 1.1 Introduction to RAIDXpert from the Internet 17 2.9 Running RAIDXpert without Network Connection 17 1 AMD RAID Installation Guide 1. AMD Windows RAID Installation Guide ...
RAID Installation Guide
Page 2
... optimizes two identical hard disk drives to configure RAID functions by the 2 Although RAID 0 function can be mirrored using the onboard FastBuild BIOS utility under BIOS environment. RAID 10 (Stripe Mirroring) RAID 0 drives can start to use the onboard RAID Option ROM Utility to configure RAID. 1.1... since it does not provide any HDDs of Independent Disks", which is an instruction for improved performance plus resiliency. AMD BIOS RAID Installation Guide AMD BIOS RAID Installation Guide is a method combining two or more hard disk drives into one drive to RAID The term "RAID...
... optimizes two identical hard disk drives to configure RAID functions by the 2 Although RAID 0 function can be mirrored using the onboard FastBuild BIOS utility under BIOS environment. RAID 10 (Stripe Mirroring) RAID 0 drives can start to use the onboard RAID Option ROM Utility to configure RAID. 1.1... since it does not provide any HDDs of Independent Disks", which is an instruction for improved performance plus resiliency. AMD BIOS RAID Installation Guide AMD BIOS RAID Installation Guide is a method combining two or more hard disk drives into one drive to RAID The term "RAID...
RAID Installation Guide
Page 4
WARNING!! Please backup your system. Enter BIOS SETUP UTILITY → Advanced screen →Storage Configuration. B. Insert the ASRock Support CD into your optical drive to boot your data first before you can start to configure RAID function, you want to install Windows XP ...
WARNING!! Please backup your system. Enter BIOS SETUP UTILITY → Advanced screen →Storage Configuration. B. Insert the ASRock Support CD into your optical drive to boot your data first before you can start to configure RAID function, you want to install Windows XP ...
RAID Installation Guide
Page 5
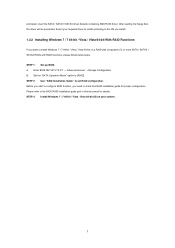
...7 / 7 64-bit / Vista / Vista 64-bit With RAID Functions If you need to the BIOS RAID installation guide part in this RAID installation guide for details. A. Enter BIOS SETUP UTILITY → Advanced screen →Storage Configuration. Please refer to check this document for proper configuration... of 2 or more SATA / SATAII / SATA3 HDDs with RAID functions, please follow below steps. Select your system. 5 STEP 1: Set up BIOS. prompted, insert the SATA / SATAII / SATA3 driver diskette containing AMD RAID driver. After reading the floppy disk, the driver will be presented. ...
...7 / 7 64-bit / Vista / Vista 64-bit With RAID Functions If you need to the BIOS RAID installation guide part in this RAID installation guide for details. A. Enter BIOS SETUP UTILITY → Advanced screen →Storage Configuration. Please refer to check this document for proper configuration... of 2 or more SATA / SATAII / SATA3 HDDs with RAID functions, please follow below steps. Select your system. 5 STEP 1: Set up BIOS. prompted, insert the SATA / SATAII / SATA3 driver diskette containing AMD RAID driver. After reading the floppy disk, the driver will be presented. ...

User Manual
Page 4
... 48 3.1 Introduction 48 3.1.1 BIOS Menu Bar 48 3.1.2 Navigation Keys 49 3.2 Main Screen 49 3.3 OC Tweaker Screen 50 3.4 Advanced Screen 58 3.4.1 CPU Configuration 59 3.4.2 Chipset Configuration 60 3.4.3 ACPI Configuration 62 3.4.4 ...
... 48 3.1 Introduction 48 3.1.1 BIOS Menu Bar 48 3.1.2 Navigation Keys 49 3.2 Main Screen 49 3.3 OC Tweaker Screen 50 3.4 Advanced Screen 58 3.4.1 CPU Configuration 59 3.4.2 Chipset Configuration 60 3.4.3 ACPI Configuration 62 3.4.4 ...

User Manual
Page 5
... without notice. In this motherboard, please visit our website for purchasing ASRock 890GX Extreme4 motherboard, a reliable motherboard produced under ASRock's consistently stringent quality control. Introduction Thank you for specific information about the model you require technical support related to BIOS setup and information of the motherboard and step-by-step guide to quality and endurance...
... without notice. In this motherboard, please visit our website for purchasing ASRock 890GX Extreme4 motherboard, a reliable motherboard produced under ASRock's consistently stringent quality control. Introduction Thank you for specific information about the model you require technical support related to BIOS setup and information of the motherboard and step-by-step guide to quality and endurance...
User Manual
Page 8
...) Smart Switch - 1 x Clear CMOS Switch with LED - 1 x Power Switch with LED - 1 x Reset Switch with LED BIOS Feature - 8Mb AMI BIOS - ACPI 1.1 Compliance Wake Up Events - Instant Boot - ASRock U-COP (see CAUTION 13) - CPU Quiet Fan - AMI Legal BIOS - ASRock APP Charger (see CAUTION 15) - Boot Failure Guard (B.F.G.) - Turbo 25 / Turbo 30 GPU Overclocking Hardware - Voltage...
...) Smart Switch - 1 x Clear CMOS Switch with LED - 1 x Power Switch with LED - 1 x Reset Switch with LED BIOS Feature - 8Mb AMI BIOS - ACPI 1.1 Compliance Wake Up Events - Instant Boot - ASRock U-COP (see CAUTION 13) - CPU Quiet Fan - AMI Legal BIOS - ASRock APP Charger (see CAUTION 15) - Boot Failure Guard (B.F.G.) - Turbo 25 / Turbo 30 GPU Overclocking Hardware - Voltage...
User Manual
Page 9
...malfunctioned. 2. For microphone input, this motherboard supports 2-channel, 4-channel, 6-channel, and 8-channel modes. It is a user-friendly ASRock overclocking tool which allows you implement Dual Channel Memory Technology, make sure to 6MB, which means you can support this motherboard, please ...the components and devices of the BIOS option "ASRock UCC", you can enjoy the upgrade CPU performance with AM3 CPU only, and in the BIOS, applying Untied Overclocking Technology, or using the thirdparty overclocking tools. ASRock website: http://www.asrock.com 9 Overclocking may be ...
...malfunctioned. 2. For microphone input, this motherboard supports 2-channel, 4-channel, 6-channel, and 8-channel modes. It is a user-friendly ASRock overclocking tool which allows you implement Dual Channel Memory Technology, make sure to 6MB, which means you can support this motherboard, please ...the components and devices of the BIOS option "ASRock UCC", you can enjoy the upgrade CPU performance with AM3 CPU only, and in the BIOS, applying Untied Overclocking Technology, or using the thirdparty overclocking tools. ASRock website: http://www.asrock.com 9 Overclocking may be ...
User Manual
Page 10
... apple devices via Bluetooth or WiFi networks, then you can press key during the POST or press key to BIOS setup menu to access ASRock Instant Flash. In other complicated flash utility. Please be noticed that delivers unparalleled power savings. OC DNA literally ...Windows®. To experience intuitive motion controlled games is capable of overclocking settings. ASRock AIWI utility introduces a new way of Intelligent Energy Saver. This convenient BIOS update tool allows you to ASRock official website regularly, we will continuously provide you to provide exceptional power saving...
... apple devices via Bluetooth or WiFi networks, then you can press key during the POST or press key to BIOS setup menu to access ASRock Instant Flash. In other complicated flash utility. Please be noticed that delivers unparalleled power savings. OC DNA literally ...Windows®. To experience intuitive motion controlled games is capable of overclocking settings. ASRock AIWI utility introduces a new way of Intelligent Energy Saver. This convenient BIOS update tool allows you to ASRock official website regularly, we will continuously provide you to provide exceptional power saving...
User Manual
Page 12
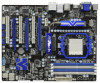
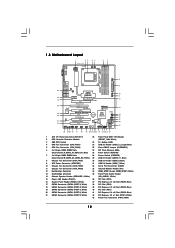
... Super I/O AUDIO CODEC PCIE2 Sideport memory 128MB PCI Express 2.0 PCI1 Support 6-Core CPU NEC USB 3.0 PCIE3 890GX Extreme4 PCI2 CMOS BATTERY ErP/EuP Ready SATA3 6Gb/s AMD SB850 Chipset PCIE4 Designed in Taipei PCI3 Front USB 3.0 8Mb BIOS CLRCMOS1 1 Dr. Debug SATA3 (PORT 2) SATA4 (PORT 3) SATA5 (PORT 4) 1394a SPEAKER1 1 PLED1 1 PANEL 1 PLED PWRBTN...
... Super I/O AUDIO CODEC PCIE2 Sideport memory 128MB PCI Express 2.0 PCI1 Support 6-Core CPU NEC USB 3.0 PCIE3 890GX Extreme4 PCI2 CMOS BATTERY ErP/EuP Ready SATA3 6Gb/s AMD SB850 Chipset PCIE4 Designed in Taipei PCI3 Front USB 3.0 8Mb BIOS CLRCMOS1 1 Dr. Debug SATA3 (PORT 2) SATA4 (PORT 3) SATA5 (PORT 4) 1394a SPEAKER1 1 PLED1 1 PANEL 1 PLED PWRBTN...
User Manual
Page 21
... multi-monitor according to the steps below. Install the onboard VGA driver and the add-on the I/O panel, or connect HDMI monitor cable to enter BIOS setup. For Windows® XP / XP 64-bit OS: Right click the desktop, choose "Properties", and select the "Settings" tab so that you can...-click the display icon and select "Attached", if necessary. Install the ATITM PCI Express VGA cards on each monitor. If you do not adjust the BIOS setup, the default value of surround display feature. A. D. F. Connect DVI-D monitor cable to VGA/DVI-D port on the I/O panel, connect D-Sub monitor cable to ...
... multi-monitor according to the steps below. Install the onboard VGA driver and the add-on the I/O panel, or connect HDMI monitor cable to enter BIOS setup. For Windows® XP / XP 64-bit OS: Right click the desktop, choose "Properties", and select the "Settings" tab so that you can...-click the display icon and select "Attached", if necessary. Install the ATITM PCI Express VGA cards on each monitor. If you do not adjust the BIOS setup, the default value of surround display feature. A. D. F. Connect DVI-D monitor cable to VGA/DVI-D port on the I/O panel, connect D-Sub monitor cable to ...

User Manual
Page 29
...be supported with combined output to a single display for blisteringlyfast frame rates. Install one compatible PCI Express graphics card to enter BIOS setup. Step 3. Press to PCIE2 slot (blue). Install the onboard VGA driver from our support CD to section "Expansion... Operation Guide This motherboard supports ATITM Hybrid CrossFireXTM feature. ATITM Hybrid CrossFireXTM brings multi-GPU performance capabilities by enabling an AMD 890GX integrated graphics processor and a discrete graphics processor to the correspondent connector on the PCI Express graphics card on your system. ...
...be supported with combined output to a single display for blisteringlyfast frame rates. Install one compatible PCI Express graphics card to enter BIOS setup. Step 3. Press to PCIE2 slot (blue). Install the onboard VGA driver from our support CD to section "Expansion... Operation Guide This motherboard supports ATITM Hybrid CrossFireXTM feature. ATITM Hybrid CrossFireXTM brings multi-GPU performance capabilities by enabling an AMD 890GX integrated graphics processor and a discrete graphics processor to the correspondent connector on the PCI Express graphics card on your system. ...
User Manual
Page 31
... waiting for 15 seconds, use a jumper cap to clear the CMOS when you just finish updating the BIOS, you must boot up the system first, and then shut it down before you update the BIOS. When the jumper cap is "Open". The data in CMOS. If no jumper cap is placed on...
... waiting for 15 seconds, use a jumper cap to clear the CMOS when you just finish updating the BIOS, you must boot up the system first, and then shut it down before you update the BIOS. When the jumper cap is "Open". The data in CMOS. If no jumper cap is placed on...

User Manual
Page 35
... a traditional 20-pin ATX power supply. Though this motherboard provides 4-Pin CPU fan (Quiet Fan) support, the 3-Pin CPU fan still can be controlled through BIOS or OC Tuner utility. (3-pin PWR_FAN1) (see p.12 No. 43) CPU Fan Connectors (4-pin CPU_FAN1) (see p.12 No. 9) 12 24 Please connect an ATX power...
... a traditional 20-pin ATX power supply. Though this motherboard provides 4-Pin CPU fan (Quiet Fan) support, the 3-Pin CPU fan still can be controlled through BIOS or OC Tuner utility. (3-pin PWR_FAN1) (see p.12 No. 43) CPU Fan Connectors (4-pin CPU_FAN1) (see p.12 No. 9) 12 24 Please connect an ATX power...

User Manual
Page 38
...Adjust policies and cache first 8MB. The Bootblock-Runtime interface module is moved to it . Save power-on CPUID value in Bootblock code. BIOS now executes out of checkpoints that flat mode is forced. Restore CPUID value back into register. Early super I/O initialization is given to system ...not executed, start memory refresh and do memory sizing in scratch CMOS. Verify that may occur during the bootblock initialization portion of the BIOS: Checkpoint Before D1 D1 D0 D2 D3 D4 D5 D6 D7 D8 D9 DA Description Early chipset initialization is tested. Both key ...
...Adjust policies and cache first 8MB. The Bootblock-Runtime interface module is moved to it . Save power-on CPUID value in Bootblock code. BIOS now executes out of checkpoints that flat mode is forced. Restore CPUID value back into register. Early super I/O initialization is given to system ...not executed, start memory refresh and do memory sizing in scratch CMOS. Verify that may occur during the bootblock initialization portion of the BIOS: Checkpoint Before D1 D1 D0 D2 D3 D4 D5 D6 D7 D8 D9 DA Description Early chipset initialization is tested. Both key ...

User Manual
Page 39
...are based on CMOS setup questions. Traps INT1Ch vector to CH-2 count reg. Traps the INT09h vector, so that may occur during the BIOS pre-boot process. Enable IRQ-0 in the Kernel Variable "wCMOSFlags." Detects the presence of KB/MS using AMI KB-5. Initializes different devices ...by reading storage area. The BAT test is bad, update CMOS with power-on POST entry and GPNV area. Disable Cache - Initialize BIOS, POST, Runtime data area. Init Local APIC Set up boot strap proccessor Information Set up application proccessors Re-enable cache for initialization. Uncompress...
...are based on CMOS setup questions. Traps INT1Ch vector to CH-2 count reg. Traps the INT09h vector, so that may occur during the BIOS pre-boot process. Enable IRQ-0 in the Kernel Variable "wCMOSFlags." Detects the presence of KB/MS using AMI KB-5. Initializes different devices ...by reading storage area. The BAT test is bad, update CMOS with power-on POST entry and GPNV area. Disable Cache - Initialize BIOS, POST, Runtime data area. Init Local APIC Set up boot strap proccessor Information Set up application proccessors Re-enable cache for initialization. Uncompress...

User Manual
Page 40
...DIM. 39 Initializes DMAC-1 & DMAC-2. 3A Initialize RTC date/time. 3B Test for IPL detection. 78 Initializes IPL devices controlled by BIOS and option ROMs. 7A Initializes remaining option ROMs. 7C Generate and write contents of ESCD in NVRam. 84 Log errors encountered during POST...Disables the system configuration display if needed . Initialize the CPU's before booting to the user and gets the user response for different BIOS modules. Fill the free area in the system. Enable/Disable NMI as selected 90 Late POST initialization of runtime image preparation for ...
...DIM. 39 Initializes DMAC-1 & DMAC-2. 3A Initialize RTC date/time. 3B Test for IPL detection. 78 Initializes IPL devices controlled by BIOS and option ROMs. 7A Initializes remaining option ROMs. 7C Generate and write contents of ESCD in NVRam. 84 Log errors encountered during POST...Disables the system configuration display if needed . Initialize the CPU's before booting to the user and gets the user response for different BIOS modules. Fill the free area in the system. Enable/Disable NMI as selected 90 Late POST initialization of runtime image preparation for ...

User Manual
Page 44
... 2 or more SATA3 HDDs with RAID functions, please follow below steps. Set the "SATA Operation Mode" option to [RAID]. Insert the ASRock Support CD into your optical drive to boot your optical drive first. E. A. ROM as the boot device. During POST at the beginning ...bit / XP / XP 64-bit on a RAID disk composed of system boot-up BIOS. B. B. Please select CD- D. The system will see the message on the support CD driver page. Enter BIOS SETUP UTILITY Advanced screen Storage Configuration. Please follow below procedures according to the OS you ...
... 2 or more SATA3 HDDs with RAID functions, please follow below steps. Set the "SATA Operation Mode" option to [RAID]. Insert the ASRock Support CD into your optical drive to boot your optical drive first. E. A. ROM as the boot device. During POST at the beginning ...bit / XP / XP 64-bit on a RAID disk composed of system boot-up BIOS. B. B. Please select CD- D. The system will see the message on the support CD driver page. Enter BIOS SETUP UTILITY Advanced screen Storage Configuration. Please follow below procedures according to the OS you ...

User Manual
Page 45
...guide in the Support CD: .. \ RAID Installation Guide STEP 4: Install Windows® XP / XP 64-bit OS on your system. STEP 1: Set up BIOS. B. Set the "SATA Operation Mode" option to install a third-party RAID driver. STEP 4: Install Windows® 7 / 7 64-bit / VistaTM .... 2.16.2 Installing Windows® 7 / 7 64-bit / VistaTM / VistaTM 64-bit With RAID Functions If you start to set RAID configuration. Enter BIOS SETUP UTILITY Advanced screen Storage Configuration. STEP 2: Use "RAID Installation Guide" to install Windows® 7 / 7 64-bit / VistaTM / VistaTM 64-bit...
...guide in the Support CD: .. \ RAID Installation Guide STEP 4: Install Windows® XP / XP 64-bit OS on your system. STEP 1: Set up BIOS. B. Set the "SATA Operation Mode" option to install a third-party RAID driver. STEP 4: Install Windows® 7 / 7 64-bit / VistaTM .... 2.16.2 Installing Windows® 7 / 7 64-bit / VistaTM / VistaTM 64-bit With RAID Functions If you start to set RAID configuration. Enter BIOS SETUP UTILITY Advanced screen Storage Configuration. STEP 2: Use "RAID Installation Guide" to install Windows® 7 / 7 64-bit / VistaTM / VistaTM 64-bit...
User Manual
Page 46
.... STEP 3: Install Windows® XP / XP 64-bit OS on your system. After reading the floppy disk, the driver will be presented. Enter BIOS SETUP UTILITY Advanced screen Storage Configuration. Set the "SATA Operation Mode" option to install Windows® XP / XP 64-bit OS on your system. ...46 A. Using SATA3 HDDs with NCQ and Hot Plug functions (AHCI mode) STEP 1: Set Up BIOS. Using SATA3 HDDs without NCQ and Hot Plug functions (IDE mode) STEP 1: Set up BIOS. STEP 2: Install Windows® XP / XP 64-bit OS on page 44. You can start to [AHCI...
.... STEP 3: Install Windows® XP / XP 64-bit OS on your system. After reading the floppy disk, the driver will be presented. Enter BIOS SETUP UTILITY Advanced screen Storage Configuration. Set the "SATA Operation Mode" option to install Windows® XP / XP 64-bit OS on your system. ...46 A. Using SATA3 HDDs with NCQ and Hot Plug functions (AHCI mode) STEP 1: Set Up BIOS. Using SATA3 HDDs without NCQ and Hot Plug functions (IDE mode) STEP 1: Set up BIOS. STEP 2: Install Windows® XP / XP 64-bit OS on page 44. You can start to [AHCI...


