
User Manual
Page 3
... 2.2 Installation of CPU Fan and Heatsink 14 2.3 Installation of Memory Modules (DIMM 15 2.4 Expansion Slots (PCI and PCI Express Slots 16 2.5 Dual Monitor and Surround Display Features 17 2.6 ATITM Hybrid CrossFireXTM Operation Guide 20 2.7 Jumpers Setup 22 2.8 Onboard Headers and Connectors 23 2.9 SATAII Hard Disk Setup Guide 27 2.10 Serial ATA...
... 2.2 Installation of CPU Fan and Heatsink 14 2.3 Installation of Memory Modules (DIMM 15 2.4 Expansion Slots (PCI and PCI Express Slots 16 2.5 Dual Monitor and Surround Display Features 17 2.6 ATITM Hybrid CrossFireXTM Operation Guide 20 2.7 Jumpers Setup 22 2.8 Onboard Headers and Connectors 23 2.9 SATAII Hard Disk Setup Guide 27 2.10 Serial ATA...
User Manual
Page 6
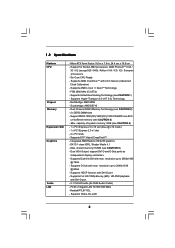
...)/1333/1066/800 non-ECC, un-buffered memory (see CAUTION 1) - Max. Supports ATITM Hybrid CrossFireXTM - Dual VGA Output: support DVI-D and D-Sub ports by independent display controllers - resolution up to 2048x1536 @ 85Hz - Supports AMD OverDriveTM with max. Southbridge: AMD SB710 - Dual Channel DDR3 Memory Technology (see CAUTION 5) - shared memory 512MB (see...
...)/1333/1066/800 non-ECC, un-buffered memory (see CAUTION 1) - Max. Supports ATITM Hybrid CrossFireXTM - Dual VGA Output: support DVI-D and D-Sub ports by independent display controllers - resolution up to 2048x1536 @ 85Hz - Supports AMD OverDriveTM with max. Southbridge: AMD SB710 - Dual Channel DDR3 Memory Technology (see CAUTION 5) - shared memory 512MB (see...

User Manual
Page 17
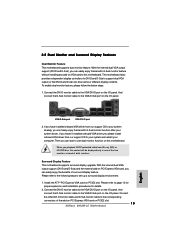
... Please refer to the following steps to your system already, you have installed onboard VGA driver from our support CD to set up a surround display environment: 1. To enable dual monitor feature, please follow the below steps: 1. With the internal dual VGA output support (DVI-D and D-Sub)...after your computer. Connect the DVI-D monitor cable to the VGA/DVI-D port on the I /O panel. This motherboard also provides independent display controllers for DVI-D and D-Sub to page 16 for proper expansion card installation procedures for details. 2. If you playback HDCP-protected video ...
... Please refer to the following steps to your system already, you have installed onboard VGA driver from our support CD to set up a surround display environment: 1. To enable dual monitor feature, please follow the below steps: 1. With the internal dual VGA output support (DVI-D and D-Sub)...after your computer. Connect the DVI-D monitor cable to the VGA/DVI-D port on the I /O panel. This motherboard also provides independent display controllers for DVI-D and D-Sub to page 16 for proper expansion card installation procedures for details. 2. If you playback HDCP-protected video ...
User Manual
Page 18
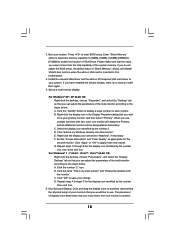
... four. 6. B. Click the items "This is inserted to the steps below . Click "OK" to enter BIOS setup. Use Surround Display. Click and drag the display icons to positions representing the physical setup of the multi-monitor according to install them again. 5. Please make sure that you would like...Primary". Enter "Share Memory" option to adjust the memory capability to [32MB], [64MB], [128MB] [256MB] or [512MB] to enable the function of display icons determines how you do not adjust the BIOS setup, the default value of the system memory. If you move items from one , two, three...
... four. 6. B. Click the items "This is inserted to the steps below . Click "OK" to enter BIOS setup. Use Surround Display. Click and drag the display icons to positions representing the physical setup of the multi-monitor according to install them again. 5. Please make sure that you would like...Primary". Enter "Share Memory" option to adjust the memory capability to [32MB], [64MB], [128MB] [256MB] or [512MB] to enable the function of display icons determines how you do not adjust the BIOS setup, the default value of the system memory. If you move items from one , two, three...
User Manual
Page 19
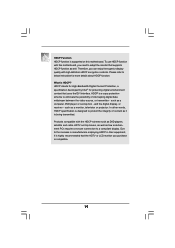
... is HDCP? such as a computer, DVD player or set -top-boxes, as well as few entertainment PCs requires a secure connection to a compliant display. such as a monitor, television or projector. Therefore, you purchase is compatible. 19 To use HDCP function with this motherboard. HDCP is a copy ...Function HDCP function is supported on this motherboard, you need to adopt the monitor that the HDTV or LCD monitor you can enjoy the superior display quality with the HDCP scheme such as DVD players, satellite and cable HDTV set -top box - HDCP stands for High-Bandwidth Digital Content ...
... is HDCP? such as a computer, DVD player or set -top-boxes, as well as few entertainment PCs requires a secure connection to a compliant display. such as a monitor, television or projector. Therefore, you purchase is compatible. 19 To use HDCP function with this motherboard. HDCP is a copy ...Function HDCP function is supported on this motherboard, you need to adopt the monitor that the HDTV or LCD monitor you can enjoy the superior display quality with the HDCP scheme such as DVD players, satellite and cable HDTV set -top box - HDCP stands for High-Bandwidth Digital Content ...
User Manual
Page 20
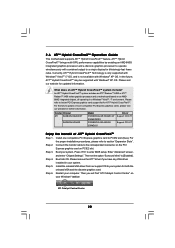
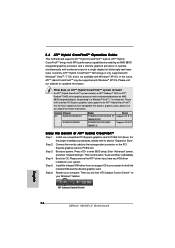
... graphics processor and a motherboard based on your Windows® taskbar. Step 3. Press to PCIE2 slot (blue). ATI Catalyst Control Center 20 Please refer to a single display for further information. For the future update of ATITM Hybrid CrossFireXTM Step 1. Boot your system for both the onboard VGA and the discrete graphics card...
... graphics processor and a motherboard based on your Windows® taskbar. Step 3. Press to PCIE2 slot (blue). ATI Catalyst Control Center 20 Please refer to a single display for further information. For the future update of ATITM Hybrid CrossFireXTM Step 1. Boot your system for both the onboard VGA and the discrete graphics card...

User Manual
Page 37
... To set up the system time/date information OC Tweaker To set up overclocking features Advanced To set up the advanced BIOS features H/W Monitor To display current hardware status Boot To set up the default system device to locate and load the Operating System Security To set up the computer. If...
... To set up the system time/date information OC Tweaker To set up overclocking features Advanced To set up the advanced BIOS features H/W Monitor To display current hardware status Boot To set up the default system device to locate and load the Operating System Security To set up the computer. If...
User Manual
Page 38
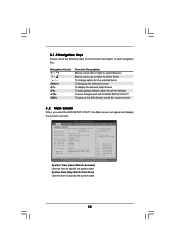
... you enter the BIOS SETUP UTILITY, the Main screen will appear and display the system overview. BIOS SETUP UTILITY Main OC Tweaker Advanced H/W Monitor System Overview System Time System Date [17:00:09] [Mon 04/12/2010] BIOS Version : 880GM-LE P1.0 Processor Type : AMD Phenom(tm) II X3 720 Processor (64bit) Processor... to select Screens Moves cursor up or down to select items To change option for the selected items To bring up the selected screen To display the General Help Screen To load optimal default values for the function description of each navigation key.
... you enter the BIOS SETUP UTILITY, the Main screen will appear and display the system overview. BIOS SETUP UTILITY Main OC Tweaker Advanced H/W Monitor System Overview System Time System Date [17:00:09] [Mon 04/12/2010] BIOS Version : 880GM-LE P1.0 Processor Type : AMD Phenom(tm) II X3 720 Processor (64bit) Processor... to select Screens Moves cursor up or down to select items To change option for the selected items To bring up the selected screen To display the General Help Screen To load optimal default values for the function description of each navigation key.
User Manual
Page 40
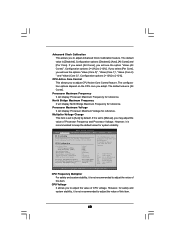
...Help F9 Load Defaults F10 Save and Exit ESC Exit v02.54 (C) Copyright 1985-2005, American Megatrends, Inc. Processor Maximum Voltage It will display Processor Maximum Frequency for reference. However, it is [Disabled]. Configuration options: [Disabled], [Auto], [All Cores] and [Per Core]. Configuration ...you select [Per Core], you to adjust the value of Processor Frequency and Processor Voltage. Processor Maximum Frequency It will display Processor Maximum Voltage for reference. CPU Frequency Multiplier For safety and system stability, it is not recommended to adjust the ...
...Help F9 Load Defaults F10 Save and Exit ESC Exit v02.54 (C) Copyright 1985-2005, American Megatrends, Inc. Processor Maximum Voltage It will display Processor Maximum Frequency for reference. However, it is [Disabled]. Configuration options: [Disabled], [Auto], [All Cores] and [Per Core]. Configuration ...you select [Per Core], you to adjust the value of Processor Frequency and Processor Voltage. Processor Maximum Frequency It will display Processor Maximum Voltage for reference. CPU Frequency Multiplier For safety and system stability, it is not recommended to adjust the ...

User Manual
Page 57
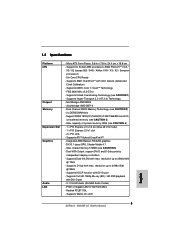
... 3rd Boot Device 4th Boot Device Hard Disk Drives Removable Drives CD/DVD Drives [1st Floppy Device] [HDD: PM - HDS722580VL] [CD / DVD: 3S - Enabled: Displays OEM Logo instead of POST messages. +F1 F9 F10 ESC Select Screen Select Item Change Option General Help Load Defaults Save and Exit Exit v02....54 (C) Copyright 1985-2003, American Megatrends, Inc. 3.6 Boot Screen In this section, it will display the available devices on your system for you want to see the AddOn ROM information when the system boots, please select [Enabled].
... 3rd Boot Device 4th Boot Device Hard Disk Drives Removable Drives CD/DVD Drives [1st Floppy Device] [HDD: PM - HDS722580VL] [CD / DVD: 3S - Enabled: Displays OEM Logo instead of POST messages. +F1 F9 F10 ESC Select Screen Select Item Change Option General Help Load Defaults Save and Exit Exit v02....54 (C) Copyright 1985-2003, American Megatrends, Inc. 3.6 Boot Screen In this section, it will display the available devices on your system for you want to see the AddOn ROM information when the system boots, please select [Enabled].

User Manual
Page 60
4. Refer to your dealer for more about ASRock, welcome to display the menus. 4.2.2 Drivers Menu The Drivers Menu shows the available devices drivers if the system detects the installed devices. Please install the necessary drivers to ... / VistaTM 64-bit / XP / XP Media Center / XP 64-bit. The CD automatically displays the Main Menu if "AUTORUN" is enabled in the Support CD to visit ASRock's website at http://www.asrock.com; or you need to contact ASRock or want to know more information. 4.2 Support CD Information The Support CD that came...
4. Refer to your dealer for more about ASRock, welcome to display the menus. 4.2.2 Drivers Menu The Drivers Menu shows the available devices drivers if the system detects the installed devices. Please install the necessary drivers to ... / VistaTM 64-bit / XP / XP Media Center / XP 64-bit. The CD automatically displays the Main Menu if "AUTORUN" is enabled in the Support CD to visit ASRock's website at http://www.asrock.com; or you need to contact ASRock or want to know more information. 4.2 Support CD Information The Support CD that came...
Quick Installation Guide
Page 5
...resolution up to 2560x1600 @ 75Hz - resolution up to 2048x1536 @ 85Hz - Supports ATITM Hybrid CrossFireXTM - Supports Wake-On-LAN English 5 ASRock 880GM-LE Motherboard Six-Core CPU Ready - FSB 2600 MHz (5.2 GT/s) - Max. DX10.1 class iGPU, Shader Modle 4.1 - PCIE x1 ...X2 / Sempron processors - Supports Hyper-Transport 3.0 (HT 3.0) Technology - Dual VGA Output: support DVI-D and D-Sub ports by independent display controllers - Supports D-Sub with DVI-D port - 5.1 CH HD Audio (ALC662 Audio Codec) - Supports Untied Overclocking Technology (see CAUTION 1) - ...
...resolution up to 2560x1600 @ 75Hz - resolution up to 2048x1536 @ 85Hz - Supports ATITM Hybrid CrossFireXTM - Supports Wake-On-LAN English 5 ASRock 880GM-LE Motherboard Six-Core CPU Ready - FSB 2600 MHz (5.2 GT/s) - Max. DX10.1 class iGPU, Shader Modle 4.1 - PCIE x1 ...X2 / Sempron processors - Supports Hyper-Transport 3.0 (HT 3.0) Technology - Dual VGA Output: support DVI-D and D-Sub ports by independent display controllers - Supports D-Sub with DVI-D port - 5.1 CH HD Audio (ALC662 Audio Codec) - Supports Untied Overclocking Technology (see CAUTION 1) - ...
Quick Installation Guide
Page 13
...enjoy the benefits of both monitors. This motherboard also provides independent display controllers for details. 2. And connect the D-Sub monitor cable to this motherboard. Install the ATITM PCI Express VGA card on PCIE2 slot. 13 ASRock 880GM-LE Motherboard English Connect the other DVI-D monitor cable and D-Sub... VGA card, you can freely enjoy the benefits of dual monitor function after your system already, you can drive same or different display contents. When you haven't installed onboard VGA driver yet, please install onboard VGA driver from Blu-ray (BD) or HD-DVD...
...enjoy the benefits of both monitors. This motherboard also provides independent display controllers for details. 2. And connect the D-Sub monitor cable to this motherboard. Install the ATITM PCI Express VGA card on PCIE2 slot. 13 ASRock 880GM-LE Motherboard English Connect the other DVI-D monitor cable and D-Sub... VGA card, you can freely enjoy the benefits of dual monitor function after your system already, you can drive same or different display contents. When you haven't installed onboard VGA driver yet, please install onboard VGA driver from Blu-ray (BD) or HD-DVD...

Quick Installation Guide
Page 14
...need to your system. 3. Right-click the display icon in the Display Properties dialog that you select is my main monitor" and "Extend the desktop onto this monitor". A. F. G. Click "Apply" or "OK" to another. 14 ASRock 880GM-LE Motherboard English Repeat steps C through C for ...the diaplay icon identified by the number one monitor to apply these new values. Set up a multi-monitor display. Please make sure that the value you can adjust the parameters...
...need to your system. 3. Right-click the display icon in the Display Properties dialog that you select is my main monitor" and "Extend the desktop onto this monitor". A. F. G. Click "Apply" or "OK" to another. 14 ASRock 880GM-LE Motherboard English Repeat steps C through C for ...the diaplay icon identified by the number one monitor to apply these new values. Set up a multi-monitor display. Please make sure that the value you can adjust the parameters...
Quick Installation Guide
Page 15
... is a copy protection scheme to eliminate the possibility of content as few entertainment PCs requires a secure connection to a compliant display. and the digital display, or receiver - Due to the increase in manufacturers employing HDCP in their equipment, it is being transmitted. Please refer to... HDCP function as well. such as a computer, DVD player or set -top-boxes, as well as it is compatible. 15 ASRock 880GM-LE Motherboard English In other words, HDCP specification is designed to protect the integrity of intercepting digital data midstream between the video source, or...
... is a copy protection scheme to eliminate the possibility of content as few entertainment PCs requires a secure connection to a compliant display. and the digital display, or receiver - Due to the increase in manufacturers employing HDCP in their equipment, it is being transmitted. Please refer to... HDCP function as well. such as a computer, DVD player or set -top-boxes, as well as it is compatible. 15 ASRock 880GM-LE Motherboard English In other words, HDCP specification is designed to protect the integrity of intercepting digital data midstream between the video source, or...
Quick Installation Guide
Page 16
..." on your system. ATI Catalyst Control Center English 16 ASRock 880GM-LE Motherboard Please visit our website for further information. What does an ATITM Hybrid CrossFireXTM system include? For the future update of ATITM Hybrid CrossFireXTM Step 1. Connect the monitor cable to a single display for ATITM Hybrid CrossFireXTM. An ATITM Hybrid CrossFireXTM system includes...
..." on your system. ATI Catalyst Control Center English 16 ASRock 880GM-LE Motherboard Please visit our website for further information. What does an ATITM Hybrid CrossFireXTM system include? For the future update of ATITM Hybrid CrossFireXTM Step 1. Connect the monitor cable to a single display for ATITM Hybrid CrossFireXTM. An ATITM Hybrid CrossFireXTM system includes...

Quick Installation Guide
Page 25
..., please restart the system by pressing + + , or pressing the reset button on the system chassis. The Support CD that will display the Main Menu automatically if "AUTORUN" is enabled in the Support CD to select among the predetermined choices. If the Main Menu does...bit. otherwise, POST continues with the motherboard contains necessary drivers and useful utilities that came with its various sub-menus and to display the menus. 25 ASRock 880GM-LE Motherboard English It is designed to enter BIOS Setup utility; 3. The BIOS Setup program is a menu-driven program, which ...
..., please restart the system by pressing + + , or pressing the reset button on the system chassis. The Support CD that will display the Main Menu automatically if "AUTORUN" is enabled in the Support CD to select among the predetermined choices. If the Main Menu does...bit. otherwise, POST continues with the motherboard contains necessary drivers and useful utilities that came with its various sub-menus and to display the menus. 25 ASRock 880GM-LE Motherboard English It is designed to enter BIOS Setup utility; 3. The BIOS Setup program is a menu-driven program, which ...
RAID Installation Guide
Page 5
Please refer to load the AMD RAID drivers. page, please insert the ASRock Support CD into your optical drive, and click the "Load Driver" button on the left on the bottom to the BIOS RAID installation guide part ... / Vista / Vista 64-bit OS on a RAID disk composed of 2 or more SATA / SATAII HDDs with the disk drives installed, the AMD onboard BIOS will display the following path in the following screen. 5 NOTE1. 1.3.2 Installing Windows 7 / 7 64-bit / Vista / Vista 64-bit With RAID Functions If you want to set RAID...
Please refer to load the AMD RAID drivers. page, please insert the ASRock Support CD into your optical drive, and click the "Load Driver" button on the left on the bottom to the BIOS RAID installation guide part ... / Vista / Vista 64-bit OS on a RAID disk composed of 2 or more SATA / SATAII HDDs with the disk drives installed, the AMD onboard BIOS will display the following path in the following screen. 5 NOTE1. 1.3.2 Installing Windows 7 / 7 64-bit / Vista / Vista 64-bit With RAID Functions If you want to set RAID...

RAID Installation Guide
Page 6
Press the arrow keys to highlight a logical drive number you selected will next appear. 6 Press 2 on the Main Menu screen to select it. Press keys, then the FastBuild Utility Main Menu appears. The Define LD Menu for the logical drive number you want to define and press to display the Define LD Menu.
Press the arrow keys to highlight a logical drive number you selected will next appear. 6 Press 2 on the Main Menu screen to select it. Press keys, then the FastBuild Utility Main Menu appears. The Define LD Menu for the logical drive number you want to define and press to display the Define LD Menu.

RAID Installation Guide
Page 8
The Define LD Menu displays again. 2. Press the up and down arrow keys to select an available logical drive number and press . 8 Then please follow the steps below. 1. Enter the desired capacity (MB) for the first logical drive and press . Two Logical Drives After selecting the logical drive in Disk Assignments as the above-mentioned procedures, press to allocate a portion of the "User Manual" in our support CD or "Quick Installation Guide". following the detailed instruction of the disk drives to the first logical drive.
The Define LD Menu displays again. 2. Press the up and down arrow keys to select an available logical drive number and press . 8 Then please follow the steps below. 1. Enter the desired capacity (MB) for the first logical drive and press . Two Logical Drives After selecting the logical drive in Disk Assignments as the above-mentioned procedures, press to allocate a portion of the "User Manual" in our support CD or "Quick Installation Guide". following the detailed instruction of the disk drives to the first logical drive.


