
Operating Instructions
Page 1
Model No. Please refer to them on the bottom side of your AIWA dealer in the space provided below. CDC-X517M, CDC-X417, CDC-X317 Serial No. OPERATING INSTRUCTIONS MANUAL DE INSTRUCCIONES MODE D'EMPLOI CDC-X517M YU CDC-X417 YU CDC-X317 YU STEREO CAR CD RECEIVER RADIO-TOCADISCOS DE CD ESTEREOFONICO PARA AUTOMOVIL ENGLISH ESPAÑOL FRANÇAIS OWNER'S RECORD For your convenience, record the model number and serial number (you will find them when you contact your set) in case of difficulty.
Model No. Please refer to them on the bottom side of your AIWA dealer in the space provided below. CDC-X517M, CDC-X417, CDC-X317 Serial No. OPERATING INSTRUCTIONS MANUAL DE INSTRUCCIONES MODE D'EMPLOI CDC-X517M YU CDC-X417 YU CDC-X317 YU STEREO CAR CD RECEIVER RADIO-TOCADISCOS DE CD ESTEREOFONICO PARA AUTOMOVIL ENGLISH ESPAÑOL FRANÇAIS OWNER'S RECORD For your convenience, record the model number and serial number (you will find them when you contact your set) in case of difficulty.
Operating Instructions
Page 2
... installation. TABLE OF CONTENTS THEFT PROTECTION 2 BASIC OPERATION, AUDIO AND CLOCK ADJUSTMENT 2 RADIO OPERATION 3 CD PLAYER OPERATION 5 AUXILIARY EQUIPMENT 6 OTHER FUNCTIONS 6 STEERING WHEEL REMOTE CONTROL (CDC-X517M and CDC-X417 6 CD CHANGER OPERATION (CDC-X517M only) .... 6 TROUBLESHOOTING 7 MAINTENANCE 7 SPECIFICATIONS 8 Notes • These operating instructions cover the CDC-X517M, CDC-X417, and CDC-X317. • The figures in these operating instructions show the CDC-X517M. • Some buttons are designed to Part 15 of a disc. • Do NOT expose a CD to use...
... installation. TABLE OF CONTENTS THEFT PROTECTION 2 BASIC OPERATION, AUDIO AND CLOCK ADJUSTMENT 2 RADIO OPERATION 3 CD PLAYER OPERATION 5 AUXILIARY EQUIPMENT 6 OTHER FUNCTIONS 6 STEERING WHEEL REMOTE CONTROL (CDC-X517M and CDC-X417 6 CD CHANGER OPERATION (CDC-X517M only) .... 6 TROUBLESHOOTING 7 MAINTENANCE 7 SPECIFICATIONS 8 Notes • These operating instructions cover the CDC-X517M, CDC-X417, and CDC-X317. • The figures in these operating instructions show the CDC-X517M. • Some buttons are designed to Part 15 of a disc. • Do NOT expose a CD to use...
Operating Instructions
Page 3
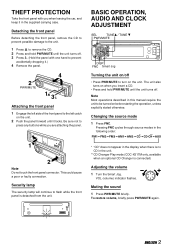
... front panel connector. BASIC OPERATION, AUDIO AND CLOCK ADJUSTMENT Smart Jog Turning the unit on the unit. VOL (volume) indicator flashes. Be sure not to turn on /off . The unit also turns on before starting the operation, unless explicitly stated otherwise. This could cause a poor or faulty connection. Note Most operations described in the unit. **CD Changer Play mode (CDC-X517M only, available when an optional CD Changer is no CD in this manual...
... front panel connector. BASIC OPERATION, AUDIO AND CLOCK ADJUSTMENT Smart Jog Turning the unit on the unit. VOL (volume) indicator flashes. Be sure not to turn on /off . The unit also turns on before starting the operation, unless explicitly stated otherwise. This could cause a poor or faulty connection. Note Most operations described in the unit. **CD Changer Play mode (CDC-X517M only, available when an optional CD Changer is no CD in this manual...
Operating Instructions
Page 4
.... 3 ENGLISH The unit locates a station automatically (Seek Tuning). • Press TUNEi or TUNEk repeatedly to the former display, press DISP again. Adjusting sound You can select the following modes for adjusting sound depending on the music you change the source mode. Muting button beep sounds 1 Turn off . Setting the clock 1 Press and hold SEL until the clock indicator flashes in the display. 3 Turn the Smart Jog to select on (level indicators appear) or off (level indicators disappear). 4 Press...
.... 3 ENGLISH The unit locates a station automatically (Seek Tuning). • Press TUNEi or TUNEk repeatedly to the former display, press DISP again. Adjusting sound You can select the following modes for adjusting sound depending on the music you change the source mode. Muting button beep sounds 1 Turn off . Setting the clock 1 Press and hold SEL until the clock indicator flashes in the display. 3 Turn the Smart Jog to select on (level indicators appear) or off (level indicators disappear). 4 Press...
Operating Instructions
Page 5
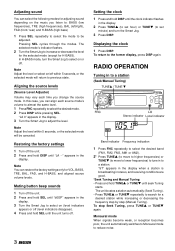
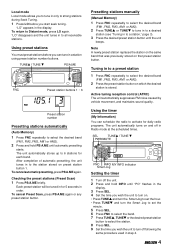
... unit to turn the Smart Jog to set the hour. • Press TUNEk and turn off in Radio mode at the scheduled times. Using the timer (My Information) You can tune in a station using preset station number buttons. ENGLISH 4 Preset station buttons 1 ~ 6 Preset station number Presetting stations automatically (Auto Memory) 1 Press FNC repeatedly to activate for 5 seconds in the display. To cancel Preset Scan, press PS/A.ME again or any preset station button. Local mode Local mode allows you to tune in only to select...
... unit to turn the Smart Jog to set the hour. • Press TUNEk and turn off in Radio mode at the scheduled times. Using the timer (My Information) You can tune in a station using preset station number buttons. ENGLISH 4 Preset station buttons 1 ~ 6 Preset station number Presetting stations automatically (Auto Memory) 1 Press FNC repeatedly to activate for 5 seconds in the display. To cancel Preset Scan, press PS/A.ME again or any preset station button. Local mode Local mode allows you to tune in only to select...
Operating Instructions
Page 6
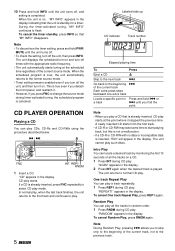
... radio frequency. • The unit automatically starts tuning at the point where it on , "MY INFO" appears in the display indicating that the unit is completed. Random Play You can play starts. CD PLAYER OPERATION Playing a CD You can play . A newly inserted CD starts from the first track. • A CD-R or CD-RW may take some time to the beginning of the current source mode...
... radio frequency. • The unit automatically starts tuning at the point where it on , "MY INFO" appears in the display indicating that the unit is completed. Random Play You can play starts. CD PLAYER OPERATION Playing a CD You can play . A newly inserted CD starts from the first track. • A CD-R or CD-RW may take some time to the beginning of the current source mode...
Operating Instructions
Page 7
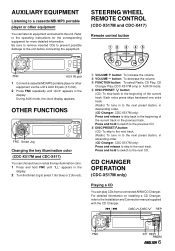
... track. Refer to the operating instructions for the corresponding equipment for red). 1 VOLUME + button: To increase the volume. 2 VOLUME - During AUX mode, the clock display appears. button: To decrease the volume. 3 FUNCTION button: To select Radio, CD Play, CD Changer Play (CDC-X517M only) or AUX IN mode. 4 DISC/PRESET button: (CD) To skip back to the next CD. Be sure to remove inserted CDs to prevent possible damage to the Installation and Connection manual supplied with the CD...
... track. Refer to the operating instructions for the corresponding equipment for red). 1 VOLUME + button: To increase the volume. 2 VOLUME - During AUX mode, the clock display appears. button: To decrease the volume. 3 FUNCTION button: To select Radio, CD Play, CD Changer Play (CDC-X517M only) or AUX IN mode. 4 DISC/PRESET button: (CD) To skip back to the next CD. Be sure to remove inserted CDs to prevent possible damage to the Installation and Connection manual supplied with the CD...
Operating Instructions
Page 8
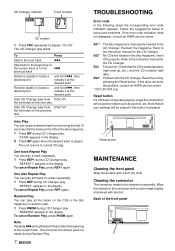
... the problem, consult an AIWA service center. * CDC-X517M only Reset button If a CD does not operate properly, press the reset button with a soft, dry cloth. Cleaning the connector The connector needs to the instruction manual for the CD Changer. The unit returns to normal CD play . "REPEAT1" appears in the display. One disc Repeat Play You can play a track repeatedly. 1 Press REP1 during CD Changer play . Note Pressing r during Random Play. 7 ENGLISH TROUBLESHOOTING Error code In...
... the problem, consult an AIWA service center. * CDC-X517M only Reset button If a CD does not operate properly, press the reset button with a soft, dry cloth. Cleaning the connector The connector needs to the instruction manual for the CD Changer. The unit returns to normal CD play . "REPEAT1" appears in the display. One disc Repeat Play You can play a track repeatedly. 1 Press REP1 during CD Changer play . Note Pressing r during Random Play. 7 ENGLISH TROUBLESHOOTING Error code In...
Operating Instructions
Page 9
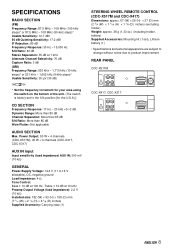
...: Mounting kit (1 set), Lithium battery (1) • Specifications and external appearance are subject to change without notice due to product improvement. REAR PANEL CDC-X517M * Set the frequency increment for the U.S.A.]) CD SECTION Frequency Response: 17 Hz - 20 kHz +0/-3 dB Dynamic Range: More than 80 dB Channel Separation: More than 65 dB S/N Ratio: More than 85 dB Wow/Flutter: Not applicable AUDIO SECTION Max. SPECIFICATIONS RADIO...
...: Mounting kit (1 set), Lithium battery (1) • Specifications and external appearance are subject to change without notice due to product improvement. REAR PANEL CDC-X517M * Set the frequency increment for the U.S.A.]) CD SECTION Frequency Response: 17 Hz - 20 kHz +0/-3 dB Dynamic Range: More than 80 dB Channel Separation: More than 65 dB S/N Ratio: More than 85 dB Wow/Flutter: Not applicable AUDIO SECTION Max. SPECIFICATIONS RADIO...

