Operating Instructions
Page 2
... system. • Disconnect the vehicle's negative battery terminal while mounting and connecting the unit. • When replacing the fuse, be sure to cool off before operating it , resulting in the adapter or any seal, label or data protection sheet to either side of procedures other than those specified herein may void the user's right or authority to ordinary CDs, CD...
... system. • Disconnect the vehicle's negative battery terminal while mounting and connecting the unit. • When replacing the fuse, be sure to cool off before operating it , resulting in the adapter or any seal, label or data protection sheet to either side of procedures other than those specified herein may void the user's right or authority to ordinary CDs, CD...
Operating Instructions
Page 3
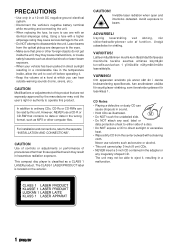
... OF CONTENTS THEFT PROTECTION 2 BASIC OPERATION, AUDIO AND CLOCK ADJUSTMENT 3 RADIO OPERATION 4 CD PLAYER OPERATION 7 AUXILIARY EQUIPMENT 8 OTHER FUNCTIONS 8 CARD REMOTE CONTROL 9 TROUBLESHOOTING 10 MAINTENANCE 10 SPECIFICATIONS 10 Note Some buttons are assigned two or more functions. Resetting the unit Before operating the unit for 5 seconds after replacing the car battery, you must reset the unit. DEMO (Demonstration) mode The unit has an extra display (DEMO) mode which demonstrates the illumination modes of the panel while the front panel appears. The unit switches to the ACC...
... OF CONTENTS THEFT PROTECTION 2 BASIC OPERATION, AUDIO AND CLOCK ADJUSTMENT 3 RADIO OPERATION 4 CD PLAYER OPERATION 7 AUXILIARY EQUIPMENT 8 OTHER FUNCTIONS 8 CARD REMOTE CONTROL 9 TROUBLESHOOTING 10 MAINTENANCE 10 SPECIFICATIONS 10 Note Some buttons are assigned two or more functions. Resetting the unit Before operating the unit for 5 seconds after replacing the car battery, you must reset the unit. DEMO (Demonstration) mode The unit has an extra display (DEMO) mode which demonstrates the illumination modes of the panel while the front panel appears. The unit switches to the ACC...
Operating Instructions
Page 4
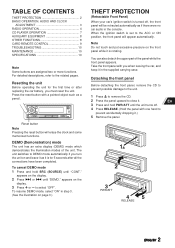
... OPERATION, AUDIO AND CLOCK ADJUSTMENT +/-/r/t PWR/ATT SRC(SOURCE) EJECTz S(SEL) D(DSPL) TU(TUNER) Turning the unit on/off • You can select the following order: * "DISC" does not appear on the display. "ATT ON" appears on the display when there is activated, you are attaching the panel. Muting the sound 1 Press PWR/ATT briefly. This could cause a poor or faulty connection. Then attach the upper part of the panel. 1 Set the ignition switch...
... OPERATION, AUDIO AND CLOCK ADJUSTMENT +/-/r/t PWR/ATT SRC(SOURCE) EJECTz S(SEL) D(DSPL) TU(TUNER) Turning the unit on/off • You can select the following order: * "DISC" does not appear on the display. "ATT ON" appears on the display when there is activated, you are attaching the panel. Muting the sound 1 Press PWR/ATT briefly. This could cause a poor or faulty connection. Then attach the upper part of the panel. 1 Set the ignition switch...
Operating Instructions
Page 5
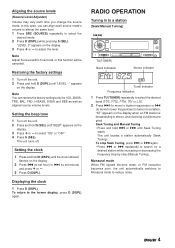
... unit locates a station automatically (Seek Tuning). Note Adjust the level within 5 seconds, or this case, you change the source mode. To stop Seek Tuning, press t or r again. • Press t or r repeatedly to a station. In this function will be canceled. Restoring the factory settings 1 Turn off the unit. 2 Press and hold t or r until the clock indicator flashes on the display. 3 Press + or - RADIO OPERATION Tuning in to a station (Seek/Manual Tuning) r/t TU(TUNER) Band indication Stereo indicator Tuner indicator Frequency...
... unit locates a station automatically (Seek Tuning). Note Adjust the level within 5 seconds, or this case, you change the source mode. To stop Seek Tuning, press t or r again. • Press t or r repeatedly to a station. In this function will be canceled. Restoring the factory settings 1 Turn off the unit. 2 Press and hold t or r until the clock indicator flashes on the display. 3 Press + or - RADIO OPERATION Tuning in to a station (Seek/Manual Tuning) r/t TU(TUNER) Band indication Stereo indicator Tuner indicator Frequency...

Operating Instructions
Page 6
... the station is stored. Note A newly preset station replaces the station on the same band that you are available with the program itself, a RDS station sends the AF list data that preset station button. Active tuning reception control (ATRC) The unit automatically suppresses FM noise caused by vehicle movement, and maintains sound quality. r/t SRC(SOURCE) TU(TUNER) Preset station buttons 1 - 6 PS/A.ME Preset station number Presetting stations automatically (Auto Memory) 1 Press TU (TUNER) repeatedly to Alternative Frequency (AF) stations There...
... the station is stored. Note A newly preset station replaces the station on the same band that you are available with the program itself, a RDS station sends the AF list data that preset station button. Active tuning reception control (ATRC) The unit automatically suppresses FM noise caused by vehicle movement, and maintains sound quality. r/t SRC(SOURCE) TU(TUNER) Preset station buttons 1 - 6 PS/A.ME Preset station number Presetting stations automatically (Auto Memory) 1 Press TU (TUNER) repeatedly to Alternative Frequency (AF) stations There...
Operating Instructions
Page 7
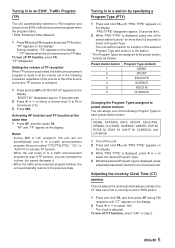
... preset station buttons* for a station of the selected Program Type and tunes in to the station. * The Program Types are assigned to the preset station buttons as follows: Preset station button 1 2 3 4 5 6 Program Type (default) NEWS SPORT EDUCATE SCIENCE ROCK M CLASSICS Changing the Program Types assigned to a traffic announcement program. To turn off the unit. 2 Press and hold AF until "BOOST 40" appears on the display. Setting the volume of TP reception When TP function is activated...
... preset station buttons* for a station of the selected Program Type and tunes in to the station. * The Program Types are assigned to the preset station buttons as follows: Preset station button 1 2 3 4 5 6 Program Type (default) NEWS SPORT EDUCATE SCIENCE ROCK M CLASSICS Changing the Program Types assigned to a traffic announcement program. To turn off the unit. 2 Press and hold AF until "BOOST 40" appears on the display. Setting the volume of TP reception When TP function is activated...
Operating Instructions
Page 8
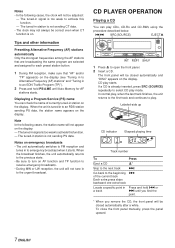
... Displaying a Program Service (PS) name You can play mode. The tuned-in station is already inserted, press SRC (SOURCE) repeatedly to select CD play CDs, CD-Rs and CD-RWs using the procedure described below. When the broadcast finishes, the unit automatically returns to the previous state. • Be sure to turn on the display: - CD play . Labeled-side up CD indicator Elapsed playing time Track number To Eject...
... Displaying a Program Service (PS) name You can play mode. The tuned-in station is already inserted, press SRC (SOURCE) repeatedly to select CD play CDs, CD-Rs and CD-RWs using the procedure described below. When the broadcast finishes, the unit automatically returns to the previous state. • Be sure to turn on the display: - CD play . Labeled-side up CD indicator Elapsed playing time Track number To Eject...
Operating Instructions
Page 9
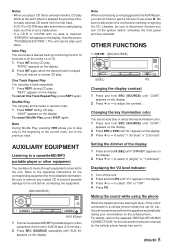
... color You can listen to music through equipment connected to disconnect the cord before connecting the equipment. Setting the dimmer of all the tracks in the display. 3 Press + or - Displaying the VU level indicator 1 Turn off the ignition switch, otherwise the front panel won't be sure to the previous track. to the separate "INSTALLATION AND CONNECTIONS" for the unit and the instruction manual for the cellular phone hands-free car kit. Muting...
... color You can listen to music through equipment connected to disconnect the cord before connecting the equipment. Setting the dimmer of all the tracks in the display. 3 Press + or - Displaying the VU level indicator 1 Turn off the ignition switch, otherwise the front panel won't be sure to the previous track. to the separate "INSTALLATION AND CONNECTIONS" for the unit and the instruction manual for the cellular phone hands-free car kit. Muting...

Operating Instructions
Page 10
... receptor on the main unit is exposed to direct sunlight, it may not respond to the manufacturer's instruction. • Keep the lithium battery out of the reach of children. CAUTIONS • Lithium battery (CR2025) for the remote control Danger of explosion if battery is installed in the battery holder. 1 TUNER button 2 CD button 3 rAMS (Auto music sensor) button 4 tAMS (Auto music sensor) button 5 PS (preset) button 6 TUNING UP/DOWN buttons 7 VOLUME +/- If swallowed, consult...
... receptor on the main unit is exposed to direct sunlight, it may not respond to the manufacturer's instruction. • Keep the lithium battery out of the reach of children. CAUTIONS • Lithium battery (CR2025) for the remote control Danger of explosion if battery is installed in the battery holder. 1 TUNER button 2 CD button 3 rAMS (Auto music sensor) button 4 tAMS (Auto music sensor) button 5 PS (preset) button 6 TUNING UP/DOWN buttons 7 VOLUME +/- If swallowed, consult...
Operating Instructions
Page 11
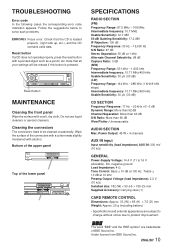
... 90 dB Wow/Flutter: Unmeasurable AUDIO SECTION Max. Cleaning the connectors The connectors need to solve such problems. ERROR03 Focus error. Power Output: 45 W × 4 channels AUX IN input Input sensitivity (load impedance) AUX IN: 300 mV (10 kΩ) GENERAL Power-Supply Voltage: 14.4 V (11 to product improvement. ENGLISH 10 Bottom of the upper panel Top of the lower panel SPECIFICATIONS RADIO SECTION (FM) Frequency Range: 87.5 MHz - 108...
... 90 dB Wow/Flutter: Unmeasurable AUDIO SECTION Max. Cleaning the connectors The connectors need to solve such problems. ERROR03 Focus error. Power Output: 45 W × 4 channels AUX IN input Input sensitivity (load impedance) AUX IN: 300 mV (10 kΩ) GENERAL Power-Supply Voltage: 14.4 V (11 to product improvement. ENGLISH 10 Bottom of the upper panel Top of the lower panel SPECIFICATIONS RADIO SECTION (FM) Frequency Range: 87.5 MHz - 108...

