Getting Started Guide
Page 4
... to a Front Panel Port 35 Connecting to the Console Port 38 Viewing Automatically Configured IP Information 42 Using 3Com Network Supervisor 42 Connecting to the Console Port 42 Methods of Managing a Switch 45 Command Line Interface Management 45 Web Interface Management 46 SNMP Management 46 Setting Up ... Management 48 Pre-requisites 48 Web Management Over the Network 49 Setting Up SNMP Management 49 Pre-requisites 50 Default Users and Passwords 50 Changing Default Passwords 50 4 PROBLEM SOLVING Solving Problems Indicated by LEDs 54 Solving Hardware Problems 55 Solving Communication Problems 55
... to a Front Panel Port 35 Connecting to the Console Port 38 Viewing Automatically Configured IP Information 42 Using 3Com Network Supervisor 42 Connecting to the Console Port 42 Methods of Managing a Switch 45 Command Line Interface Management 45 Web Interface Management 46 SNMP Management 46 Setting Up ... Management 48 Pre-requisites 48 Web Management Over the Network 49 Setting Up SNMP Management 49 Pre-requisites 50 Default Users and Passwords 50 Changing Default Passwords 50 4 PROBLEM SOLVING Solving Problems Indicated by LEDs 54 Solving Hardware Problems 55 Solving Communication Problems 55
Getting Started Guide
Page 18
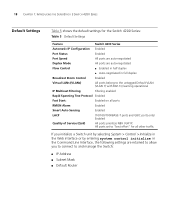
...THE SUPERSTACK 3 SWITCH 4200 SERIES Default Settings Table 5 shows the default settings for all ports RMON Alarm Enabled Smart Auto-Sensing Enabled LACP (10/100/1000BASE-T ports and GBIC ports only) Enabled Quality of Service (QoS) All ports prioritize NBX VoIP IP. If you initialize a Switch ... All ports belong to and manage the Switch: ■ IP Address ■ Subnet Mask ■ Default Router All ports set to "best effort" for the Switch 4200 Series: Table 5 Default Settings Feature Switch 4200 Series Automatic IP Configuration Enabled Port Status Enabled Port Speed...
...THE SUPERSTACK 3 SWITCH 4200 SERIES Default Settings Table 5 shows the default settings for all ports RMON Alarm Enabled Smart Auto-Sensing Enabled LACP (10/100/1000BASE-T ports and GBIC ports only) Enabled Quality of Service (QoS) All ports prioritize NBX VoIP IP. If you initialize a Switch ... All ports belong to and manage the Switch: ■ IP Address ■ Subnet Mask ■ Default Router All ports set to "best effort" for the Switch 4200 Series: Table 5 Default Settings Feature Switch 4200 Series Automatic IP Configuration Enabled Port Status Enabled Port Speed...
Getting Started Guide
Page 23
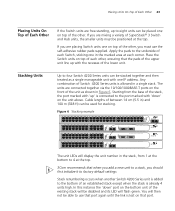
...stack, you should first initialize it to factory default settings Stack renumbering occurs when another Switch 4200 Series unit is added to the bottom...12 36 13 37 14 38 15 39 16 40 17 41 18 42 19 43 3C17302 Superstack 3 Switch 4250T 20 44 21 45 22 46 23 47 24 48 Power/ Self Test 1 Up Down ... ) and 100 m (328 ft) can be positioned at the top. 3Com recommends that the pads of each corner. Any combination of the lower unit....IP address. Place the Switch units on the unit above. Cable lengths of between 14 cm (5.5 in a single stack. Stacking Units Up to four Switch...
...stack, you should first initialize it to factory default settings Stack renumbering occurs when another Switch 4200 Series unit is added to the bottom...12 36 13 37 14 38 15 39 16 40 17 41 18 42 19 43 3C17302 Superstack 3 Switch 4250T 20 44 21 45 22 46 23 47 24 48 Power/ Self Test 1 Up Down ... ) and 100 m (328 ft) can be positioned at the top. 3Com recommends that the pads of each corner. Any combination of the lower unit....IP address. Place the Switch units on the unit above. Cable lengths of between 14 cm (5.5 in a single stack. Stacking Units Up to four Switch...

Getting Started Guide
Page 31
...plug-and-play). It covers the following topics: ■ Setting Up Overview ■ Manually Configuring IP Information ■ Viewing Automatically Configured IP Information ■ Methods of the features offered by the Switch, and to access the management software that is known as managing the...software to improve the efficiency of the Switch and therefore the overall performance of your network. 3 SETTING UP FOR MANAGEMENT Your Switch can operate in its default state, that resides on the Switch. However, to make full use of Managing a Switch ■ Setting Up Command Line ...
...plug-and-play). It covers the following topics: ■ Setting Up Overview ■ Manually Configuring IP Information ■ Viewing Automatically Configured IP Information ■ Methods of the features offered by the Switch, and to access the management software that is known as managing the...software to improve the efficiency of the Switch and therefore the overall performance of your network. 3 SETTING UP FOR MANAGEMENT Your Switch can operate in its default state, that resides on the Switch. However, to make full use of Managing a Switch ■ Setting Up Command Line ...

Getting Started Guide
Page 32
.... Connect via Telnet. Page 47. Page 38. Page 45. Connect to get your Switch set up the Switch. For more information on default users and changing default passwords, see "Default Users and Passwords" on page 50. Use 3Com Network Supervisor (3NS). Connect to view the automatically configured IP information? Connect over the network. CAUTION: To protect your...
.... Connect via Telnet. Page 47. Page 38. Page 45. Connect to get your Switch set up the Switch. For more information on default users and changing default passwords, see "Default Users and Passwords" on page 50. Use 3Com Network Supervisor (3NS). Connect to view the automatically configured IP information? Connect over the network. CAUTION: To protect your...

Getting Started Guide
Page 33
... installations, 3Com recommends that you enter until you wish to manage your Switch, work through the "Manually Configuring IP Information" section on page 35. Automatic IP Configuration By default the Switch tries to obtain an IP address from a DHCP or BootP server on the network. You should use on the network then the Switch detects this default IP address is...
... installations, 3Com recommends that you enter until you wish to manage your Switch, work through the "Manually Configuring IP Information" section on page 35. Automatic IP Configuration By default the Switch tries to obtain an IP address from a DHCP or BootP server on the network. You should use on the network then the Switch detects this default IP address is...

Getting Started Guide
Page 35
... line interface (CLI). ■ Connecting to a front panel port - Manually Configuring IP Information 35 Manually Configuring IP Information You can manually configure the Switch IP information in standalone mode and has the default IP address of 169.254.100.100. You can then manually enter IP information using the command line interface (CLI). The procedure described in...
... line interface (CLI). ■ Connecting to a front panel port - Manually Configuring IP Information 35 Manually Configuring IP Information You can manually configure the Switch IP information in standalone mode and has the default IP address of 169.254.100.100. You can then manually enter IP information using the command line interface (CLI). The procedure described in...

Getting Started Guide
Page 36
...254.100.100 in the workstation. Change the workstation to the following settings: ■ IP address - 169.254.100.99 ■ Subnet mask - 255.255.0.0 Setting Up the Switch with IP Information You are now ready to an offline unit. This is automatically assigned to manually ...the Switch. Figure 9 Connecting a workstation to change the IP address and subnet mask of the front panel ports on the Switch. Using the Web Interface 1 Power-up the Switch with IP Information You need to the Switch via telnet. This takes approximately one of the workstation that is the default IP ...
...254.100.100 in the workstation. Change the workstation to the following settings: ■ IP address - 169.254.100.99 ■ Subnet mask - 255.255.0.0 Setting Up the Switch with IP Information You are now ready to an offline unit. This is automatically assigned to manually ...the Switch. Figure 9 Connecting a workstation to change the IP address and subnet mask of the front panel ports on the Switch. Using the Web Interface 1 Power-up the Switch with IP Information You need to the Switch via telnet. This takes approximately one of the workstation that is the default IP ...

Getting Started Guide
Page 37
...HyperTerminal click on page 45. If you want the Switch to use when it has been configured to set of the unit, that Send line ends with carriage returns. Select Manual and then enter the IP address, subnet mask, and default gateway that you have logged on some platforms unless it...password prompt. You should not configure HyperTerminal in the Properties screen, click on correctly, the b In the dialogue box that appears type the default IP address of Getting Started pages are displayed. 4 The Getting Started pages allow you have logged on ASCII Setup.. Manually Configuring...
...HyperTerminal click on page 45. If you want the Switch to use when it has been configured to set of the unit, that Send line ends with carriage returns. Select Manual and then enter the IP address, subnet mask, and default gateway that you have logged on some platforms unless it...password prompt. You should not configure HyperTerminal in the Properties screen, click on correctly, the b In the dialogue box that appears type the default IP address of Getting Started pages are displayed. 4 The Getting Started pages allow you have logged on ASCII Setup.. Manually Configuring...

Getting Started Guide
Page 39
... port directly, or through a modem. ■ Documentation supplied with IP information: ■ IP address ■ subnet mask ■ default gateway Connecting the Workstation to the Switch 1 Connect the workstation to one of the Switch. if you are connecting directly to the console port using a standard.... This software allows you can find pin-out diagrams for both cables in Appendix B on your workstation. You can manually set up the Switch with the terminal emulation software. ■ A suitable cable: ■ A standard null modem cable - if you are connecting to the ...
... port directly, or through a modem. ■ Documentation supplied with IP information: ■ IP address ■ subnet mask ■ default gateway Connecting the Workstation to the Switch 1 Connect the workstation to one of the Switch. if you are connecting directly to the console port using a standard.... This software allows you can find pin-out diagrams for both cables in Appendix B on your workstation. You can manually set up the Switch with the terminal emulation software. ■ A suitable cable: ■ A standard null modem cable - if you are connecting to the ...
Getting Started Guide
Page 40
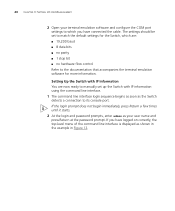
... configure the COM port settings to the documentation that accompanies the terminal emulation software for the Switch, which are now ready to manually set to match the default settings for more information. Setting Up the Switch with IP Information You are : ■ 19,200 baud ■ 8 data bits ■ no parity ■ 1 stop bit...
... configure the COM port settings to the documentation that accompanies the terminal emulation software for the Switch, which are now ready to manually set to match the default settings for more information. Setting Up the Switch with IP Information You are : ■ 19,200 baud ■ 8 data bits ■ no parity ■ 1 stop bit...

Getting Started Guide
Page 43
c Connect the other end of the cable to the network. Viewing Automatically Configured IP Information 43 ■ A suitable cable: ■ A standard null modem cable - if you have connected the cable. You can find pin-out diagrams for more information. b ... workstation to the documentation that accompanies the terminal emulation software for both cables in Figure 13. The settings should be set to match the default settings for the Switch, which are: ■ 19,200 baud ■ 8 data bits ■ no parity ■ 1 stop bit ■ no hardware flow control Refer to the...
c Connect the other end of the cable to the network. Viewing Automatically Configured IP Information 43 ■ A suitable cable: ■ A standard null modem cable - if you have connected the cable. You can find pin-out diagrams for more information. b ... workstation to the documentation that accompanies the terminal emulation software for both cables in Figure 13. The settings should be set to match the default settings for the Switch, which are: ■ 19,200 baud ■ 8 data bits ■ no parity ■ 1 stop bit ■ no hardware flow control Refer to the...
Getting Started Guide
Page 44
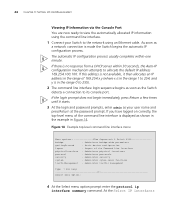
... 3Com Superstack 3 Switch 4200 bridge - Administer security system - For help 1 Select menu option: 4 At the Select menu option prompt enter the protocol ip interface summary command. 44 CHAPTER 3: SETTING UP FOR MANAGEMENT Viewing IP ...Switch detects a connection to the network using an Ethernet cable. If you have logged on correctly, the top-level menu of the Command Line Interface physicalInterface - Administer physical interfaces protocol - Administer traffic management Type ? As soon as shown in the example in the range 0 to allocate the default IP...
... 3Com Superstack 3 Switch 4200 bridge - Administer security system - For help 1 Select menu option: 4 At the Select menu option prompt enter the protocol ip interface summary command. 44 CHAPTER 3: SETTING UP FOR MANAGEMENT Viewing IP ...Switch detects a connection to the network using an Ethernet cable. If you have logged on correctly, the top-level menu of the Command Line Interface physicalInterface - Administer physical interfaces protocol - Administer traffic management Type ? As soon as shown in the example in the range 0 to allocate the default IP...
Getting Started Guide
Page 48
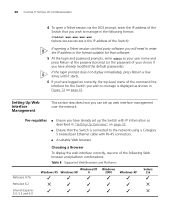
...Switch with RJ-45 connectors. ■ A suitable Web browser. Choosing a Browser To display the web interface correctly, use one of the following format: >telnet xxx.xxx.xxx.xxx (where xxx.xxx.xxx.xxx is the IP address of the Switch...) If opening a Telnet session via the DOS prompt, enter the IP address of the command line interface for the Switch...software you will need to enter the IP address in the format suitable for that the Switch is displayed as your user name ...logged on correctly, the top-level menu of the Switch that you wish to manage in Figure 12 on ...
...Switch with RJ-45 connectors. ■ A suitable Web browser. Choosing a Browser To display the web interface correctly, use one of the following format: >telnet xxx.xxx.xxx.xxx (where xxx.xxx.xxx.xxx is the IP address of the Switch...) If opening a Telnet session via the DOS prompt, enter the IP address of the command line interface for the Switch...software you will need to enter the IP address in the format suitable for that the Switch is displayed as your user name ...logged on correctly, the top-level menu of the Switch that you wish to manage in Figure 12 on ...

Getting Started Guide
Page 49
... them if you use the 3Com Network Supervisor application that accompanies your Switch to browse the World Wide Web. Web Management To manage a Switch using a port in VLAN 1. If you have the IP protocol correctly installed on your Switch. You can manage a Switch if: ■ The correct Management Information Bases (MIBs) are in VLAN 1 (the Default VLAN).
... them if you use the 3Com Network Supervisor application that accompanies your Switch to browse the World Wide Web. Web Management To manage a Switch using a port in VLAN 1. If you have the IP protocol correctly installed on your Switch. You can manage a Switch if: ■ The correct Management Information Bases (MIBs) are in VLAN 1 (the Default VLAN).
Getting Started Guide
Page 55
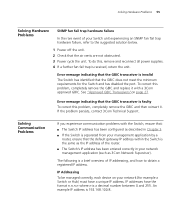
... the GBIC and replace it . If the problem persists, contact 3Com Technical Support. Error message indicating that the GBIC transceiver is invalid The Switch has identified that the default gateway IP address within the Switch is the same as the IP address of the router. ■ The Switch's IP address has been entered correctly in Chapter 3 ■ If...
... the GBIC and replace it . If the problem persists, contact 3Com Technical Support. Error message indicating that the GBIC transceiver is invalid The Switch has identified that the default gateway IP address within the Switch is the same as the IP address of the router. ■ The Switch's IP address has been entered correctly in Chapter 3 ■ If...

Getting Started Guide
Page 81
INDEX Numbers 10/100/1000BASE-T ports 14 3C number 22 3Com Knowledgebase Web Services 76 3Com URL 75 A access levels of default users 50 automatic setup 42 3Com Network Supervisor 42 console port 42 B browsers choosing 48 C cable choosing the correct 25 fiber 26 maximum length 14 pin-...GBIC ports 14 transceivers 27 GBIC ports 14 H hardware features 12 I installing the Switch 19 prerequisites 20 IP addressing registered 56 IP configuration 33 L LEDs 15 logging in as a default user 50 M MAC address of the Switch 22 management methods 45 preparing for 34 setting up 31, 32 manual setup console port...
INDEX Numbers 10/100/1000BASE-T ports 14 3C number 22 3Com Knowledgebase Web Services 76 3Com URL 75 A access levels of default users 50 automatic setup 42 3Com Network Supervisor 42 console port 42 B browsers choosing 48 C cable choosing the correct 25 fiber 26 maximum length 14 pin-...GBIC ports 14 transceivers 27 GBIC ports 14 H hardware features 12 I installing the Switch 19 prerequisites 20 IP addressing registered 56 IP configuration 33 L LEDs 15 logging in as a default user 50 M MAC address of the Switch 22 management methods 45 preparing for 34 setting up 31, 32 manual setup console port...

