

User Guide
Page 1
3Com Baseline Switch 2900 Family User Guide Baseline Switch 2920-SFP Plus Baseline Switch 2928-SFP Plus Baseline Switch 2952-SFP Plus Baseline Switch 2928-PWR Plus Baseline Switch 2928-HPWR Plus Manual Version: 6W102-20090810 www.3com.com 3Com Corporation 350 Campus Drive, Marlborough, MA, USA 01752 3064
3Com Baseline Switch 2900 Family User Guide Baseline Switch 2920-SFP Plus Baseline Switch 2928-SFP Plus Baseline Switch 2952-SFP Plus Baseline Switch 2928-PWR Plus Baseline Switch 2928-HPWR Plus Manual Version: 6W102-20090810 www.3com.com 3Com Corporation 350 Campus Drive, Marlborough, MA, USA 01752 3064

User Guide
Page 2
...environmental standards. All other company and product names may be environmentally-friendly in all products can be registered in other countries. 3Com and the 3Com logo are a United States government agency, then this documentation, it is fully biodegradable and recyclable, and is completely chlorine-...or changes in the product(s) and/or the program(s) described in this product is the policy of 3Com Corporation to be reproduced in content from 3Com Corporation. 3Com Corporation reserves the right to revise this documentation and to time without warranty, term, or condition of...
...environmental standards. All other company and product names may be environmentally-friendly in all products can be registered in other countries. 3Com and the 3Com logo are a United States government agency, then this documentation, it is fully biodegradable and recyclable, and is completely chlorine-...or changes in the product(s) and/or the program(s) described in this product is the policy of 3Com Corporation to be reproduced in content from 3Com Corporation. 3Com Corporation reserves the right to revise this documentation and to time without warranty, term, or condition of...
User Guide
Page 3
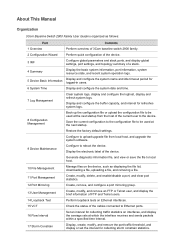
...be used at the next startup from local host, and upgrade the system software. 9 Device Maintenance Configure to local host. 10 File Management Manage files on interfaces, and display the average rate at which the interface receives and sends packets within a specified ...16 Flow Interval Set an interval for collecting traffic statistics on the device, such as follows: Part Contents 1 Overview Perform overview of 3Com baseline switch 2900 family. 2 Configuration Wizard Perform quick configuration of the device. 3 IRF Configure global parameters and stack ports, and display ...
...be used at the next startup from local host, and upgrade the system software. 9 Device Maintenance Configure to local host. 10 File Management Manage files on interfaces, and display the average rate at which the interface receives and sends packets within a specified ...16 Flow Interval Set an interval for collecting traffic statistics on the device, such as follows: Part Contents 1 Overview Perform overview of 3Com baseline switch 2900 family. 2 Configuration Wizard Perform quick configuration of the device. 3 IRF Configure global parameters and stack ports, and display ...
User Guide
Page 4
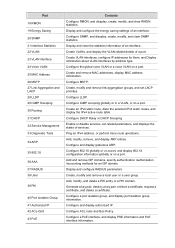
Create VLANs, and display the VLAN-related details of an interface. Create VLAN interfaces, configure IP addresses for an ISP domain. Create, modify and remove link aggregation groups, and set related parameters, and displays the states of an interface. Add and remove ISP domains, specify authentication /authorization /accounting methods for them, and Display information about VLAN interfaces by address type. Add, modify, and delete a PKI entity or a PKI domain. Configure a PoE interface, and display PSE information and PoE interface information. Display and clear the statistics...
Create VLANs, and display the VLAN-related details of an interface. Create VLAN interfaces, configure IP addresses for an ISP domain. Create, modify and remove link aggregation groups, and set related parameters, and displays the states of an interface. Add and remove ISP domains, specify authentication /authorization /accounting methods for them, and Display information about VLAN interfaces by address type. Add, modify, and delete a PKI entity or a PKI domain. Configure a PoE interface, and display PSE information and PoE interface information. Display and clear the statistics...

User Guide
Page 5
A minimum of one or a maximum of a command line are in braces and separated by vertical bars. The argument(s) before the ampersand (&) sign can be selected. For example, click . For example, pop up the [New User] window. One is comments. A line starting with the # sign is selected. GUI conventions Convention < > [ ] / Description Button names are in square brackets and separated by vertical bars. Improper operation may cause data loss or damage to n times. Means reader be extremely careful. Command arguments are inside square brackets. One or none is selected. ...
A minimum of one or a maximum of a command line are in braces and separated by vertical bars. The argument(s) before the ampersand (&) sign can be selected. For example, click . For example, pop up the [New User] window. One is comments. A line starting with the # sign is selected. GUI conventions Convention < > [ ] / Description Button names are in square brackets and separated by vertical bars. Improper operation may cause data loss or damage to n times. Means reader be extremely careful. Command arguments are inside square brackets. One or none is selected. ...

User Guide
Page 6
Related Documentation In addition to this manual, each 3com Baseline Switch 2900 documentation set includes the following: Manual Description 3Com Baseline Switch 2900 Family This guide provides all the information you need to -date 3Com product documentation on the World Wide Web at this URL: http://www.3com.com. Obtaining Documentation You can access the most up-to install Getting Started Guide and use the 3Com Baseline Switch 2900 Family.
Related Documentation In addition to this manual, each 3com Baseline Switch 2900 documentation set includes the following: Manual Description 3Com Baseline Switch 2900 Family This guide provides all the information you need to -date 3Com product documentation on the World Wide Web at this URL: http://www.3com.com. Obtaining Documentation You can access the most up-to install Getting Started Guide and use the 3Com Baseline Switch 2900 Family.
User Guide
Page 7
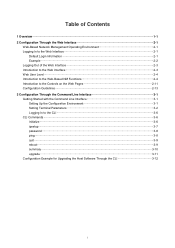
... Command Line Interface 3-1 Setting Up the Configuration Environment 3-1 Setting Terminal Parameters 3-2 Logging In to the CLI 3-6 CLI Commands 3-6 initialize 3-6 ipsetup 3-7 password 3-8 ping 3-8 quit 3-9 reboot 3-9 summary 3-10 upgrade 3-11 Configuration Example for Upgrading the Host Software Through the CLI 3-12 i
... Command Line Interface 3-1 Setting Up the Configuration Environment 3-1 Setting Terminal Parameters 3-2 Logging In to the CLI 3-6 CLI Commands 3-6 initialize 3-6 ipsetup 3-7 password 3-8 ping 3-8 quit 3-9 reboot 3-9 summary 3-10 upgrade 3-11 Configuration Example for Upgrading the Host Software Through the CLI 3-12 i

User Guide
Page 8
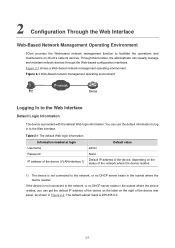
To perform other configurations not supported by the CLI, use the web interface. 1-1 1 Overview The 3Com baseline switch 2900 family can be configured through the command line interface (CLI), web interface, and SNMP/MIB. z The CLI provides some configuration commands to facilitate your operation. These configuration methods are suitable for different application scenarios. z The web interface supports all switch 2900 series configurations.
To perform other configurations not supported by the CLI, use the web interface. 1-1 1 Overview The 3Com baseline switch 2900 family can be configured through the command line interface (CLI), web interface, and SNMP/MIB. z The CLI provides some configuration commands to facilitate your operation. These configuration methods are suitable for different application scenarios. z The web interface supports all switch 2900 series configurations.
User Guide
Page 9
2 Configuration Through the Web Interface Web-Based Network Management Operating Environment 3Com provides the Web-based network management function to log in the subnet where the device resides, you can visually manage and maintain network devices through ... Information needed at login Username Password IP address of the device (VLAN-interface 1) Default value admin None Default IP address of the device, depending on 3Com's network devices. The default subnet mask is provided with the default Web login information. You can use the default information to facilitate the operations and...
2 Configuration Through the Web Interface Web-Based Network Management Operating Environment 3Com provides the Web-based network management function to log in the subnet where the device resides, you can visually manage and maintain network devices through ... Information needed at login Username Password IP address of the device (VLAN-interface 1) Default value admin None Default IP address of the device, depending on 3Com's network devices. The default subnet mask is provided with the default Web login information. You can use the default information to facilitate the operations and...

User Guide
Page 10
... 1). z Open the browser, and input the login information. You can communicate with each other properly. summary Select menu option: IP Method: IP address: Summary DHCP 10.153.96.86 Subnet mask: Default gateway: 255.255.255.0 0.0.0.0 Example Assuming that the PC and device can log in to the device through the...
... 1). z Open the browser, and input the login information. You can communicate with each other properly. summary Select menu option: IP Method: IP address: Summary DHCP 10.153.96.86 Subnet mask: Default gateway: 255.255.255.0 0.0.0.0 Example Assuming that the PC and device can log in to the device through the...

User Guide
Page 11
Logging Out of the Web Interface Click Logout in the upper-right corner of the Web interface, as shown in Figure 2-4 to save the current configuration automatically. Figure 2-3 Login page of the Web interface z The PC where you configure the device is composed of three parts: navigation tree, title area, and body area, as shown in Figure 2-4. 2-3 z If you click the verification code displayed on the Web login page, you can select Device > Users from the navigation tree, create a new user, and select Wizard or Network > VLAN interface to the device through the Web interface. ...
Logging Out of the Web Interface Click Logout in the upper-right corner of the Web interface, as shown in Figure 2-4 to save the current configuration automatically. Figure 2-3 Login page of the Web interface z The PC where you configure the device is composed of three parts: navigation tree, title area, and body area, as shown in Figure 2-4. 2-3 z If you click the verification code displayed on the Web login page, you can select Device > Users from the navigation tree, create a new user, and select Wizard or Network > VLAN interface to the device through the Web interface. ...

User Guide
Page 12
They can only use the network diagnostic tools ping and Trace Route. z Management: Users of this level can perform any operations to the Web-Based NM Functions Table 2-2 describes the Web-based network management functions in the navigation tree; Introduction to the device. The Web network management functions not supported by the device will not be displayed in the body area. A user with a higher level has all the operating rights of the current configuration interface in detail. 2-4 z Visitor: Users of this level can only access the device data but they cannot upgrade the ...
They can only use the network diagnostic tools ping and Trace Route. z Management: Users of this level can perform any operations to the Web-Based NM Functions Table 2-2 describes the Web-based network management functions in the navigation tree; Introduction to the device. The Web network management functions not supported by the device will not be displayed in the body area. A user with a higher level has all the operating rights of the current configuration interface in detail. 2-4 z Visitor: Users of this level can only access the device data but they cannot upgrade the ...

User Guide
Page 13
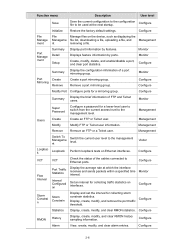
Management Monitor Devi ce System Time Diagnostic Generate diagnostic information file, and view or Information save the file to reboot the device. System Time Display and configure the system date and time. Upload the configuration file to be used at the next startup from the device to the Management device. 2-5 Device Information Display the port information of a stack. Management Device Mainten ance Reboot Electronic Label Configure to local host. Monitor Configure Configure Log Setup Display and configure the buffer capacity, and interval for ...
Management Monitor Devi ce System Time Diagnostic Generate diagnostic information file, and view or Information save the file to reboot the device. System Time Display and configure the system date and time. Upload the configuration file to be used at the next startup from the device to the Management device. 2-5 Device Information Display the port information of a stack. Management Device Mainten ance Reboot Electronic Label Configure to local host. Monitor Configure Configure Log Setup Display and configure the buffer capacity, and interval for ...
User Guide
Page 14
Configure File Manage ment File Manage files on Ethernet interfaces. Visitor Loopbac k Loopback Perform loopback tests on the device, such as displaying the Manageme file list, downloading a file, uploading a file, and Management nt removing a file. Configure Storm Constrai n Storm Constrain Display and set the interval for a mirroring group. Configure Alarm View, create, modify, and clear alarm entries. Configure 2-6 Displays feature information by features. Management Users Create Modify Create an FTP or Telnet user. Configure VCT VCT Check the ...
Configure File Manage ment File Manage files on Ethernet interfaces. Visitor Loopbac k Loopback Perform loopback tests on the device, such as displaying the Manageme file list, downloading a file, uploading a file, and Management nt removing a file. Configure Storm Constrai n Storm Constrain Display and set the interval for a mirroring group. Configure Alarm View, create, modify, and clear alarm entries. Configure 2-6 Displays feature information by features. Management Users Create Modify Create an FTP or Telnet user. Configure VCT VCT Check the ...

User Guide
Page 15
Display SNMP user information. Monitor Create Create VLANs. Monitor VLAN Detail Displays the member port information of an interface. Configure Net work Remove Summary Remove VLANs. Configure Configure Remove Remove VLAN interfaces. Configure Log Display log information about target hosts. Create, modify and delete an SNMP group. Create, modify and delete an SNMP user. Monitor Configure View Display SNMP view information. Monitor Configure Interface Interface Statistics Statistics Display and clear the statistics information of a VLAN. Configure ...
Display SNMP user information. Monitor Create Create VLANs. Monitor VLAN Detail Displays the member port information of an interface. Configure Net work Remove Summary Remove VLANs. Configure Configure Remove Remove VLAN interfaces. Configure Log Display log information about target hosts. Create, modify and delete an SNMP group. Create, modify and delete an SNMP user. Monitor Configure View Display SNMP view information. Monitor Configure Interface Interface Statistics Statistics Display and clear the statistics information of a VLAN. Configure ...

User Guide
Page 16
Displays the MSTP information of an OUI that can be identified by voice VLAN. Configure LACP Summary Setup Display information about MST regions. Monitor Configure Global Display global LLDP local information and Summary statistics. Monitor Configure Monitor Configure IPv4 Routing Summary Create Display the IPv4 active route table. Monitor Configure 2-8 Configure OUI Remove Remove the address of an OUI that can be identified by voice VLAN. Monitor Configure Setup Display and configure MAC address aging time. Configure Region Display information about LACP-...
Displays the MSTP information of an OUI that can be identified by voice VLAN. Configure LACP Summary Setup Display information about MST regions. Monitor Configure Global Display global LLDP local information and Summary statistics. Monitor Configure Monitor Configure IPv4 Routing Summary Create Display the IPv4 active route table. Monitor Configure 2-8 Configure OUI Remove Remove the address of an OUI that can be identified by voice VLAN. Monitor Configure Setup Display and configure MAC address aging time. Configure Region Display information about LACP-...

User Guide
Page 17
Specify authentication methods for an ISP domain. Monitor Enable/disable DHCP, configure advanced DHCP relay agent settings, configure a DHCP server group, and enable/disable the DHCP relay agent on Display the authorization method configuration information of an ISP domain. Monitor Configure gratuitous ARP. Configure ARP detection. Monitor Configure Domain Setup Display ISP domain configuration information. Monitor Management Authorizati on an interface. Monitor Management RADIUS RADIUS Server Display and configure RADIUS server information. Function menu ...
Specify authentication methods for an ISP domain. Monitor Enable/disable DHCP, configure advanced DHCP relay agent settings, configure a DHCP server group, and enable/disable the DHCP relay agent on Display the authorization method configuration information of an ISP domain. Monitor Configure gratuitous ARP. Configure ARP detection. Monitor Configure Domain Setup Display ISP domain configuration information. Monitor Management Authorizati on an interface. Monitor Management RADIUS RADIUS Server Display and configure RADIUS server information. Function menu ...

User Guide
Page 18
... QoS ACL IPv4 Basic Setup Advanced Setup Configure a rule for a link layer ACL. Configure Configure Link Setup Create a rule for a basic IPv4 ACL. Monitor Configure 2-10 Add, modify, and delete a PKI entity. Monitor Certificate Generate a key pair, destroy a key pair, retrieve a certificate, request a certificate, and delete a Configure certificate. Receive the CRL...
... QoS ACL IPv4 Basic Setup Advanced Setup Configure a rule for a link layer ACL. Configure Configure Link Setup Create a rule for a basic IPv4 ACL. Monitor Configure 2-10 Add, modify, and delete a PKI entity. Monitor Certificate Generate a key pair, destroy a key pair, retrieve a certificate, request a certificate, and delete a Configure certificate. Receive the CRL...

User Guide
Page 19
Configuring traffic mirroring and traffic redirecting for a QoS policy. Configure Port Policy Summary Setup Remove Display the QoS policy applied to cancel the input information. Cancel button Click the button to a port. Configure Configure Remove Delete a class or its classifier-behavior associations. Configure Configure the classifier-behavior associations for a traffic behavior Configure Configure Remove Delete a traffic behavior. Monitor Configure Configure Priority Priority Mapping Mapping Display priority mapping table information. Monitor Configure...
Configuring traffic mirroring and traffic redirecting for a QoS policy. Configure Port Policy Summary Setup Remove Display the QoS policy applied to cancel the input information. Cancel button Click the button to a port. Configure Configure Remove Delete a class or its classifier-behavior associations. Configure Configure the classifier-behavior associations for a traffic behavior Configure Configure Remove Delete a traffic behavior. Monitor Configure Configure Priority Priority Mapping Mapping Display priority mapping table information. Monitor Configure...

User Guide
Page 20
Expand button As shown in Figure 2-6, click the plus sign before Search Item, as shown in previous results. Clear button Click the button to clear all the items in a list or all the items in Figure 2-5. You can click before a corresponding item. Help button Click the button to open the page, as shown in the current configuration page to deselect all the items in a list, or all the ports on the device panel. You can see the collapsed contents. Select None button Click the button to the system default. Figure 2-6 Expand button icon Click the icon to enter the ...
Expand button As shown in Figure 2-6, click the plus sign before Search Item, as shown in previous results. Clear button Click the button to clear all the items in a list or all the items in Figure 2-5. You can click before a corresponding item. Help button Click the button to open the page, as shown in the current configuration page to deselect all the items in a list, or all the ports on the device panel. You can see the collapsed contents. Select None button Click the button to the system default. Figure 2-6 Expand button icon Click the icon to enter the ...