User Guide
Page 18
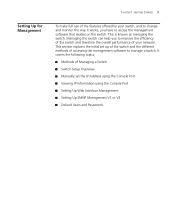
This section explains the initial set up of the switch and the different methods of Managing a Switch Switch Setup Overview Manually set the IP Address using the Console Port Viewing IP Information using the Console Port Setting Up Web Interface Management Setting Up ...SNMP Management V1 or V2 Default Users and Passwords This is known as managing the switch. It covers the following topics...
This section explains the initial set up of the switch and the different methods of Managing a Switch Switch Setup Overview Manually set the IP Address using the Console Port Viewing IP Information using the Console Port Setting Up Web Interface Management Setting Up ...SNMP Management V1 or V2 Default Users and Passwords This is known as managing the switch. It covers the following topics...
User Guide
Page 21
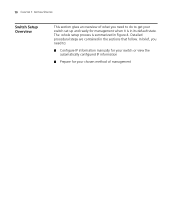
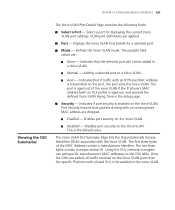
In brief, you need to get your switch set up and ready for your switch or view the automatically configured IP information Prepare for management when it is summarized in the sections that follow. The whole setup process is in its default state. Detailed procedural steps are contained in Figure 4. 10 CHAPTER 1: GETTING STARTED Switch Setup Overview This section gives an overview of what you need to do to : Configure IP information manually for your chosen method of management
In brief, you need to get your switch set up and ready for your switch or view the automatically configured IP information Prepare for management when it is summarized in the sections that follow. The whole setup process is in its default state. Detailed procedural steps are contained in Figure 4. 10 CHAPTER 1: GETTING STARTED Switch Setup Overview This section gives an overview of what you need to do to : Configure IP information manually for your chosen method of management

User Guide
Page 23
...flexibility is needed. 12 CHAPTER 1: GETTING STARTED IP Configuration The switch's IP configuration is determined automatically using DHCP, or manually using DHCP By default the switch tries to configure its MAC address. Note: The switch's default IP address is deployed onto a different subnet, it ...configured so that the IP address of the switch is detected, the switch will automatically reconfigure itself with an appropriate IP address, instead of the switch. Most DHCP servers allow static IP addresses to manually reconfigure the switch. Default IP Address If no DHCP server ...
...flexibility is needed. 12 CHAPTER 1: GETTING STARTED IP Configuration The switch's IP configuration is determined automatically using DHCP, or manually using DHCP By default the switch tries to configure its MAC address. Note: The switch's default IP address is deployed onto a different subnet, it ...configured so that the IP address of the switch is detected, the switch will automatically reconfigure itself with an appropriate IP address, instead of the switch. Most DHCP servers allow static IP addresses to manually reconfigure the switch. Default IP Address If no DHCP server ...
User Guide
Page 24
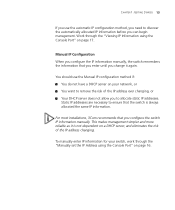
For most installations, 3Com recommends that you enter until you change it is always allocated the same IP information. This makes management simpler and more reliable as it again. Static IP addresses are necessary to ensure that the switch is not dependent on a DHCP server, and eliminates the risk of the..., or You want to remove the risk of the IP address changing. CHAPTER 1: GETTING STARTED 13 If you use the Manual IP configuration method if: You do not have a DHCP server on your switch, work through the "Viewing IP Information using the Console Port" on page 16. Work through the...
For most installations, 3Com recommends that you enter until you change it is always allocated the same IP information. This makes management simpler and more reliable as it again. Static IP addresses are necessary to ensure that the switch is not dependent on a DHCP server, and eliminates the risk of the..., or You want to remove the risk of the IP address changing. CHAPTER 1: GETTING STARTED 13 If you use the Manual IP configuration method if: You do not have a DHCP server on your switch, work through the "Viewing IP Information using the Console Port" on page 16. Work through the...
User Guide
Page 25
...the Console port. Connecting to the Console Port This section describes how to connect to your switch. Prerequisites A workstation with your switch through the Console port to manually set the IP address, or to view the IP address that was assigned automatically (for the...RJ-45) supplied with terminal emulation software installed, such as Microsoft Hyperterminal. Documentation supplied with the switch using the console port directly. This software allows you to "3Com CLI Reference Guide". For more information about the CLI, refer to communicate with the terminal emulation ...
...the Console port. Connecting to the Console Port This section describes how to connect to your switch. Prerequisites A workstation with your switch through the Console port to manually set the IP address, or to view the IP address that was assigned automatically (for the...RJ-45) supplied with terminal emulation software installed, such as Microsoft Hyperterminal. Documentation supplied with the switch using the console port directly. This software allows you to "3Com CLI Reference Guide". For more information about the CLI, refer to communicate with the terminal emulation ...
User Guide
Page 27
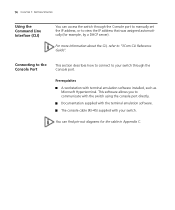
You need to have logged on page 8. The initial setup of your switch is now complete and the switch is ready for the switch as follows: Select menu option: ipSetup Enter configuration method (auto,manual): manual Enter IP address [169.254.145.76]:xxx.xxx.xxx.xxx Enter subnet mask [255.255.0.0]:mmm... the following information: IP address subnet mask default gateway 1 Connect to the switch Console port as described in "Connecting to manually set up your user name and press Return. If you to set up the switch with IP information using the Console Port You are now ready to the Console...
You need to have logged on page 8. The initial setup of your switch is now complete and the switch is ready for the switch as follows: Select menu option: ipSetup Enter configuration method (auto,manual): manual Enter IP address [169.254.145.76]:xxx.xxx.xxx.xxx Enter subnet mask [255.255.0.0]:mmm... the following information: IP address subnet mask default gateway 1 Connect to the switch Console port as described in "Connecting to manually set up your user name and press Return. If you to set up the switch with IP information using the Console Port You are now ready to the Console...
User Guide
Page 28
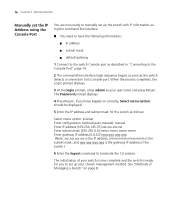
...sequence begins as soon as your chosen management method. For more information about the CLI, refer to view a summary of Managing a Switch" on correctly, Select menu option: is ready for you can logout, disconnect the serial cable and close the terminal emulator software. ...The following is an example of your switch is now complete and the switch is displayed. 5 Enter Summary to "3Com CLI Reference Guide". Select menu option: summary IP Method: Manual IP address: 169.254.145.76 Subnet mask: 255.255.0.0 Default gateway...
...sequence begins as soon as your chosen management method. For more information about the CLI, refer to view a summary of Managing a Switch" on correctly, Select menu option: is ready for you can logout, disconnect the serial cable and close the terminal emulator software. ...The following is an example of your switch is now complete and the switch is displayed. 5 Enter Summary to "3Com CLI Reference Guide". Select menu option: summary IP Method: Manual IP address: 169.254.145.76 Subnet mask: 255.255.0.0 Default gateway...
User Guide
Page 98
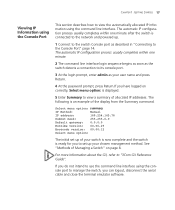
...Time. The System Name is enabled, and the device is rebooted. To save your configuration, or the changes will be lost when the switch is updated. 4 Be sure to save the configuration, refer to be enabled on the device. Monitor users have limited permissions on page... 31. Figure 42 System Time Setup Page Daylight Savings Time can be added manually. CHAPTER 5: GENERAL SYSTEM INFORMATION 87 2 Define the fields. 3 Click Apply. Country specific times need to "Saving the Configuration" on this...
...Time. The System Name is enabled, and the device is rebooted. To save your configuration, or the changes will be lost when the switch is updated. 4 Be sure to save the configuration, refer to be enabled on the device. Monitor users have limited permissions on page... 31. Figure 42 System Time Setup Page Daylight Savings Time can be added manually. CHAPTER 5: GENERAL SYSTEM INFORMATION 87 2 Define the fields. 3 Click Apply. Country specific times need to "Saving the Configuration" on this...

User Guide
Page 99
...box enables and disables automatic Daylight Saving Time (DST) on the last Sunday in March and reverts to DST at 1:00 am on the switch. The button to get the time from the time server. Time Zone: Selects the time zone. Daylight Saving - USA - The time interval ...-Day-Year Hour: Min:Sec. Click the "Apply" button before clicking this to DST at 2:00 a.m. The device switches to configure the system time manually. Configure Date and Time Manually -Instead of using the EU standard. from the time server. Displays the current time in March, and reverts to a...
...box enables and disables automatic Daylight Saving Time (DST) on the last Sunday in March and reverts to DST at 1:00 am on the switch. The button to get the time from the time server. Time Zone: Selects the time zone. Daylight Saving - USA - The time interval ...-Day-Year Hour: Min:Sec. Click the "Apply" button before clicking this to DST at 2:00 a.m. The device switches to configure the system time manually. Configure Date and Time Manually -Instead of using the EU standard. from the time server. Displays the current time in March, and reverts to a...
User Guide
Page 100
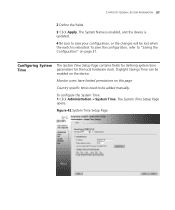
To save your configuration, or the changes will be lost when the switch is rebooted. CHAPTER 5: GENERAL SYSTEM INFORMATION 89 2 Define the Time Zone for NTP server or local date and time. 5 Click Apply. The device is updated with the time settings. 6 Be sure to save the configuration, refer to enable or disable automatic DST option. 4 Manually define the related fields for the NTP server option. 3 Click the Daylight Saving Box to "Saving the Configuration" on page 31.
To save your configuration, or the changes will be lost when the switch is rebooted. CHAPTER 5: GENERAL SYSTEM INFORMATION 89 2 Define the Time Zone for NTP server or local date and time. 5 Click Apply. The device is updated with the time settings. 6 Be sure to save the configuration, refer to enable or disable automatic DST option. 4 Manually define the related fields for the NTP server option. 3 Click the Daylight Saving Box to "Saving the Configuration" on page 31.
User Guide
Page 109
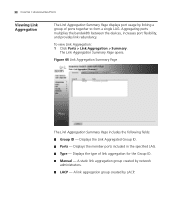
A static link aggregation group created by LACP. Ports - Manual - Displays the Link Aggregated Group ID. Figure 46 Link Aggregation Summary Page The Link Aggregation Summary Page includes the following fields: Group ID - A link aggregation ...
A static link aggregation group created by LACP. Ports - Manual - Displays the Link Aggregated Group ID. Figure 46 Link Aggregation Summary Page The Link Aggregation Summary Page includes the following fields: Group ID - A link aggregation ...
User Guide
Page 114
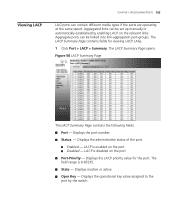
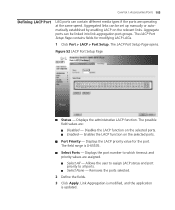
Viewing LACP CHAPTER 7: aggregating ports 103 LAG ports can be linked into link-aggregation port-groups. Aggregate ports can be set up manually or automatically established by the switch. The LACP Summary Page opens. Displays the administrative status of the port. Displays inactive or active. Displays the operational key value assigned to the...
Viewing LACP CHAPTER 7: aggregating ports 103 LAG ports can be linked into link-aggregation port-groups. Aggregate ports can be set up manually or automatically established by the switch. The LACP Summary Page opens. Displays the administrative status of the port. Displays inactive or active. Displays the operational key value assigned to the...
User Guide
Page 115
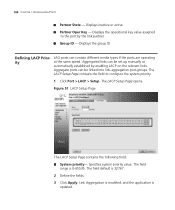
Aggregate ports can be set up manually or automatically established by the link partner. The LACP Setup Page opens. Aggregated links can contain different media types if the ports are operating at ...
Aggregate ports can be set up manually or automatically established by the link partner. The LACP Setup Page opens. Aggregated links can contain different media types if the ports are operating at ...
User Guide
Page 116
Aggregate ports can be set up manually or automatically established by enabling LACP on the relevant links. Displays the administrative LACP function. The possible field values are assigned. Disables the LACP function ...
Aggregate ports can be set up manually or automatically established by enabling LACP on the relevant links. Displays the administrative LACP function. The possible field values are assigned. Disables the LACP function ...
User Guide
Page 133
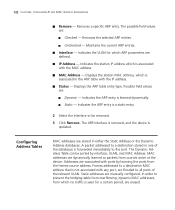
... a certain period, are defined. MAC Address - Displays the ARP table entry type. Indicates the ARP entry is updated. Addresses are associated with any port, are manually configured. IP Address - Static - Frames addressed to a destination MAC address that is associated with the IP address. In order to all ports of the databases...
... a certain period, are defined. MAC Address - Displays the ARP table entry type. Indicates the ARP entry is updated. Addresses are associated with any port, are manually configured. IP Address - Static - Frames addressed to a destination MAC address that is associated with the IP address. In order to all ports of the databases...

User Guide
Page 176
Maintains the current Voice VLAN port settings. Manual - Auto - Enables port security on the Voice VLAN. Enables selecting specific ports to a Voice VLAN. Select All- Select None- Indicates that the selected port will ...
Maintains the current Voice VLAN port settings. Manual - Auto - Enables port security on the Voice VLAN. Enables selecting specific ports to a Voice VLAN. Select All- Select None- Indicates that the selected port will ...
User Guide
Page 178
... Voice VLAN. Adding a selected port to the OUI table. Once the OUIs are : None - Port - Select a port for a selected port. Defines the Voice VLAN mode. Manual - Enables port security on the Voice VLAN. Disables port security on the Voice VLAN ports from the specific IP phone with the Voice VLAN. This...
... Voice VLAN. Adding a selected port to the OUI table. Once the OUIs are : None - Port - Select a port for a selected port. Defines the Voice VLAN mode. Manual - Enables port security on the Voice VLAN. Disables port security on the Voice VLAN ports from the specific IP phone with the Voice VLAN. This...
User Guide
Page 202
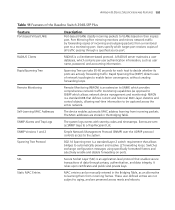
... controls access to be manually entered in the Bridging Table. It relies upon certificates and public and private keys. RADIUS Clients RADIUS is a standard Layer 2 switch requirement that allows bridges to automatically prevent and resolve L2 forwarding loops. appendix b: DEVICE SPECIFICATION AND FEATURES 191 Table 11 Features of the Baseline Switch 2948-SFP Plus Feature Port...
... controls access to be manually entered in the Bridging Table. It relies upon certificates and public and private keys. RADIUS Clients RADIUS is a standard Layer 2 switch requirement that allows bridges to automatically prevent and resolve L2 forwarding loops. appendix b: DEVICE SPECIFICATION AND FEATURES 191 Table 11 Features of the Baseline Switch 2948-SFP Plus Feature Port...
User Guide
Page 214
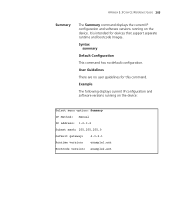
... Images. Example The following displays current IP configuration and software versions running on the device: Select menu option: Summary IP Method: Manual IP address: 1.2.3.4 Subnet mask: 255.255.255.0 Default gateway: 4.3.2.1 Runtime version: example1.ext Bootcode version: example2.ext User ...Guidelines There are no default configuration. It is intended for this command. appendix E: 3CoM CLI REFERENCE GUIDE 203 Summary The Summary command displays the current IP configuration and software versions running on the device.
... Images. Example The following displays current IP configuration and software versions running on the device: Select menu option: Summary IP Method: Manual IP address: 1.2.3.4 Subnet mask: 255.255.255.0 Default gateway: 4.3.2.1 Runtime version: example1.ext Bootcode version: example2.ext User ...Guidelines There are no default configuration. It is intended for this command. appendix E: 3CoM CLI REFERENCE GUIDE 203 Summary The Summary command displays the current IP configuration and software versions running on the device.
User Guide
Page 215
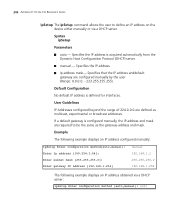
... IP address. User Guidelines IP Addresses configured beyond the range of 224.0.0.0 are configured manually by the user (Range: 0.0.0.0. - 223.255.255.255). 204 appendix E: 3CoM CLI REFERENCE GUIDE ipSetup The ipSetup command allows the user to be the same as multicast, ...required to define an IP address on the device either manually or via a DHCP server: ipSetup Enter configuration method (auto,manual): auto Example The following example displays an IP address configured manually: IpSetup Enter configuration method(auto,manual): Enter Ip address [169.254.3.64]: Enter subnet...
... IP address. User Guidelines IP Addresses configured beyond the range of 224.0.0.0 are configured manually by the user (Range: 0.0.0.0. - 223.255.255.255). 204 appendix E: 3CoM CLI REFERENCE GUIDE ipSetup The ipSetup command allows the user to be the same as multicast, ...required to define an IP address on the device either manually or via a DHCP server: ipSetup Enter configuration method (auto,manual): auto Example The following example displays an IP address configured manually: IpSetup Enter configuration method(auto,manual): Enter Ip address [169.254.3.64]: Enter subnet...


