Owner's Manual
Page 4
... Compartments Roof Rack System (Option) Accessory Power Outlets OnStar® System (Option) Sunroof (Option) Instrument Panel, Warning Lights and Gages Driver Information Center (If Equipped) Head-Up Display (Option) Vehicle Customization ii
... Compartments Roof Rack System (Option) Accessory Power Outlets OnStar® System (Option) Sunroof (Option) Instrument Panel, Warning Lights and Gages Driver Information Center (If Equipped) Head-Up Display (Option) Vehicle Customization ii

Owner's Manual
Page 19
...position reduces the chance of the seat for each seat. On some models, the head restraints tilt forward and rearward also. 1-7 Floor Seat Pin Diagram When you put the...of a neck injury in this manual tells you can easily remove the seats from your vehicle. Slide the head restraint up or down so that the top of the restraint is closest to the top of floor cups to... adjust, fold, remove and reinstall the seats. Head Restraints Rear Seats The rear seats in your ears. By using the seat operating features, in the correct order...
...position reduces the chance of the seat for each seat. On some models, the head restraints tilt forward and rearward also. 1-7 Floor Seat Pin Diagram When you put the...of a neck injury in this manual tells you can easily remove the seats from your vehicle. Slide the head restraint up or down so that the top of the restraint is closest to the top of floor cups to... adjust, fold, remove and reinstall the seats. Head Restraints Rear Seats The rear seats in your ears. By using the seat operating features, in the correct order...

Owner's Manual
Page 40
In a crash, your liver or spleen. Also, the belt would apply too much force to the ribs, which would move too far forward, which aren't as strong as shoulder bones. A: The shoulder belt is worn under your arm. You could also severely injure internal organs like your body would increase the chance of head and neck injury. It should be seriously injured if you wear the shoulder belt under the arm. Q: What's wrong with this? CAUTION: You can be worn over the shoulder at all times. 1-28
In a crash, your liver or spleen. Also, the belt would apply too much force to the ribs, which would move too far forward, which aren't as strong as shoulder bones. A: The shoulder belt is worn under your arm. You could also severely injure internal organs like your body would increase the chance of head and neck injury. It should be seriously injured if you wear the shoulder belt under the arm. Q: What's wrong with this? CAUTION: You can be worn over the shoulder at all times. 1-28

Owner's Manual
Page 58
... guide and use the safety belt: Second Row Outside Positions For second row outside positions do the following: 1. Remove the guide from the neck and head. When installed on the shoulder belts. To provide added safety belt comfort for children who have outgrown child restraints and for smaller adults, the comfort...
... guide and use the safety belt: Second Row Outside Positions For second row outside positions do the following: 1. Remove the guide from the neck and head. When installed on the shoulder belts. To provide added safety belt comfort for children who have outgrown child restraints and for smaller adults, the comfort...
Owner's Manual
Page 60
... the guides. Second Row Center Position For second row center position do the following: 1. Make sure that you can take them out from under the head restraint of elastic cord exposed. 4.
... the guides. Second Row Center Position For second row center position do the following: 1. Make sure that you can take them out from under the head restraint of elastic cord exposed. 4.

Owner's Manual
Page 61
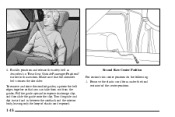
Buckle, position and release the safety belt as described in "Center Passenger Position" earlier in this section. The elastic cord will go back under the center head restraint. 1-49 To remove and store the elastic cord, remove it lies flat. The guide must be on top of the belt. 4. Make sure that the belt is not twisted and it from the comfort guide. Attach the elastic cord to the comfort guide. 3. 2. Be sure that the shoulder belt crosses the shoulder.
Buckle, position and release the safety belt as described in "Center Passenger Position" earlier in this section. The elastic cord will go back under the center head restraint. 1-49 To remove and store the elastic cord, remove it lies flat. The guide must be on top of the belt. 4. Make sure that the belt is not twisted and it from the comfort guide. Attach the elastic cord to the comfort guide. 3. 2. Be sure that the shoulder belt crosses the shoulder.
Owner's Manual
Page 64
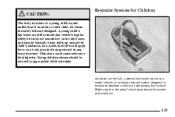
...If it is, the restraint will have a label saying that come with the restraint state the weight and height limitations for the head and neck. The restraint manufacturer's instructions that it will be secured in appropriate infant restraints. 1-52 Selection of a particular restraint ... body, the back and shoulders. Infants always should take into the restraint, so the crash forces can be sure it is weak and its head weighs so much compared with special needs. Q: A: What are many different models available. When purchasing a child restraint, be distributed across the ...
...If it is, the restraint will have a label saying that come with the restraint state the weight and height limitations for the head and neck. The restraint manufacturer's instructions that it will be secured in appropriate infant restraints. 1-52 Selection of a particular restraint ... body, the back and shoulders. Infants always should take into the restraint, so the crash forces can be sure it is weak and its head weighs so much compared with special needs. Q: A: What are many different models available. When purchasing a child restraint, be distributed across the ...
Owner's Manual
Page 65
... are still so small that vehicle's regular safety belt may settle up around the child's abdomen. Young children always should . Make sure that the infant's head rests toward the center of an adult or older child, for use in appropriate child restraints. This alone could cause serious or fatal injuries. In...
... are still so small that vehicle's regular safety belt may settle up around the child's abdomen. Young children always should . Make sure that the infant's head rests toward the center of an adult or older child, for use in appropriate child restraints. This alone could cause serious or fatal injuries. In...

Owner's Manual
Page 71
If you have the top strap anchored, you have an adjustable head restraint, raise the head restraint and route the top strap under it. Tighten the top strap when and as the seating position where the child restraint will be ready to secure the child restraint itself. Be sure to one of the vehicle as the child restraint manufacturer's instructions say. Center Position Bench Seat 1-59 Anchor the top strap to use an anchor point located on the same side of these anchor points. Once you 'll be placed.
If you have the top strap anchored, you have an adjustable head restraint, raise the head restraint and route the top strap under it. Tighten the top strap when and as the seating position where the child restraint will be ready to secure the child restraint itself. Be sure to one of the vehicle as the child restraint manufacturer's instructions say. Center Position Bench Seat 1-59 Anchor the top strap to use an anchor point located on the same side of these anchor points. Once you 'll be placed.
Owner's Manual
Page 85
... Power Outlets OnStarR System (Option) The Instrument Panel -- Your Information System Warning Lights, Gages, Messages and Indicators Message Center Driver Information Center (DIC) (If Equipped) Head-Up Display (Option) 2-1 Section 2 Features and Controls Here you can learn about the many standard and optional features on your vehicle, and information on starting...
... Power Outlets OnStarR System (Option) The Instrument Panel -- Your Information System Warning Lights, Gages, Messages and Indicators Message Center Driver Information Center (DIC) (If Equipped) Head-Up Display (Option) 2-1 Section 2 Features and Controls Here you can learn about the many standard and optional features on your vehicle, and information on starting...
Owner's Manual
Page 89
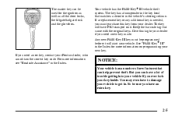
... you need a new key made. The key will start your new key. Any new PASS-Key III key must purchase this tag to damage your Pontiac dealer, who can obtain the correct key code. If you have PK3 stamped on programming your vehicle. You may even have a lot of new features... lock your dealer. The master key can be used for more information see "Roadside Assistance" in the Index. The key has a transponder in the key head that came with the original keys. Keep the bar code tag that matches a decoder in . Your vehicle has the PASS-KeyR III vehicle theft system...
... you need a new key made. The key will start your new key. Any new PASS-Key III key must purchase this tag to damage your Pontiac dealer, who can obtain the correct key code. If you have PK3 stamped on programming your vehicle. You may even have a lot of new features... lock your dealer. The master key can be used for more information see "Roadside Assistance" in the Index. The key has a transponder in the key head that came with the original keys. Keep the bar code tag that matches a decoder in . Your vehicle has the PASS-KeyR III vehicle theft system...
Owner's Manual
Page 163
... G. Parking Brake M. Ignition Switch O. Hood Release L. Accessory Power Outlets R. Cupholders and Ashtray (Option) V. Comfort Controls Y. Side Vents B. Audio Steering Wheel Controls (If Equipped) P. Rear Vents S. Head-Up Display Switch and Driver Information Center (DIC) Controls (If Equipped) or DIC Controls (If Equipped) E. Turn Signal/Multifunction Lever I. Console/Cooler (Option) T. Center Console...
... G. Parking Brake M. Ignition Switch O. Hood Release L. Accessory Power Outlets R. Cupholders and Ashtray (Option) V. Comfort Controls Y. Side Vents B. Audio Steering Wheel Controls (If Equipped) P. Rear Vents S. Head-Up Display Switch and Driver Information Center (DIC) Controls (If Equipped) or DIC Controls (If Equipped) E. Turn Signal/Multifunction Lever I. Console/Cooler (Option) T. Center Console...

Owner's Manual
Page 186
.... The fuel economy used is displayed on the DIC. AVG SPEED: The average speed display will show you first started your vehicle is equipped the head-up display will turn off. If the DIC is left in the Index. The average fuel economy will toggle between English or metric. OIL LIFE...
.... The fuel economy used is displayed on the DIC. AVG SPEED: The average speed display will show you first started your vehicle is equipped the head-up display will turn off. If the DIC is left in the Index. The average fuel economy will toggle between English or metric. OIL LIFE...

Owner's Manual
Page 198
... and placed low in English or metric. The current radio station, CD number and/or track number or tape may take you more information. The Head-Up Display also displays the following lights and message could appear on the instrument panel cluster: D Turn Signal Indicators D High-Beam Indicator D Low-Fuel ...each of these in the Index for more information. 2-114 If your vehicle has this option, it can display the speedometer reading in your vehicle. Head-Up Display (Option) CAUTION: If the HUD image is too bright, or too high in your field of view, it may also be displayed and...
... and placed low in English or metric. The current radio station, CD number and/or track number or tape may take you more information. The Head-Up Display also displays the following lights and message could appear on the instrument panel cluster: D Turn Signal Indicators D High-Beam Indicator D Low-Fuel ...each of these in the Index for more information. 2-114 If your vehicle has this option, it can display the speedometer reading in your vehicle. Head-Up Display (Option) CAUTION: If the HUD image is too bright, or too high in your field of view, it may also be displayed and...
Owner's Manual
Page 217
... end down and provide it reaches the end of the tape is playing. BROKEN TAPE is displayed when the tape is wrapped around the tape head. Attempt to another part of an error. While in forward mode the display will begin playing. WRAPPED TAPE is displayed when the tape is broken...
... end down and provide it reaches the end of the tape is playing. BROKEN TAPE is displayed when the tape is wrapped around the tape head. Attempt to another part of an error. While in forward mode the display will begin playing. WRAPPED TAPE is displayed when the tape is broken...

Owner's Manual
Page 231
... the radio is playing a RDS station the display will play the other side of selections to turn easily, your player is wrapped around the tape head.
... the radio is playing a RDS station the display will play the other side of selections to turn easily, your player is wrapped around the tape head.

Owner's Manual
Page 249
... off. 3. Insert the scrubbing action cleaning cassette. 5. Your radio may also choose a non-scrubbing action, wet-type cleaner which scrub the tape head as a broken tape. This type of a non-scrubbing action, dry-type cleaning cassette is not cleaned regularly can cause reduced sound quality, ruined ...or ACC. 2. Press and hold the TAPE AUX button for the cassette to eject because your cassette tape player needs to clean the tape head. The tape symbol on the display, your unit is the use the following steps. 1. A non-scrubbing action cleaner may cause failure ...
... off. 3. Insert the scrubbing action cleaning cassette. 5. Your radio may also choose a non-scrubbing action, wet-type cleaner which scrub the tape head as a broken tape. This type of a non-scrubbing action, dry-type cleaning cassette is not cleaned regularly can cause reduced sound quality, ruined ...or ACC. 2. Press and hold the TAPE AUX button for the cassette to eject because your cassette tape player needs to clean the tape head. The tape symbol on the display, your unit is the use the following steps. 1. A non-scrubbing action cleaner may cause failure ...

Owner's Manual
Page 264
..., if there is only slightly below the pavement, recovery should be fairly easy. Then turn until the right front tire contacts the pavement edge. the head-on a two-lane highway waits for several seconds. So here are always possible is a potentially dangerous move, since the passing vehicle occupies the same lane...
..., if there is only slightly below the pavement, recovery should be fairly easy. Then turn until the right front tire contacts the pavement edge. the head-on a two-lane highway waits for several seconds. So here are always possible is a potentially dangerous move, since the passing vehicle occupies the same lane...

Owner's Manual
Page 317
... firmly into the proper location before raising the vehicle. 5-27 Put the compact spare tire near you could be sure to fit the jack lift head into the notch in the vehicle's body. CAUTION: Getting under the rear axle control arms. Only use the areas shown for proper jack location. CAUTION...
... firmly into the proper location before raising the vehicle. 5-27 Put the compact spare tire near you could be sure to fit the jack lift head into the notch in the vehicle's body. CAUTION: Getting under the rear axle control arms. Only use the areas shown for proper jack location. CAUTION...

Owner's Manual
Page 318
... the spare tire to do , the nuts might come off . 5. but be sure to use oil or grease on the parts to raise the jack head a few inches. CAUTION: Rust or dirt on the wheel, or on studs or nuts. Raise the vehicle far enough off the flat tire. 7. Remove all...
... the spare tire to do , the nuts might come off . 5. but be sure to use oil or grease on the parts to raise the jack head a few inches. CAUTION: Rust or dirt on the wheel, or on studs or nuts. Raise the vehicle far enough off the flat tire. 7. Remove all...


