
Owner's Manual
Page 145
... nets. Store such loads on the floor of the side convenience nets. Do the following to keep the rear exit clear. connect to secure the cooler storage compartment properly. Store the net in one of your vehicle, as far forward as you then take down the convenience nets to extend life... on the sidewall trim. The two side nets can . 2-61 Attach the upper and lower hooks on either side of the rear of the vehicle. Console/Cooler (Option) D The upper hooks on the side convenience nets connect to the lower hooks on the floor of the rear of the vehicle (the label...
... nets. Store such loads on the floor of the side convenience nets. Do the following to keep the rear exit clear. connect to secure the cooler storage compartment properly. Store the net in one of your vehicle, as far forward as you then take down the convenience nets to extend life... on the sidewall trim. The two side nets can . 2-61 Attach the upper and lower hooks on either side of the rear of the vehicle. Console/Cooler (Option) D The upper hooks on the side convenience nets connect to the lower hooks on the floor of the rear of the vehicle (the label...
Owner's Manual
Page 146
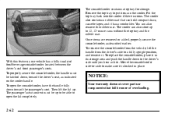
...that fail because of overloading. 2-62 Once items are removed or added, properly secure the console/cooler, as indicated on the cooler handle. To replace the console/cooler, place it has a coinholder. To properly secure the console/cooler, the handle must be up to be latched down, toward the passenger's seat. The ...parts or components that can also remove the rubber mat. You can hold compact discs, cassette tapes, and it in the cooler. Move the console/cooler side-to-side to a fully upright position, and remove it is room. Then lift the lid up to put items in...
...that fail because of overloading. 2-62 Once items are removed or added, properly secure the console/cooler, as indicated on the cooler handle. To replace the console/cooler, place it has a coinholder. To properly secure the console/cooler, the handle must be up to be latched down, toward the passenger's seat. The ...parts or components that can also remove the rubber mat. You can hold compact discs, cassette tapes, and it in the cooler. Move the console/cooler side-to-side to a fully upright position, and remove it is room. Then lift the lid up to put items in...
Owner's Manual
Page 163
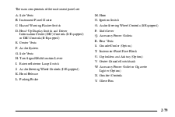
.../Multifunction Lever I. Ignition Switch O. Accessory Power Outlet or Cigarette Lighter (Option) X. Audio System G. Parking Brake M. Comfort Controls Y. Side Vents B. Horn N. Accessory Power Outlets R. Center Vents F. Console/Cooler (Option) T. The main components of the instrument panel are: A. Instrument Panel Cluster C. Side Vents H. Rear Vents S. Instrument Panel Fuse Block U. Glove Box 2-79 Audio Steering...
.../Multifunction Lever I. Ignition Switch O. Accessory Power Outlet or Cigarette Lighter (Option) X. Audio System G. Parking Brake M. Comfort Controls Y. Side Vents B. Horn N. Accessory Power Outlets R. Center Vents F. Console/Cooler (Option) T. The main components of the instrument panel are: A. Instrument Panel Cluster C. Side Vents H. Rear Vents S. Instrument Panel Fuse Block U. Glove Box 2-79 Audio Steering...

Owner's Manual
Page 202
...for you. Turn the knob clockwise to increase fan speed and counterclockwise to operate. Turn the knob counterclockwise (toward the red area) for cooler air. Mode Knob The right knob is the fan knob and selects the force of the air coming through the instrument panel outlets and ...the rear console outlets. Air Conditioning with Temperature Control 3-2 Turn the knob clockwise (toward the blue area) for warmer air. Comfort Controls This section tells you...
...for you. Turn the knob clockwise to increase fan speed and counterclockwise to operate. Turn the knob counterclockwise (toward the red area) for cooler air. Mode Knob The right knob is the fan knob and selects the force of the air coming through the instrument panel outlets and ...the rear console outlets. Air Conditioning with Temperature Control 3-2 Turn the knob clockwise (toward the blue area) for warmer air. Comfort Controls This section tells you...
Owner's Manual
Page 203
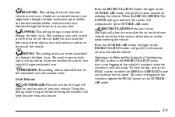
... system to the windshield and side window vents. BI-LEVEL: This setting directs air into your feet. Cooler air is directed toward your upper body through the front instrument panel outlets and the rear console outlets, while warmed air is directed through the floor ducts. This setting is cold and damp. To...
... system to the windshield and side window vents. BI-LEVEL: This setting directs air into your feet. Cooler air is directed toward your upper body through the front instrument panel outlets and the rear console outlets, while warmed air is directed through the floor ducts. This setting is cold and damp. To...
Owner's Manual
Page 206
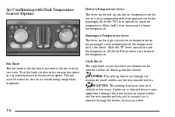
... must be turned on the driver's side independent of the temperature set by the driver. Cooler air is directed toward your upper body through the front instrument panel outlets and the rear console outlets, while warmed air is directed through the instrument panel outlets and the rear... console outlets. Air Conditioning with Dual Temperature Control (Option) Driver's Temperature Lever The lever on the ...
... must be turned on the driver's side independent of the temperature set by the driver. Cooler air is directed toward your upper body through the front instrument panel outlets and the rear console outlets, while warmed air is directed through the instrument panel outlets and the rear... console outlets. Air Conditioning with Dual Temperature Control (Option) Driver's Temperature Lever The lever on the ...


