Owner's Manual
Page 55
... ...65 ▫ Memory System - If Equipped ...68 ▫ Heated Seats - If Equipped ...71 ▫ 60/40 Split Rear Seat ...71 To Open And Close The Hood ...74 3
... ...65 ▫ Memory System - If Equipped ...68 ▫ Heated Seats - If Equipped ...71 ▫ 60/40 Split Rear Seat ...71 To Open And Close The Hood ...74 3
Owner's Manual
Page 74
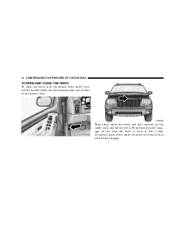
To prevent possible damage, do not slam the hood to ensure that both latches engage. Use a firm downward push at the center of the driver's door. Then reach under the hood and pull upward on the safety latch and lift the hood. 74 UNDERSTANDING THE FEATURES OF YOUR VEHICLE TO OPEN AND CLOSE THE HOOD To open the hood, pull the release lever inside your vehicle located below the instrument panel and in front of the hood to close it.
To prevent possible damage, do not slam the hood to ensure that both latches engage. Use a firm downward push at the center of the driver's door. Then reach under the hood and pull upward on the safety latch and lift the hood. 74 UNDERSTANDING THE FEATURES OF YOUR VEHICLE TO OPEN AND CLOSE THE HOOD To open the hood, pull the release lever inside your vehicle located below the instrument panel and in front of the hood to close it.

Owner's Manual
Page 75
... to the extreme up when the vehicle is moving and block your forward vision. UNDERSTANDING THE FEATURES OF YOUR VEHICLE 75 WARNING! If the hood is not fully latched, it could fly up position will activate all hood latches are also reading lights located above the rear doors, and a rear cargo light.
... to the extreme up when the vehicle is moving and block your forward vision. UNDERSTANDING THE FEATURES OF YOUR VEHICLE 75 WARNING! If the hood is not fully latched, it could fly up position will activate all hood latches are also reading lights located above the rear doors, and a rear cargo light.
Owner's Manual
Page 267
... excess oil and grease should be removed. MAINTAINING YOUR VEHICLE 267 apparent, and/or the system is not functioning as seat tracks, doors, tailgate and hood hinges, should be checked on a level surface with grease fittings for complete service information. With a clean cloth, wipe any lubricant, the parts concerned should be...
... excess oil and grease should be removed. MAINTAINING YOUR VEHICLE 267 apparent, and/or the system is not functioning as seat tracks, doors, tailgate and hood hinges, should be checked on a level surface with grease fittings for complete service information. With a clean cloth, wipe any lubricant, the parts concerned should be...

Owner's Manual
Page 268
268 MAINTAINING YOUR VEHICLE attention should also be given to hood latching components to wipe frost or ice from a dry windshield. The external lock cylinders should be checked for fluid level at regular intervals. Apply a small ... "Washer Fluid Low" message will be indicated. When the sensor detects a low fluid level, the windshield will be displayed. When performing other underhood services, the hood latch, release mechanism and safety catch should be cleaned periodically with a Vehicle Information Center, the low washer fluid level will light on dry glass for...
268 MAINTAINING YOUR VEHICLE attention should also be given to hood latching components to wipe frost or ice from a dry windshield. The external lock cylinders should be checked for fluid level at regular intervals. Apply a small ... "Washer Fluid Low" message will be indicated. When the sensor detects a low fluid level, the windshield will be displayed. When performing other underhood services, the hood latch, release mechanism and safety catch should be cleaned periodically with a Vehicle Information Center, the low washer fluid level will light on dry glass for...
Owner's Manual
Page 269
..., inspect the exhaust system each time the vehicle is raised for broken, damaged, deteriorated, or mispositioned parts. Never try to open the hood until the radiator has had time to seep into the vehicle body is damaged; Coolant Checks Check coolant protection every 12 months (before the... onset of the exhaust system; Care must be badly burned by hot coolant or steam from under the hood, don't open a cooling system pressure cap when the radiator or coolant bottle is 7 Exhaust System The best protection against carbon monoxide entry...
..., inspect the exhaust system each time the vehicle is raised for broken, damaged, deteriorated, or mispositioned parts. Never try to open the hood until the radiator has had time to seep into the vehicle body is damaged; Coolant Checks Check coolant protection every 12 months (before the... onset of the exhaust system; Care must be badly burned by hot coolant or steam from under the hood, don't open a cooling system pressure cap when the radiator or coolant bottle is 7 Exhaust System The best protection against carbon monoxide entry...

Owner's Manual
Page 276
However, low fluid level may be caused by a leak and a checkup may be checked when performing under hood services, or immediately if the brake system warning lamp shows system failure fluid reservoir. Be sure to the requirements described on the brake If necessary, ...
However, low fluid level may be caused by a leak and a checkup may be checked when performing under hood services, or immediately if the brake system warning lamp shows system failure fluid reservoir. Be sure to the requirements described on the brake If necessary, ...
Owner's Manual
Page 334
... Headlights ...77 High Beam ...129 On With Wipers ...77 Heated Mirrors ...61 Heated Seats ...71 Heater, Engine Block ...178 Holder, Cup ...116 Homelink Transmitter ...106 Hood Release ...74 Hoses ...274 Identifying Your Engine ...251,252 Ignition Key ...11 Illuminated Entry ...15 Infant Restraint ...44 Inflation Pressure Tires ...212 Information Center, Vehicle...
... Headlights ...77 High Beam ...129 On With Wipers ...77 Heated Mirrors ...61 Heated Seats ...71 Heater, Engine Block ...178 Holder, Cup ...116 Homelink Transmitter ...106 Hood Release ...74 Hoses ...274 Identifying Your Engine ...251,252 Ignition Key ...11 Illuminated Entry ...15 Infant Restraint ...44 Inflation Pressure Tires ...212 Information Center, Vehicle...
Owner Manual
Page 68
... Keyless Entry Transmitter To Memory ...107 ▫ Memory Position Recall ...108 ▫ To Disable A Transmitter Linked To Memory . . 109 Ⅵ To Open And Close The Hood ...110 Ⅵ Lights ...111 ▫ Interior Lighting ...111 ▫ Front Map/Reading Lights ...111 ▫ Multi-Function Control Lever ...112 ▫ Battery Saver Feature-Exterior...
... Keyless Entry Transmitter To Memory ...107 ▫ Memory Position Recall ...108 ▫ To Disable A Transmitter Linked To Memory . . 109 Ⅵ To Open And Close The Hood ...110 Ⅵ Lights ...111 ▫ Interior Lighting ...111 ▫ Front Map/Reading Lights ...111 ▫ Multi-Function Control Lever ...112 ▫ Battery Saver Feature-Exterior...

Owner Manual
Page 110
Use a firm downward push at the center of the driver's door. Hood Release Lever Underhood Safety Latch To prevent possible damage, do not slam the hood to ensure that both latches engage. Then reach under the hood and pull upward on the safety latch and lift the hood. 110 UNDERSTANDING THE FEATURES OF YOUR VEHICLE TO OPEN AND CLOSE THE HOOD To open the hood, pull the release lever inside your vehicle located below the instrument panel and in front of the hood to close it.
Use a firm downward push at the center of the driver's door. Hood Release Lever Underhood Safety Latch To prevent possible damage, do not slam the hood to ensure that both latches engage. Then reach under the hood and pull upward on the safety latch and lift the hood. 110 UNDERSTANDING THE FEATURES OF YOUR VEHICLE TO OPEN AND CLOSE THE HOOD To open the hood, pull the release lever inside your vehicle located below the instrument panel and in front of the hood to close it.

Owner Manual
Page 111
... turn these lights off , press the recessed area of the lens a second time. 3 Front Map/Reading Lights If the hood is not fully latched, it could fly up position will activate all hood latches are mounted in the overhead console. To turn these lights off , press the recessed area of the lens...
... turn these lights off , press the recessed area of the lens a second time. 3 Front Map/Reading Lights If the hood is not fully latched, it could fly up position will activate all hood latches are mounted in the overhead console. To turn these lights off , press the recessed area of the lens...

Owner Manual
Page 166
... during acceleration, apply as little throttle as possible. If Equipped If this light turns on solid, ESP or TCS may not be checked under the hood. 11. The indicator light will flash at a slower speed continuously after the alarm is arming. x 1000) for about three seconds when the ignition is on...
... during acceleration, apply as little throttle as possible. If Equipped If this light turns on solid, ESP or TCS may not be checked under the hood. 11. The indicator light will flash at a slower speed continuously after the alarm is arming. x 1000) for about three seconds when the ignition is on...

Owner Manual
Page 168
... vehicle is in this display shows the Electronic Vehicle Information Center (EVIC) messages. You or others could damage your vehicle. Follow the warnings under the hood yourself, refer to look under "Cooling System Pressure Cap." If temperature gauge reads (H), pull over and stop the vehicle. The TOW/ HAUL button is dangerous...
... vehicle is in this display shows the Electronic Vehicle Information Center (EVIC) messages. You or others could damage your vehicle. Follow the warnings under the hood yourself, refer to look under "Cooling System Pressure Cap." If temperature gauge reads (H), pull over and stop the vehicle. The TOW/ HAUL button is dangerous...

Owner Manual
Page 172
...(with graphic) • HOOD OPEN (with graphic) • HOOD/DOOR OPEN (with graphic) • HOOD/DOORS OPEN (with graphic) • LIFTGATE/HOOD OPEN (with graphic) • HOOD/GLASS/DOOR OPEN (with graphic) • HOOD/GLASS/DOORS OPEN (with graphic) • HOOD/GATE/DOOR OPEN (with graphic) • HOOD/GATE/DOORS OPEN (with graphic...) • LIFTGLASS/DOOR OPEN (with graphic) • LIFTGLASS/DOORS OPEN (with graphic) • LIFTGLASS/HOOD OPEN (with graphic) • WASHER FLUID LOW (with graphic) • FUEL LOW (with graphic) • CHECK GAUGES • ...
...(with graphic) • HOOD OPEN (with graphic) • HOOD/DOOR OPEN (with graphic) • HOOD/DOORS OPEN (with graphic) • LIFTGATE/HOOD OPEN (with graphic) • HOOD/GLASS/DOOR OPEN (with graphic) • HOOD/GLASS/DOORS OPEN (with graphic) • HOOD/GATE/DOOR OPEN (with graphic) • HOOD/GATE/DOORS OPEN (with graphic...) • LIFTGLASS/DOOR OPEN (with graphic) • LIFTGLASS/DOORS OPEN (with graphic) • LIFTGLASS/HOOD OPEN (with graphic) • WASHER FLUID LOW (with graphic) • FUEL LOW (with graphic) • CHECK GAUGES • ...

Owner Manual
Page 327
... and Genuine Parts for correct fluid type. Prior to the application of a high quality lubricant such as seat tracks, doors, tailgate and hood hinges, should also be wiped clean to remove dust and grit; Apply a small amount of any spilled fluid from moving parts, and ... Lock Cylinder Lubricant directly into the lock cylinder. Body Lubrication Locks and all surfaces. When performing other underhood services, the hood latch, release mechanism and safety catch should be cleaned periodically with the engine off to protect against rust and wear. Use only the...
... and Genuine Parts for correct fluid type. Prior to the application of a high quality lubricant such as seat tracks, doors, tailgate and hood hinges, should also be wiped clean to remove dust and grit; Apply a small amount of any spilled fluid from moving parts, and ... Lock Cylinder Lubricant directly into the lock cylinder. Body Lubrication Locks and all surfaces. When performing other underhood services, the hood latch, release mechanism and safety catch should be cleaned periodically with the engine off to protect against rust and wear. Use only the...

Owner Manual
Page 329
... is sealing properly, the antifreeze/coolant will begin to drain from a garden hose vertically down the face of the condenser. Never try to open the hood until the radiator has had time to seep into the passenger compartment. If you see or hear steam coming from your radiator. If dirty, clean... applicable). If the cap is dirty or rusty in appearance, the system should be badly burned by hot antifreeze/ coolant or steam from under the hood, don't open a cooling system pressure cap when the radiator or coolant bottle is raised for any accumulation of bugs, leaves, etc.
... is sealing properly, the antifreeze/coolant will begin to drain from a garden hose vertically down the face of the condenser. Never try to open the hood until the radiator has had time to seep into the passenger compartment. If you see or hear steam coming from your radiator. If dirty, clean... applicable). If the cap is dirty or rusty in appearance, the system should be badly burned by hot antifreeze/ coolant or steam from under the hood, don't open a cooling system pressure cap when the radiator or coolant bottle is raised for any accumulation of bugs, leaves, etc.
Owner Manual
Page 335
Actual dripping of hot fluid when systems are under hood services, or immediately if the brake system warning lamp shows system failure Be sure to clean the top of the master cylinder area before hose ...
Actual dripping of hot fluid when systems are under hood services, or immediately if the brake system warning lamp shows system failure Be sure to clean the top of the master cylinder area before hose ...

Owner Manual
Page 351
... a bulb needs to be purchased from your authorized dealer or refer to commercial bulb types that can be replaced, visit your authorized dealer. Open the hood. 2. Remove the headlamp cover. 7 BULB REPLACEMENT Head Light 1. MAINTAINING YOUR VEHICLE 351 Exterior Lights Bulb Type Front Park/Turn Light (Laredo) ...3157A Front Side Marker...
... a bulb needs to be purchased from your authorized dealer or refer to commercial bulb types that can be replaced, visit your authorized dealer. Open the hood. 2. Remove the headlamp cover. 7 BULB REPLACEMENT Head Light 1. MAINTAINING YOUR VEHICLE 351 Exterior Lights Bulb Type Front Park/Turn Light (Laredo) ...3157A Front Side Marker...

Owner Manual
Page 353
Disconnect the electrical connector and replace the bulb. MAINTAINING YOUR VEHICLE 353 Front Turn Signal 1. Remove the headlamp cover. 3. Turn the turn signal bulb 1/4 turn counter clockwise to remove from housing. 7 4. Open the hood. 2.
Disconnect the electrical connector and replace the bulb. MAINTAINING YOUR VEHICLE 353 Front Turn Signal 1. Remove the headlamp cover. 3. Turn the turn signal bulb 1/4 turn counter clockwise to remove from housing. 7 4. Open the hood. 2.
Owner Manual
Page 398
398 INDEX Speedometer ...Tachometer ...Gear Ranges ...General Information Glass Cleaning ... ... ... ... ... ... ... ... ... ... ... ... ... ... ... ... ... ... ... ... ... . . 164 . . 166 . . 234 20,275 . . 343 Holder, Cup ...Homelink Transmitter Hood Release ...Hoses ... ... ... ... ... ... ... ... ... ... ... ... ... ... ... ... ... ... ... ... ... 149 138 110 334 Hands-Free Phone ...76 Hazard Warning Flasher ...296 Head Restraints ...101 Head Rests ...101 Headlights ...113 Bulb Replacement ...351 ...
398 INDEX Speedometer ...Tachometer ...Gear Ranges ...General Information Glass Cleaning ... ... ... ... ... ... ... ... ... ... ... ... ... ... ... ... ... ... ... ... ... . . 164 . . 166 . . 234 20,275 . . 343 Holder, Cup ...Homelink Transmitter Hood Release ...Hoses ... ... ... ... ... ... ... ... ... ... ... ... ... ... ... ... ... ... ... ... ... 149 138 110 334 Hands-Free Phone ...76 Hazard Warning Flasher ...296 Head Restraints ...101 Head Rests ...101 Headlights ...113 Bulb Replacement ...351 ...
