Owner's Manual
Page 23
... . To Disarm the System To disarm the system, use the power door lock switch while the door is arming. Test the transmitter operation. During this occurs, press the "Unlock" button on top of the instrument panel will flash for tampering. If something has triggered the system in the... vehicle and lock the doors with the transmitter, once the system is activated, the system provides both audible and visual ...
... . To Disarm the System To disarm the system, use the power door lock switch while the door is arming. Test the transmitter operation. During this occurs, press the "Unlock" button on top of the instrument panel will flash for tampering. If something has triggered the system in the... vehicle and lock the doors with the transmitter, once the system is activated, the system provides both audible and visual ...

Owner's Manual
Page 24
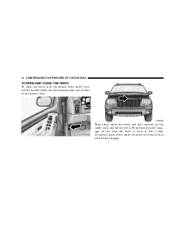
24 THINGS TO KNOW BEFORE STARTING YOUR VEHICLE transmitter to disarm the system. You may also accidentally disarm the system by unlocking the driver's door with the key and then locking it. POWER WINDOWS The power window controls are located on the front passenger door which operates the passenger door window. The door will be locked but the Security Alarm will not arm. There is a single switch on the driver's door trim panel.
24 THINGS TO KNOW BEFORE STARTING YOUR VEHICLE transmitter to disarm the system. You may also accidentally disarm the system by unlocking the driver's door with the key and then locking it. POWER WINDOWS The power window controls are located on the front passenger door which operates the passenger door window. The door will be locked but the Security Alarm will not arm. There is a single switch on the driver's door trim panel.
Owner's Manual
Page 25
...switches that are located on the ears or a helicopter type sound in certain 2 Opening a vehicle front door will go down , or the sunroof (if equipped) in the ears. The power window switches remain active... for up to stop. Auto Down Feature - If Equipped The driver's door window switch has an "Auto Down" feature. THINGS TO KNOW BEFORE STARTING YOUR VEHICLE 25 The window... lock switch located next to the power door lock switch allows you want the window to 45 seconds after the ignition switch has been...
...switches that are located on the ears or a helicopter type sound in certain 2 Opening a vehicle front door will go down , or the sunroof (if equipped) in the ears. The power window switches remain active... for up to stop. Auto Down Feature - If Equipped The driver's door window switch has an "Auto Down" feature. THINGS TO KNOW BEFORE STARTING YOUR VEHICLE 25 The window... lock switch located next to the power door lock switch allows you want the window to 45 seconds after the ignition switch has been...

Owner's Manual
Page 39
...39 WARNING! • Relying on the airbags alone could lead to the steering wheel or instrument panel during airbag deployment could cause serious injury. Do not lean against the door or window. Always wear your seat belt to restrain you have airbags. • Being too ...Airbag • Window Bags above Side Windows (If Equipped) • Side Impact Sensors (If Equipped) • Steering Wheel and Column • Instrument Panel • Crash Sensor • Interconnecting Wiring • Knee Impact Bolsters 2 In some collisions the airbags won't deploy at all. The airbags work ...
...39 WARNING! • Relying on the airbags alone could lead to the steering wheel or instrument panel during airbag deployment could cause serious injury. Do not lean against the door or window. Always wear your seat belt to restrain you have airbags. • Being too ...Airbag • Window Bags above Side Windows (If Equipped) • Side Impact Sensors (If Equipped) • Steering Wheel and Column • Instrument Panel • Crash Sensor • Interconnecting Wiring • Knee Impact Bolsters 2 In some collisions the airbags won't deploy at all. The airbags work ...
Owner's Manual
Page 61
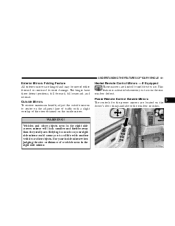
... are hinged and may be moved either forward or rearward to resist damage. Use your right side mirror could cause you turn on the driver's door trim panel above the window switches. 3 WARNING! Outside Mirrors To receive maximum benefit, adjust the outside mirrors to melt frost or ice. Heated Remote Control Mirrors...
... are hinged and may be moved either forward or rearward to resist damage. Use your right side mirror could cause you turn on the driver's door trim panel above the window switches. 3 WARNING! Outside Mirrors To receive maximum benefit, adjust the outside mirrors to melt frost or ice. Heated Remote Control Mirrors...

Owner's Manual
Page 68
... and to return the seatback to saved positions. 68 UNDERSTANDING THE FEATURES OF YOUR VEHICLE Power Reclining Seat The recliner control is on the driver's door panel can be seriously or even fatally injured. Use the recliner only when the vehicle is no longer resting against your Remote Keyless Entry Transmitter or...
... and to return the seatback to saved positions. 68 UNDERSTANDING THE FEATURES OF YOUR VEHICLE Power Reclining Seat The recliner control is on the driver's door panel can be seriously or even fatally injured. Use the recliner only when the vehicle is no longer resting against your Remote Keyless Entry Transmitter or...
Owner's Manual
Page 74
To prevent possible damage, do not slam the hood to ensure that both latches engage. Use a firm downward push at the center of the driver's door. Then reach under the hood and pull upward on the safety latch and lift the hood. 74 UNDERSTANDING THE FEATURES OF YOUR VEHICLE TO OPEN AND CLOSE THE HOOD To open the hood, pull the release lever inside your vehicle located below the instrument panel and in front of the hood to close it.
To prevent possible damage, do not slam the hood to ensure that both latches engage. Use a firm downward push at the center of the driver's door. Then reach under the hood and pull upward on the safety latch and lift the hood. 74 UNDERSTANDING THE FEATURES OF YOUR VEHICLE TO OPEN AND CLOSE THE HOOD To open the hood, pull the release lever inside your vehicle located below the instrument panel and in front of the hood to close it.

Owner's Manual
Page 75
...Lights These lights are also reading lights located above the rear doors, and a rear cargo light. Each light can be turned on by pressing the recessed area of courtesy lights mounted below the instrument panel, an overhead console light assembly which contains both driver and passenger... reading lights, reading lights located above the rear doors. There are mounted in the overhead console. UNDERSTANDING THE FEATURES OF ...
...Lights These lights are also reading lights located above the rear doors, and a rear cargo light. Each light can be turned on by pressing the recessed area of courtesy lights mounted below the instrument panel, an overhead console light assembly which contains both driver and passenger... reading lights, reading lights located above the rear doors. There are mounted in the overhead console. UNDERSTANDING THE FEATURES OF ...
Owner's Manual
Page 78
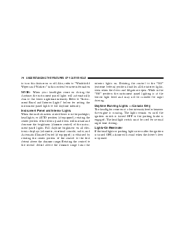
Instrument Panel and Interior Lights When the multi-function control lever is in the parklight, headlights, or AUTO position (if equipped), rotating the center portion of the lever up and down will sound when the driver's door is turned OFF, a chime will increase and decrease the brightness (dimmer ...Only The headlights come on all the interior lights, even when the doors and liftgate are on after the ignition is opened. The lights remain on . The headlight switch must be suitable for setting the instrument panel lights to the lower nighttime intensity. Rotating the control to the ...
Instrument Panel and Interior Lights When the multi-function control lever is in the parklight, headlights, or AUTO position (if equipped), rotating the center portion of the lever up and down will sound when the driver's door is turned OFF, a chime will increase and decrease the brightness (dimmer ...Only The headlights come on all the interior lights, even when the doors and liftgate are on after the ignition is opened. The lights remain on . The headlight switch must be suitable for setting the instrument panel lights to the lower nighttime intensity. Rotating the control to the ...
Owner's Manual
Page 96
... select "Yes" or "No." Remote Unlock Driver's Door 1st? Pressing the STEP button when in P (Park) or N (Neutral) position. The overhead console and instrument panel displays will be in this feature is selected all doors and the liftgate lock automatically when the speed of the ...remote keyless entry unlock button and require a second press to unlock the remaining locked doors and liftgate. Pressing the STEP button...
... select "Yes" or "No." Remote Unlock Driver's Door 1st? Pressing the STEP button when in P (Park) or N (Neutral) position. The overhead console and instrument panel displays will be in this feature is selected all doors and the liftgate lock automatically when the speed of the ...remote keyless entry unlock button and require a second press to unlock the remaining locked doors and liftgate. Pressing the STEP button...
Owner's Manual
Page 113
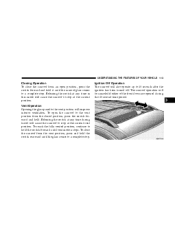
... close the sunroof from the vent position, press and hold the switch rearward until the glass comes to a complete stop. Vent Operation Opening the glass panel to the vent position from the closed position, press the switch forward and hold. The sunroof operation will be canceled if either of the front...
... close the sunroof from the vent position, press and hold the switch rearward until the glass comes to a complete stop. Vent Operation Opening the glass panel to the vent position from the closed position, press the switch forward and hold. The sunroof operation will be canceled if either of the front...

Owner's Manual
Page 156
The door is parked in an underground parking structure or under a physical obstacle. • Dense tree coverage may crack if dropped or knocked against a hard surface. 156 UNDERSTANDING YOUR INSTRUMENT PANEL Reception Quality Satellite reception may be interrupted due to one of the following reasons. •... blockage. 10-DISC REMOTE CD CHANGER Loading the CD Changer Removing the CD Changer Magazine NOTE: Always keep the CD changer door closed except when ejecting or installing the magazines. Handle the magazine with reasonable care. The magazine may interrupt reception in the ...
The door is parked in an underground parking structure or under a physical obstacle. • Dense tree coverage may crack if dropped or knocked against a hard surface. 156 UNDERSTANDING YOUR INSTRUMENT PANEL Reception Quality Satellite reception may be interrupted due to one of the following reasons. •... blockage. 10-DISC REMOTE CD CHANGER Loading the CD Changer Removing the CD Changer Magazine NOTE: Always keep the CD changer door closed except when ejecting or installing the magazines. Handle the magazine with reasonable care. The magazine may interrupt reception in the ...
Owner's Manual
Page 157
UNDERSTANDING YOUR INSTRUMENT PANEL 157 1. Press the EJECT button. Slide the CD changer door all the way to the right. 4 3. Open the CD changer compartment located in the right rear cargo area. 2.
UNDERSTANDING YOUR INSTRUMENT PANEL 157 1. Press the EJECT button. Slide the CD changer door all the way to the right. 4 3. Open the CD changer compartment located in the right rear cargo area. 2.
Owner's Manual
Page 158
158 UNDERSTANDING YOUR INSTRUMENT PANEL 4. If the discs are installed upside down "CD Err" will be displayed on the magazine label (up and out of the CD changer. Gently remove the magazine by sliding it up to the left. Loading Discs into the Magazine Gently slide the discs into the magazine with the disc label in the direction indicated on the radio. 5. Close the CD changer door by pulling it to 10 discs).
158 UNDERSTANDING YOUR INSTRUMENT PANEL 4. If the discs are installed upside down "CD Err" will be displayed on the magazine label (up and out of the CD changer. Gently remove the magazine by sliding it up to the left. Loading Discs into the Magazine Gently slide the discs into the magazine with the disc label in the direction indicated on the radio. 5. Close the CD changer door by pulling it to 10 discs).
Owner's Manual
Page 159
If a CD adaptor for 3 inch (8 cm) discs is a light spring tension holding the disc in the right rear cargo area. 2. Removing Discs from the Magazine To remove the disc, gently press on the exposed edge of the disc. There is used, the disc will not be ejected. Slide the CD changer door all the way to the right to disassemble the magazine. Installing the CD Changer Magazine 1. NOTE: Do not attempt to access the magazine slot. 4 Open the CD changer compartment located in place. UNDERSTANDING YOUR INSTRUMENT PANEL 159 NOTE: Do not use 3 inch (8 cm) discs in the magazine.
If a CD adaptor for 3 inch (8 cm) discs is a light spring tension holding the disc in the right rear cargo area. 2. Removing Discs from the Magazine To remove the disc, gently press on the exposed edge of the disc. There is used, the disc will not be ejected. Slide the CD changer door all the way to the right to disassemble the magazine. Installing the CD Changer Magazine 1. NOTE: Do not attempt to access the magazine slot. 4 Open the CD changer compartment located in place. UNDERSTANDING YOUR INSTRUMENT PANEL 159 NOTE: Do not use 3 inch (8 cm) discs in the magazine.
Owner's Manual
Page 160
Insert the magazine into the changer slot with a push-button in the same direction as the word Jeep on the rear surface of the steering wheel. Reach behind the wheel to close the changer door. Slide the changer door to the left to access the switches. 4. The right hand control is a rocker type switch... facing in the center and controls the volume and REMOTE SOUND SYSTEM CONTROLS - IF EQUIPPED The remote sound system controls are located on the changer door (disc loading slots facing to the right). 160 UNDERSTANDING YOUR INSTRUMENT...
Insert the magazine into the changer slot with a push-button in the same direction as the word Jeep on the rear surface of the steering wheel. Reach behind the wheel to close the changer door. Slide the changer door to the left to access the switches. 4. The right hand control is a rocker type switch... facing in the center and controls the volume and REMOTE SOUND SYSTEM CONTROLS - IF EQUIPPED The remote sound system controls are located on the changer door (disc loading slots facing to the right). 160 UNDERSTANDING YOUR INSTRUMENT...

Owner's Manual
Page 283
Special Care • If you carry special cargo such as possible. The cost of such repairs is considered the responsibility of the doors, rocker panels, and rear liftgate must be cleaned regularly with mild soap and water to prevent corrosion. Avoid automatic car washes that use acidic solutions or harsh ...
Special Care • If you carry special cargo such as possible. The cost of such repairs is considered the responsibility of the doors, rocker panels, and rear liftgate must be cleaned regularly with mild soap and water to prevent corrosion. Avoid automatic car washes that use acidic solutions or harsh ...

Owner Manual
Page 17
... the vehicle until you press the door lock switch while the keys are in Section 4 of this switch to "Electronic Vehicle Information Center (EVIC) - It will reset whenever a door is closed . The rear doors cannot be turned on each front door panel. This feature is selectable and can... be opened . Press this manual or see your door locks will lock automatically if the vehicle speed is open, the...
... the vehicle until you press the door lock switch while the keys are in Section 4 of this switch to "Electronic Vehicle Information Center (EVIC) - It will reset whenever a door is closed . The rear doors cannot be turned on each front door panel. This feature is selectable and can... be opened . Press this manual or see your door locks will lock automatically if the vehicle speed is open, the...

Owner Manual
Page 25
... your passengers could be injured by these fumes. You and your vehicle. Keep the flipper glass closed when you are located on the driver's door trim panel. THINGS TO KNOW BEFORE STARTING YOUR VEHICLE 25 Once the liftgate flipper glass has been opened, connection to the rear window wiper is interrupted, preventing...
... your passengers could be injured by these fumes. You and your vehicle. Keep the flipper glass closed when you are located on the driver's door trim panel. THINGS TO KNOW BEFORE STARTING YOUR VEHICLE 25 Once the liftgate flipper glass has been opened, connection to the rear window wiper is interrupted, preventing...
Owner Manual
Page 106
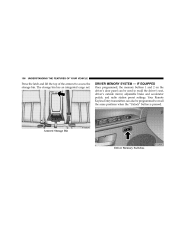
.... Armrest Storage Bin Driver Memory Switches The storage bin has an integrated cargo net. IF EQUIPPED Once programmed, the memory buttons 1 and 2 on the driver's door panel can also be used to access the storage bin. 106 UNDERSTANDING THE FEATURES OF YOUR VEHICLE Press the latch and lift the top of the...
.... Armrest Storage Bin Driver Memory Switches The storage bin has an integrated cargo net. IF EQUIPPED Once programmed, the memory buttons 1 and 2 on the driver's door panel can also be used to access the storage bin. 106 UNDERSTANDING THE FEATURES OF YOUR VEHICLE Press the latch and lift the top of the...


