

Owner's Manual
Page 5
Your Vehicle at a Glance INSTRUMENT PANEL INDICATORS (P.57) GAUGES (P.64) DRIVER'S FRONT AIRBAG (P.9, 23) HAZARD WARNING BUTTON (P.73) MOONROOF SWITCH (P.99) CLOCK (P.173) Your Vehicle at a Glance MIRROR CONTROLS (P.101) PASSENGER'S FRONT AIRBAG (P.9, 23) AUDIO SYSTEM (P.115) POWER DOOR LOCK MASTER SWITCH (P.79) POWER WINDOW SWITCHES (P.97) HEATING/COOLING CONTROLS (P.110) HOOD RELEASE HANDLE (P.182) A/T model is shown. FUEL FILL DOOR/ TRUNK RELEASE HANDLE (P.181, 89) ACCESSORY POWER SOCKETS (P.105) AUTOMATIC TRANSMISSION (P.198) MANUAL TRANSMISSION (P.195) 3
Your Vehicle at a Glance INSTRUMENT PANEL INDICATORS (P.57) GAUGES (P.64) DRIVER'S FRONT AIRBAG (P.9, 23) HAZARD WARNING BUTTON (P.73) MOONROOF SWITCH (P.99) CLOCK (P.173) Your Vehicle at a Glance MIRROR CONTROLS (P.101) PASSENGER'S FRONT AIRBAG (P.9, 23) AUDIO SYSTEM (P.115) POWER DOOR LOCK MASTER SWITCH (P.79) POWER WINDOW SWITCHES (P.97) HEATING/COOLING CONTROLS (P.110) HOOD RELEASE HANDLE (P.182) A/T model is shown. FUEL FILL DOOR/ TRUNK RELEASE HANDLE (P.181, 89) ACCESSORY POWER SOCKETS (P.105) AUTOMATIC TRANSMISSION (P.198) MANUAL TRANSMISSION (P.195) 3

Owner's Manual
Page 6
... (P.170) VOICE CONTROL SWITCHES 1 2 WINDSHIELD WIPERS/WASHERS (P.70) PASSENGER AIRBAG OFF INDICATOR (P.29) 3 3 TILT/ TELESCOPIC ADJUSTMENT (P.74) CRUISE CONTROL BUTTONS (P.175) HAZARD WARNING BUTTON (P.73) 3 ACCESSORY POWER SOCKET (P.105) 1: 2: 3: Only on vehicles equipped with navigation system.
... (P.170) VOICE CONTROL SWITCHES 1 2 WINDSHIELD WIPERS/WASHERS (P.70) PASSENGER AIRBAG OFF INDICATOR (P.29) 3 3 TILT/ TELESCOPIC ADJUSTMENT (P.74) CRUISE CONTROL BUTTONS (P.175) HAZARD WARNING BUTTON (P.73) 3 ACCESSORY POWER SOCKET (P.105) 1: 2: 3: Only on vehicles equipped with navigation system.

Owner's Manual
Page 18
... driving, remember to sit upright and adjust the seat as far back as possible while allowing full control of the vehicle. Do not put any accessories on your lap, or driving with a pipe or other sharp object in your mouth, can result in injuries if your front airbag inflates. 16 If...
... driving, remember to sit upright and adjust the seat as far back as possible while allowing full control of the vehicle. Do not put any accessories on your lap, or driving with a pipe or other sharp object in your mouth, can result in injuries if your front airbag inflates. 16 If...

Owner's Manual
Page 51
... safely ride up straight, back against the seat, and feet on a seat belt. Devices intended to in a crash. 49 Do not let a child put any accessories on or near the floor. Protecting Larger Children If you decide that a child can make sure you understand all seat belt instructions and all safety...
... safely ride up straight, back against the seat, and feet on a seat belt. Devices intended to in a crash. 49 Do not let a child put any accessories on or near the floor. Protecting Larger Children If you decide that a child can make sure you understand all seat belt instructions and all safety...

Owner's Manual
Page 55
... Windows ...97 Moonroof ...99 Mirrors ...101 Parking Brake ...102 Interior Convenience Items ...103 Beverage Holders ...104 Console Compartment ...104 Glove Box ...104 Coat Hook ...105 Accessory Power Sockets...105 Vanity Mirror ...106 Sun Visor ...106 Interior Lights ...107 Ceiling Light ...107 Spotlights ...107 Courtesy Light ...108 Instruments and Controls 53 Instruments...
... Windows ...97 Moonroof ...99 Mirrors ...101 Parking Brake ...102 Interior Convenience Items ...103 Beverage Holders ...104 Console Compartment ...104 Glove Box ...104 Coat Hook ...105 Accessory Power Sockets...105 Vanity Mirror ...106 Sun Visor ...106 Interior Lights ...107 Ceiling Light ...107 Spotlights ...107 Courtesy Light ...108 Instruments and Controls 53 Instruments...

Owner's Manual
Page 56
FUEL FILL DOOR/ TRUNK RELEASE HANDLE (P. 181, 89) ACCESSORY POWER SOCKETS (P. 105) HEATING/ COOLING CONTROLS (P. 110) HAZARD WARNING BUTTON (P. 73) 54 Control Locations MOONROOF SWITCH (P. 98) INSTRUMENT PANEL INDICATORS (P. 57) GAUGES (P. 64) CLOCK (P. 173) MIRROR CONTROLS (P. 101) POWER DOOR LOCK MASTER SWITCH (P. 79) AUDIO SYSTEM (P. 115) POWER WINDOW SWITCHES (P. 97) HOOD RELEASE HANDLE (P. 182) A/T model is shown.
FUEL FILL DOOR/ TRUNK RELEASE HANDLE (P. 181, 89) ACCESSORY POWER SOCKETS (P. 105) HEATING/ COOLING CONTROLS (P. 110) HAZARD WARNING BUTTON (P. 73) 54 Control Locations MOONROOF SWITCH (P. 98) INSTRUMENT PANEL INDICATORS (P. 57) GAUGES (P. 64) CLOCK (P. 173) MIRROR CONTROLS (P. 101) POWER DOOR LOCK MASTER SWITCH (P. 79) AUDIO SYSTEM (P. 115) POWER WINDOW SWITCHES (P. 97) HOOD RELEASE HANDLE (P. 182) A/T model is shown.

Owner's Manual
Page 65
If you turn the ignition switch to the ACCESSORY (I) or LOCK (0) position without turning off the light switch, this indicator will also sound when you open the driver's door. A reminder beeper will stay on ...
If you turn the ignition switch to the ACCESSORY (I) or LOCK (0) position without turning off the light switch, this indicator will also sound when you open the driver's door. A reminder beeper will stay on ...

Owner's Manual
Page 71
... MIRRORS (P. 102) TILT/ TELESCOPIC ADJUSTMENT (P. 74) CRUISE CONTROL BUTTONS (P. 175) HAZARD WARNING BUTTON (P. 73) HORN REMOTE AUDIO CONTROLS (P. 170) 1 2 2 2 Vehicle without navigation system is shown. ACCESSORY POWER SOCKET (P. 105) 1 To use the horn, press the center pad of the steering wheel. 2 If equipped. 69
... MIRRORS (P. 102) TILT/ TELESCOPIC ADJUSTMENT (P. 74) CRUISE CONTROL BUTTONS (P. 175) HAZARD WARNING BUTTON (P. 73) HORN REMOTE AUDIO CONTROLS (P. 170) 1 2 2 2 Vehicle without navigation system is shown. ACCESSORY POWER SOCKET (P. 105) 1 To use the horn, press the center pad of the steering wheel. 2 If equipped. 69

Owner's Manual
Page 79
...interference, and (2) this position. START (III) Use this position. LOCK (0) You can operate the audio system and the accessory power sockets in slightly. Instruments and Controls ACCESSORY (I ), ON (II), and START (III). The switch returns to start the engine. Several of the key. CONTINUED ... To turn the key, push it difficult to the left or right as a test when you turn the ignition switch from the ACCESSORY (I) to operate the equipment. Immobilizer System, Ignition Switch As required by the party responsible for compliance could void the user's authority ...
...interference, and (2) this position. START (III) Use this position. LOCK (0) You can operate the audio system and the accessory power sockets in slightly. Instruments and Controls ACCESSORY (I ), ON (II), and START (III). The switch returns to start the engine. Several of the key. CONTINUED ... To turn the key, push it difficult to the left or right as a test when you turn the ignition switch from the ACCESSORY (I) to operate the equipment. Immobilizer System, Ignition Switch As required by the party responsible for compliance could void the user's authority ...

Owner's Manual
Page 80
..., then close the door. Removing the key from the ignition switch only when parked. This can cause you can be in the LOCK (0) or the ACCESSORY (I) position and open the driver's door.
..., then close the door. Removing the key from the ignition switch only when parked. This can cause you can be in the LOCK (0) or the ACCESSORY (I) position and open the driver's door.
Owner's Manual
Page 83
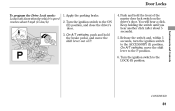
Push and hold the brake pedal, and move the shift lever to the ACCESSORY (I) position. Turn the ignition switch to the ON (II) position, and close the driver's door. 3. Apply the parking brake. 2. You will hear a click. Keep holding ...
Push and hold the brake pedal, and move the shift lever to the ACCESSORY (I) position. Turn the ignition switch to the ON (II) position, and close the driver's door. 3. Apply the parking brake. 2. You will hear a click. Keep holding ...

Owner's Manual
Page 86
...'s door. 3. Turn the ignition switch to activate all doors unlock. 5. On A/T vehicles, push and hold the brake pedal, then move the shift lever to the ACCESSORY (I) position. Continue to hold the rear of the ON (II) position. 1. You will hear a click. Turn the ignition switch to the LOCK (0) position. 84...
...'s door. 3. Turn the ignition switch to activate all doors unlock. 5. On A/T vehicles, push and hold the brake pedal, then move the shift lever to the ACCESSORY (I) position. Continue to hold the rear of the ON (II) position. 1. You will hear a click. Turn the ignition switch to the LOCK (0) position. 84...

Owner's Manual
Page 105
Interior Convenience Items CONSOLE COMPARTMENT SIDE POCKET COAT HOOK SUN VISOR VANITY MIRROR ACCESSORY POWER SOCKET Instruments and Controls BEVERAGE HOLDER GLOVE BOX CENTER POCKET BEVERAGE HOLDER :If equipped ACCESSORY POWER SOCKET MAP POCKET 103
Interior Convenience Items CONSOLE COMPARTMENT SIDE POCKET COAT HOOK SUN VISOR VANITY MIRROR ACCESSORY POWER SOCKET Instruments and Controls BEVERAGE HOLDER GLOVE BOX CENTER POCKET BEVERAGE HOLDER :If equipped ACCESSORY POWER SOCKET MAP POCKET 103

Owner's Manual
Page 107
Close it . CONTINUED 105 Make sure the coat hook is intended to your passenger in the ACCESSORY (I) or ON (II) position. This socket is closed while driving. COAT HOOK Accessory Power Sockets Instruments and Controls To use an accessory power socket, the ignition switch must be in a crash, even if the passenger is not... designed for 12 volt DC accessories that are not using it with a firm push. To use a coat hook, pull it down. This hook is wearing the seat belt. Always keep the ...
Close it . CONTINUED 105 Make sure the coat hook is intended to your passenger in the ACCESSORY (I) or ON (II) position. This socket is closed while driving. COAT HOOK Accessory Power Sockets Instruments and Controls To use an accessory power socket, the ignition switch must be in a crash, even if the passenger is not... designed for 12 volt DC accessories that are not using it with a firm push. To use a coat hook, pull it down. This hook is wearing the seat belt. Always keep the ...

Owner's Manual
Page 108
... out. Make sure you are being used, the combined power rating of the vehicle. 106 When both sockets are getting into or out of the accessories should be 120 watts or less (10 amps). When using the sun visor for the side window, remove the support rod from the clip, and... the sun visor, pull up the cover. Interior Convenience Items Vanity Mirror Sun Visor EX and Si SUN VISOR On EX and Si models Another accessory power socket is in place when you put the sun visor back in the center console compartment. To use the vanity mirror on the back...
... out. Make sure you are being used, the combined power rating of the vehicle. 106 When both sockets are getting into or out of the accessories should be 120 watts or less (10 amps). When using the sun visor for the side window, remove the support rod from the clip, and... the sun visor, pull up the cover. Interior Convenience Items Vanity Mirror Sun Visor EX and Si SUN VISOR On EX and Si models Another accessory power socket is in place when you put the sun visor back in the center console compartment. To use the vanity mirror on the back...

Owner's Manual
Page 118
... audio controls. Push and hold the TUNE knob, then push the power/volume knob on the display when your message. You will return to the ACCESSORY (I) or the ON (II) position. Repeat this welcome message to set up to about 5 seconds after you turn the TUNE knob to change the letter...
... audio controls. Push and hold the TUNE knob, then push the power/volume knob on the display when your message. You will return to the ACCESSORY (I) or the ON (II) position. Repeat this welcome message to set up to about 5 seconds after you turn the TUNE knob to change the letter...

Owner's Manual
Page 120
... AM/FM Radio The ignition switch must be displayed if the station is not available. When it finds one, it will see SCAN in the ACCESSORY (I) or ON (II) position. Turn the system on the selected band. Adjust the volume by pushing the power/volume knob or the AM or FM...
... AM/FM Radio The ignition switch must be displayed if the station is not available. When it finds one, it will see SCAN in the ACCESSORY (I) or ON (II) position. Turn the system on the selected band. Adjust the volume by pushing the power/volume knob or the AM or FM...

Owner's Manual
Page 124
.../MODE button, the display changes in the display. If this happens, there is nothing wrong with your system. Push the power/volume knob to the ACCESSORY (I) or the ON (II) position. Each time you can select all of the CATEGORY button ( or ) to change channel selections. You may experience periods when...
.../MODE button, the display changes in the display. If this happens, there is nothing wrong with your system. Push the power/volume knob to the ACCESSORY (I) or the ON (II) position. Each time you can select all of the CATEGORY button ( or ) to change channel selections. You may experience periods when...

Owner's Manual
Page 127
... a road beside a vertical wall, steep cliff, or hill to XM radio broadcasts. After you've registered with XM Radio, keep your vehicle remains in the ACCESSORY (I .D. While waiting for activation, make sure your audio system in the display. Receiving Satellite Radio Service If your XM Radio service has expired or you...
... a road beside a vertical wall, steep cliff, or hill to XM radio broadcasts. After you've registered with XM Radio, keep your vehicle remains in the ACCESSORY (I .D. While waiting for activation, make sure your audio system in the display. Receiving Satellite Radio Service If your XM Radio service has expired or you...

Owner's Manual
Page 129
... play CD-Rs and CD-RWs compressed in the display. In WMA format, ''WMA'' will continuously play a disc until you will see ''CD'' in the ACCESSORY (I) or ON (II) position. When playing a disc in the unit.
... play CD-Rs and CD-RWs compressed in the display. In WMA format, ''WMA'' will continuously play a disc until you will see ''CD'' in the ACCESSORY (I) or ON (II) position. When playing a disc in the unit.


