

Owner's Manual
Page 1
... owner's manual, click on authorized manuals or go to start the engine, shift the transmission, and park, plus towing a trailer. Before Driving...179 What gasoline to use, how to break-in your new Acura, and how to the dealer. and Canada) ...291 A summary of your vehicle to contact us. Comfort and Convenience Features ...109 How to load luggage and other convenience features. Instruments and Controls ...53 Instrument panel...
... owner's manual, click on authorized manuals or go to start the engine, shift the transmission, and park, plus towing a trailer. Before Driving...179 What gasoline to use, how to break-in your new Acura, and how to the dealer. and Canada) ...291 A summary of your vehicle to contact us. Comfort and Convenience Features ...109 How to load luggage and other convenience features. Instruments and Controls ...53 Instrument panel...

Owner's Manual
Page 6
... the horn, press the center pad of the steering wheel. Your Vehicle at a Glance HEADLIGHTS/TURN SIGNALS (P.71) INSTRUMENT PANEL BRIGHTNESS (P.72) DISPLAY CHANGE BUTTON (P.65) SEL/RESET BUTTON (P.64) MIRROR CONTROLS (P.101) VEHICLE STABILITY ASSIST (VSA) SYSTEM OFF SWITCH (P.207) REAR WINDOW DEFOGGER (P.73) HEATED MIRRORS (P.102) HORN REMOTE AUDIO CONTROLS (P.170) VOICE CONTROL SWITCHES 1 2 WINDSHIELD WIPERS/WASHERS (P.70) PASSENGER AIRBAG OFF INDICATOR (P.29) 3 3 TILT/ TELESCOPIC ADJUSTMENT (P.74) CRUISE CONTROL BUTTONS (P.175) HAZARD WARNING BUTTON (P.73) 3 ACCESSORY POWER SOCKET...
... the horn, press the center pad of the steering wheel. Your Vehicle at a Glance HEADLIGHTS/TURN SIGNALS (P.71) INSTRUMENT PANEL BRIGHTNESS (P.72) DISPLAY CHANGE BUTTON (P.65) SEL/RESET BUTTON (P.64) MIRROR CONTROLS (P.101) VEHICLE STABILITY ASSIST (VSA) SYSTEM OFF SWITCH (P.207) REAR WINDOW DEFOGGER (P.73) HEATED MIRRORS (P.102) HORN REMOTE AUDIO CONTROLS (P.170) VOICE CONTROL SWITCHES 1 2 WINDSHIELD WIPERS/WASHERS (P.70) PASSENGER AIRBAG OFF INDICATOR (P.29) 3 3 TILT/ TELESCOPIC ADJUSTMENT (P.74) CRUISE CONTROL BUTTONS (P.175) HAZARD WARNING BUTTON (P.73) 3 ACCESSORY POWER SOCKET...

Owner's Manual
Page 9
...your passengers. (8) (11) (7) (5) Driver and Passenger Safety (7) (2) (12) (8) (10) (2) (1) Safety Cage (2) Crush Zone (3) Seats and Seat-Backs (4) Head Restraints (5) Collapsible Steering Column (6) Seat Belts (7) Front Airbags (8) Side Airbags (9) Side Curtain Airbags (10) Front Seat Belt Tensioners (11) Door Locks (12) Front Seat Belt Buckle Tensioners 7 and tensioners that forms a safety cage around the passenger compartment; These include a strong steel framework that tighten the front seat belts in a crash. Your Vehicle's Safety Features (1) (3) (4) (6) (9) Your vehicle is...
...your passengers. (8) (11) (7) (5) Driver and Passenger Safety (7) (2) (12) (8) (10) (2) (1) Safety Cage (2) Crush Zone (3) Seats and Seat-Backs (4) Head Restraints (5) Collapsible Steering Column (6) Seat Belts (7) Front Airbags (8) Side Airbags (9) Side Curtain Airbags (10) Front Seat Belt Tensioners (11) Door Locks (12) Front Seat Belt Buckle Tensioners 7 and tensioners that forms a safety cage around the passenger compartment; These include a strong steel framework that tighten the front seat belts in a crash. Your Vehicle's Safety Features (1) (3) (4) (6) (9) Your vehicle is...

Owner's Manual
Page 28
... the folded rear seat. Additional Information About Your Airbags Be aware that objects placed on the seat or floor behind the front passenger's seat is turned off, a ''passenger airbag off indicator will be turned off . To ensure that the passenger's advanced front airbag system will detect rapid acceleration and signal the control unit to the floor mat anchor (see page 29 ). Moving the front seat or seat-back forcibly...
... the folded rear seat. Additional Information About Your Airbags Be aware that objects placed on the seat or floor behind the front passenger's seat is turned off, a ''passenger airbag off indicator will be turned off . To ensure that the passenger's advanced front airbag system will detect rapid acceleration and signal the control unit to the floor mat anchor (see page 29 ). Moving the front seat or seat-back forcibly...

Owner's Manual
Page 55
... Gauge ...67 Check Fuel Cap Indicator ...67 Maintenance Minder ...68 Controls Near the Steering Wheel ...69 Windshield Wipers and Washers .. 70 Turn Signal and Headlights...71 Instrument Panel Brightness ...72 Hazard Warning Button ...73 Rear Window Defogger ...73 Steering Wheel Adjustments ...74 Keys and Locks ...75 Immobilizer System...76 Ignition Switch ...77 Door Locks ...78 Power Door Locks ...79 Auto Door Locking/Unlocking.. 79 Remote Transmitter ...86 Trunk...89 Emergency Trunk Opener ...90 Seats ...91 Power Windows ...97 Moonroof ...99 Mirrors ...101 Parking Brake ...102 Interior...
... Gauge ...67 Check Fuel Cap Indicator ...67 Maintenance Minder ...68 Controls Near the Steering Wheel ...69 Windshield Wipers and Washers .. 70 Turn Signal and Headlights...71 Instrument Panel Brightness ...72 Hazard Warning Button ...73 Rear Window Defogger ...73 Steering Wheel Adjustments ...74 Keys and Locks ...75 Immobilizer System...76 Ignition Switch ...77 Door Locks ...78 Power Door Locks ...79 Auto Door Locking/Unlocking.. 79 Remote Transmitter ...86 Trunk...89 Emergency Trunk Opener ...90 Seats ...91 Power Windows ...97 Moonroof ...99 Mirrors ...101 Parking Brake ...102 Interior...

Owner's Manual
Page 76
... to lose control of the vehicle and be seriously injured in position. 4. Make sure you start driving. 3. Push the lever up , down, in place by trying to move it points toward your chest, not toward your face. Make sure you to lock the steering wheel in a crash. Steering Wheel Adjustments Make any steering wheel adjustments before you can see the instrument panel gauges and indicators...
... to lose control of the vehicle and be seriously injured in position. 4. Make sure you start driving. 3. Push the lever up , down, in place by trying to move it points toward your chest, not toward your face. Make sure you to lock the steering wheel in a crash. Steering Wheel Adjustments Make any steering wheel adjustments before you can see the instrument panel gauges and indicators...

Owner's Manual
Page 78
... keys do not contain batteries. If the system repeatedly does not recognize the coding of the key. They will not work to it means the system does not recognize the coding of your key, contact your key's coding if another immobilizer key or other device) is used, the engine's fuel system is near the ignition switch when you have lost your key and cannot start the engine...
... keys do not contain batteries. If the system repeatedly does not recognize the coding of the key. They will not work to it means the system does not recognize the coding of your key, contact your key's coding if another immobilizer key or other device) is used, the engine's fuel system is near the ignition switch when you have lost your key and cannot start the engine...
Owner's Manual
Page 87
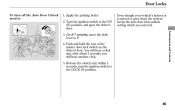
... click. 5. Instruments and Controls 85 Turn the ignition switch to the LOCK (0) position. Release the switch and, within 5 seconds, turn off the Auto Door Unlock modes: 1. Even though your vehicle's battery is removed or goes dead, the system keeps the auto door lock/unlock setting which you will hear a click and, after about 5 seconds, you selected. On A/T vehicles, move the shift lever to P. 4. Apply the parking brake. 2. Door Locks To turn the ignition switch to...
... click. 5. Instruments and Controls 85 Turn the ignition switch to the LOCK (0) position. Release the switch and, within 5 seconds, turn off the Auto Door Unlock modes: 1. Even though your vehicle's battery is removed or goes dead, the system keeps the auto door lock/unlock setting which you will hear a click and, after about 5 seconds, you selected. On A/T vehicles, move the shift lever to P. 4. Apply the parking brake. 2. Door Locks To turn the ignition switch to...

Owner's Manual
Page 99
... ignition switch. Closing a power window on the window switch. Instruments and Controls If equipped Turn the ignition switch to the ON (II) position to close the driver's window partially, push down , pull back on the switch and hold it . Opening either window. MAIN SWITCH AUTO To open or close the window. To open the driver's window fully, push the window switch firmly down until the window reaches the desired position. Make sure your passengers...
... ignition switch. Closing a power window on the window switch. Instruments and Controls If equipped Turn the ignition switch to the ON (II) position to close the driver's window partially, push down , pull back on the switch and hold it . Opening either window. MAIN SWITCH AUTO To open or close the window. To open the driver's window fully, push the window switch firmly down until the window reaches the desired position. Make sure your passengers...

Owner's Manual
Page 100
... switch is OFF, and the passenger's window cannot be disabled. To cancel this : 1. AUTO REVERSE If the driver's window runs into any obstacle while it is fully open. 2. You should always check that all passengers and objects are away from the window before closing automatically, it . Start the engine. If the power windows do not operate properly after reconnecting the battery or installing the fuse, do...
... switch is OFF, and the passenger's window cannot be disabled. To cancel this : 1. AUTO REVERSE If the driver's window runs into any obstacle while it is fully open. 2. You should always check that all passengers and objects are away from the window before closing automatically, it . Start the engine. If the power windows do not operate properly after reconnecting the battery or installing the fuse, do...

Owner's Manual
Page 104
REAR WINDOW DEFOGGER/ HEATED MIRRORS BUTTON PARKING BRAKE LEVER On Canadian LX, EX and Si models The outside mirrors are heated to turn on . A beeper will sound if the vehicle is fully released (see page 58 ). 102 To apply the parking brake, pull the lever up slightly, push the button, and lower the lever. With the ignition switch in the button comes on the instrument panel should go out when...
REAR WINDOW DEFOGGER/ HEATED MIRRORS BUTTON PARKING BRAKE LEVER On Canadian LX, EX and Si models The outside mirrors are heated to turn on . A beeper will sound if the vehicle is fully released (see page 58 ). 102 To apply the parking brake, pull the lever up slightly, push the button, and lower the lever. With the ignition switch in the button comes on the instrument panel should go out when...

Owner's Manual
Page 187
The air conditioning puts an extra load on your vehicle, they may not meet factory specifications, and could adversely affect your airbags and anti-lock brakes. 186 Accessories Your dealer has Honda accessories that allow you slow down and speed up, your vehicle's handling, stability, and performance, and cause a crash in this owner's manual regarding accessories and modifications. Follow all instructions in which makes it unsafe. Before you can be...
The air conditioning puts an extra load on your vehicle, they may not meet factory specifications, and could adversely affect your airbags and anti-lock brakes. 186 Accessories Your dealer has Honda accessories that allow you slow down and speed up, your vehicle's handling, stability, and performance, and cause a crash in this owner's manual regarding accessories and modifications. Follow all instructions in which makes it unsafe. Before you can be...

Owner's Manual
Page 198
... may be developing a problem. Driving If you are in the engine's computer controls. If you cannot accidentally shift from any forward gear to reverse when the vehicle is moving at a certain speed. With the clutch pedal still pressed, start the engine. Press the clutch pedal, and shift to reverse. 197 On Si model Reverse Lockout 6-speed manual transmission The manual transmission has lockout so you cannot shift to reverse while...
... may be developing a problem. Driving If you are in the engine's computer controls. If you cannot accidentally shift from any forward gear to reverse when the vehicle is moving at a certain speed. With the clutch pedal still pressed, start the engine. Press the clutch pedal, and shift to reverse. 197 On Si model Reverse Lockout 6-speed manual transmission The manual transmission has lockout so you cannot shift to reverse while...

Owner's Manual
Page 217
... 183 . See page 243 . Check your warranties in this type of completion, and have maintenance done. Vehicles: Maintenance, replacement, or repair of their performance and durability. However, all receipts as proof of automotive service. Engine oil level Check every time you fill the fuel tank. Automatic transmission Check the fluid level monthly. Brakes Check the fluid level monthly. Tires Check the tire pressure monthly. Maintenance may be done by the information display...
... 183 . See page 243 . Check your warranties in this type of completion, and have maintenance done. Vehicles: Maintenance, replacement, or repair of their performance and durability. However, all receipts as proof of automotive service. Engine oil level Check every time you fill the fuel tank. Automatic transmission Check the fluid level monthly. Brakes Check the fluid level monthly. Tires Check the tire pressure monthly. Maintenance may be done by the information display...

Owner's Manual
Page 218
... idle speed every 160,000 miles (256,000 km). Inspect drive belt Replace transmission fluid Replace spark plugs Inspect valve clearance Replace engine coolant Maintenance Minder 3 4 5 : If the message ''SERVICE'' does not appear more than 12 months after the display is reset, change the engine oil every year. : See information on page 214 . Maintenance Minder Symbol A B Maintenance Main Items Replace engine oil Replace engine oil and oil filter Inspect front and rear brakes Check parking brake adjustment Visually inspect these items: Tie rod ends, steering gear...
... idle speed every 160,000 miles (256,000 km). Inspect drive belt Replace transmission fluid Replace spark plugs Inspect valve clearance Replace engine coolant Maintenance Minder 3 4 5 : If the message ''SERVICE'' does not appear more than 12 months after the display is reset, change the engine oil every year. : See information on page 214 . Maintenance Minder Symbol A B Maintenance Main Items Replace engine oil Replace engine oil and oil filter Inspect front and rear brakes Check parking brake adjustment Visually inspect these items: Tie rod ends, steering gear...

Owner's Manual
Page 221
Fluid Locations DX, Canadian DX-G, LX, and EX models ENGINE OIL FILL CAP POWER STEERING FLUID (Red cap) BRAKE FLUID (Black cap) CLUTCH FLUID (Manual transmission only) (Light gray cap) AUTOMATIC TRANSMISSION FLUID DIPSTICK (Yellow loop) ENGINE COOLANT RESERVOIR ENGINE OIL DIPSTICK (Orange handle) WASHER FLUID (Blue cap) RADIATOR CAP 220
Fluid Locations DX, Canadian DX-G, LX, and EX models ENGINE OIL FILL CAP POWER STEERING FLUID (Red cap) BRAKE FLUID (Black cap) CLUTCH FLUID (Manual transmission only) (Light gray cap) AUTOMATIC TRANSMISSION FLUID DIPSTICK (Yellow loop) ENGINE COOLANT RESERVOIR ENGINE OIL DIPSTICK (Orange handle) WASHER FLUID (Blue cap) RADIATOR CAP 220

Owner's Manual
Page 222
Fluid Locations Si model ENGINE OIL DIPSTICK (Orange handle) ENGINE OIL FILL CAP BRAKE FLUID (Black cap) CLUTCH FLUID (Light gray cap) WASHER FLUID (Blue cap) Maintenance ENGINE COOLANT RESERVOIR RADIATOR CAP 221
Fluid Locations Si model ENGINE OIL DIPSTICK (Orange handle) ENGINE OIL FILL CAP BRAKE FLUID (Black cap) CLUTCH FLUID (Light gray cap) WASHER FLUID (Blue cap) Maintenance ENGINE COOLANT RESERVOIR RADIATOR CAP 221

Owner's Manual
Page 298
... Controls .. 285 Exhaust Fumes ...50 Expectant Mothers, Use of Seat Belts by ...16 F Fan Control...111 Features ...109 Filling the Fuel Tank ...181 Filters Dust and Pollen ...241 Oil ...224 Flashers, Hazard Warning...73 Flat Tire, Changing a ...255 Fluids Automatic Transmission...230 Brake ...232 Clutch ...232 Manual Transmission ...231 Power Steering...233 Windshield Washer ...229 FM Stereo Radio Reception ...167 Folding Rear Seat ...95 Four-way Flashers ...73 CONTINUED E Economy, Fuel ...185 Emergencies...253 Battery, Jump Starting ...261 Brake System Indicator ...267 Changing...
... Controls .. 285 Exhaust Fumes ...50 Expectant Mothers, Use of Seat Belts by ...16 F Fan Control...111 Features ...109 Filling the Fuel Tank ...181 Filters Dust and Pollen ...241 Oil ...224 Flashers, Hazard Warning...73 Flat Tire, Changing a ...255 Fluids Automatic Transmission...230 Brake ...232 Clutch ...232 Manual Transmission ...231 Power Steering...233 Windshield Washer ...229 FM Stereo Radio Reception ...167 Folding Rear Seat ...95 Four-way Flashers ...73 CONTINUED E Economy, Fuel ...185 Emergencies...253 Battery, Jump Starting ...261 Brake System Indicator ...267 Changing...

Owner's Manual
Page 299
... Ignition Keys...75 Switch ...77 Timing Control System ...286 Immobilizer System...76 Important Safety Precautions ...6 Indicators ABS (Anti-Lock Brake)...59 Brake (Parking and Brake System) ...58 Charging System ...57, 265 Cruise Control ...62 DRL (Daytime Running Lights)...62 H Halogen Headlight Bulbs...234 Hazard Warning Flashers...73 Headlights Aiming ...234 Daytime Running Lights...72 High Beam Indicator ...62 Reminder Beeper ...71 Replacing Halogen Bulbs ...234 Turning on ...71 Head Restraints ...94 Heated Mirrors ...102 Heating and Cooling ...110 G Gas Mileage...
... Ignition Keys...75 Switch ...77 Timing Control System ...286 Immobilizer System...76 Important Safety Precautions ...6 Indicators ABS (Anti-Lock Brake)...59 Brake (Parking and Brake System) ...58 Charging System ...57, 265 Cruise Control ...62 DRL (Daytime Running Lights)...62 H Halogen Headlight Bulbs...234 Hazard Warning Flashers...73 Headlights Aiming ...234 Daytime Running Lights...72 High Beam Indicator ...62 Reminder Beeper ...71 Replacing Halogen Bulbs ...234 Turning on ...71 Head Restraints ...94 Heated Mirrors ...102 Heating and Cooling ...110 G Gas Mileage...

Owner's Manual
Page 303
... a Child Seat ...39 Serial Number ...278 Service Intervals ...211 Service Manual ...295 Service Station Procedures ...181 Setting the Clock ...173 Shift Lever Position Indicators ...198 Shift Lock Release ...201 Side Airbags ...9, 26 Off Indicator ...29, 58 Side Curtain Airbags ...9, 28 Side Marker Lights, Bulb Replacement ...237 Signaling Turns ...71 Snow Chains ...249 Snow Tires ...248 Sockets, Accessory Power ...105 Sound System ...116 Spare Tire Inflating ...254 Specifications ...281 Spark Plugs ...280 Specifications ...280 Speed Control ...175 Speed Limiter...
... a Child Seat ...39 Serial Number ...278 Service Intervals ...211 Service Manual ...295 Service Station Procedures ...181 Setting the Clock ...173 Shift Lever Position Indicators ...198 Shift Lock Release ...201 Side Airbags ...9, 26 Off Indicator ...29, 58 Side Curtain Airbags ...9, 28 Side Marker Lights, Bulb Replacement ...237 Signaling Turns ...71 Snow Chains ...249 Snow Tires ...248 Sockets, Accessory Power ...105 Sound System ...116 Spare Tire Inflating ...254 Specifications ...281 Spark Plugs ...280 Specifications ...280 Speed Control ...175 Speed Limiter...


