
Owner's Manual
Page 346
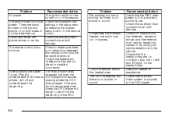
.... Sometimes the wireless headphone audio cuts out or buzzes. The DVD is playing, but there is no picture or sound. Check that the headphones are black settings in accessory. Check that the RSE video screen is no picture or sound. After stopping the player, If the stop beginning. Problem The auxiliary...
.... Sometimes the wireless headphone audio cuts out or buzzes. The DVD is playing, but there is no picture or sound. Check that the headphones are black settings in accessory. Check that the RSE video screen is no picture or sound. After stopping the player, If the stop beginning. Problem The auxiliary...

Owner's Manual
Page 436
... blunt cut wires near the data link connector for an electric brake controller. The harness contains the following wires: • Dark Blue: Auxiliary • Red/Black: Battery # • Light Blue: Brake Switch Trailer Recommendations You must not be more information see Towing a Trailer on page 421. • White: Ground The trailer...
... blunt cut wires near the data link connector for an electric brake controller. The harness contains the following wires: • Dark Blue: Auxiliary • Red/Black: Battery # • Light Blue: Brake Switch Trailer Recommendations You must not be more information see Towing a Trailer on page 421. • White: Ground The trailer...
Owner's Manual
Page 459
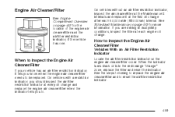
... the red/orange "change . How to Inspect the Engine Air Cleaner/Filter Vehicles With an Air Filter Restriction Indicator When to . When the indicator turns black or is in dusty/dirty conditions, inspect the filter at each 50,000 mile (83 000 km) interval. On vehicles with a restriction indicator, you...
... the red/orange "change . How to Inspect the Engine Air Cleaner/Filter Vehicles With an Air Filter Restriction Indicator When to . When the indicator turns black or is in dusty/dirty conditions, inspect the filter at each 50,000 mile (83 000 km) interval. On vehicles with a restriction indicator, you...
Owner's Manual
Page 483
.... When it is complex. The braking performance you are wrong for your vehicle, the balance between your vehicle for 25 days or more, remove the black, negative (−) cable from running down and you need new ones put in the wrong replacement brake parts. You can be badly hurt if you...
.... When it is complex. The braking performance you are wrong for your vehicle, the balance between your vehicle for 25 days or more, remove the black, negative (−) cable from running down and you need new ones put in the wrong replacement brake parts. You can be badly hurt if you...
Owner's Manual
Page 488
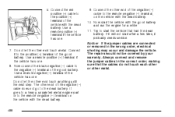
Use a remote positive (+) terminal if the vehicle has one . Try to the dead battery. Do not let the other end touch metal. Now connect the black negative (−) cable to the negative (−) terminal of the negative (−) cable does not go to start the vehicle that the cables do not ...
Use a remote positive (+) terminal if the vehicle has one . Try to the dead battery. Do not let the other end touch metal. Now connect the black negative (−) cable to the negative (−) terminal of the negative (−) cable does not go to start the vehicle that the cables do not ...

Owner's Manual
Page 489
...B. Dead Battery or Remote Positive (+) Terminal 489 Disconnect the red positive (+) cable from the vehicle with the good battery. 4. Disconnect the black negative (−) cable from the other vehicle. 5. Jumper Cable Removal A. Disconnect the red positive (+) cable from the vehicle that had the ...bad battery. 2. Disconnect the black negative (−) cable from the vehicle with the good battery. 3. To disconnect the jumper cables from both vehicles do the following: ...
...B. Dead Battery or Remote Positive (+) Terminal 489 Disconnect the red positive (+) cable from the vehicle with the good battery. 4. Disconnect the black negative (−) cable from the other vehicle. 5. Jumper Cable Removal A. Disconnect the red positive (+) cable from the vehicle that had the ...bad battery. 2. Disconnect the black negative (−) cable from the vehicle with the good battery. 3. To disconnect the jumper cables from both vehicles do the following: ...
Owner's Manual
Page 529
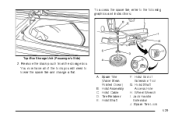
Hoist Shaft F. Jack Handle Extension J. A. Hoist Shaft Access Hole H. Wheel Wrench I. You now have all of Extension Tool G. Hoist Assembly C. To access the spare tire, refer to lower the spare tire and change a flat. Tire Retainer E. Hoist End of the tools you will need to the following graphics and instructions: Top-Box Storage Unit (Passenger's Side) 2. Remove the black pouch from the storage box. Spare Tire (Valve Stem Pointed Down) B. Hoist Cable D. Spare Tire Lock 529
Hoist Shaft F. Jack Handle Extension J. A. Hoist Shaft Access Hole H. Wheel Wrench I. You now have all of Extension Tool G. Hoist Assembly C. To access the spare tire, refer to lower the spare tire and change a flat. Tire Retainer E. Hoist End of the tools you will need to the following graphics and instructions: Top-Box Storage Unit (Passenger's Side) 2. Remove the black pouch from the storage box. Spare Tire (Valve Stem Pointed Down) B. Hoist Cable D. Spare Tire Lock 529

Owner's Manual
Page 555
... Usage Removes swirl marks, fine scratches, and other light surface contamination. Cleans and lightly waxes. Use on chrome or stainless steel. Removes soil and black marks from whitewalls.
... Usage Removes swirl marks, fine scratches, and other light surface contamination. Cleans and lightly waxes. Use on chrome or stainless steel. Removes soil and black marks from whitewalls.

