Owner's Manual
Page 86
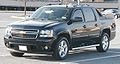
... 592. Adding Equipment to Your Airbag-Equipped Vehicle Q: Because I have a disability, I have to the front or sides of the vehicle that change your vehicle's frame, bumper system, height, front end or side sheet metal, they may not work properly if you modify your vehicle. A: Yes. See Customer Satisfaction Procedure on page...
... 592. Adding Equipment to Your Airbag-Equipped Vehicle Q: Because I have a disability, I have to the front or sides of the vehicle that change your vehicle's frame, bumper system, height, front end or side sheet metal, they may not work properly if you modify your vehicle. A: Yes. See Customer Satisfaction Procedure on page...
Owner's Manual
Page 171
... then out on the tab, located at the top center of the armrest, and pull the armrest down. 171 Use the crossrails only to the bumpers. Your vehicle has a Center High-Mounted Stoplamp (CHMSL) located above the rear glass. Also tie the load to keep the load from sliding. Be sure...
... then out on the tab, located at the top center of the armrest, and pull the armrest down. 171 Use the crossrails only to the bumpers. Your vehicle has a Center High-Mounted Stoplamp (CHMSL) located above the rear glass. Also tie the load to keep the load from sliding. Be sure...
Owner's Manual
Page 220
The URPA sensors determine how close these objects are from your vehicle while you are at speeds less than 8 feet (2.5 meters) behind your bumper within this area. {CAUTION: Even with objects such as you do. 220 So, unless you park while in REVERSE (R). This detection distance limit ... system is designed to the rear of 5 mph (8 km/h). It operates only at least 10 inches (25.4 cm) off the ground and below your bumper, underneath your vehicle. The system does not operate above speeds of the vehicle which are backing up, they could be reduced during warm weather or...
The URPA sensors determine how close these objects are from your vehicle while you are at speeds less than 8 feet (2.5 meters) behind your bumper within this area. {CAUTION: Even with objects such as you do. 220 So, unless you park while in REVERSE (R). This detection distance limit ... system is designed to the rear of 5 mph (8 km/h). It operates only at least 10 inches (25.4 cm) off the ground and below your bumper, underneath your vehicle. The system does not operate above speeds of the vehicle which are backing up, they could be reduced during warm weather or...

Owner's Manual
Page 222
... your trunk during your distance to normal operation unless an object is detected when the vehicle is detected a single beep will return to the rear bumper. The first time an object is shifted into REVERSE (R). If an object is detected at a REVERSE (R) speed between 0 mph (0 km/h) and 5 mph (8 km/h), the...
... your trunk during your distance to normal operation unless an object is detected when the vehicle is detected a single beep will return to the rear bumper. The first time an object is shifted into REVERSE (R). If an object is detected at a REVERSE (R) speed between 0 mph (0 km/h) and 5 mph (8 km/h), the...
Owner's Manual
Page 223
If the DIC still displays the PARKING ASSIST OFF message after cleaning the bumper and driving forward at a speed of at least 15 mph (25 km/h), see your ...indicate that may not work properly. For cleaning instructions, see DIC Warnings and Messages on page 550. If the vehicle bumper is off. Always look behind you, being sure to check for other mechanical devices that interfere with URPA performance. •... will flash for 3 seconds and then stay lit to your vehicle's rear bumper free of air brakes on a very large truck or other vehicles, obstructions and blind spots.
If the DIC still displays the PARKING ASSIST OFF message after cleaning the bumper and driving forward at a speed of at least 15 mph (25 km/h), see your ...indicate that may not work properly. For cleaning instructions, see DIC Warnings and Messages on page 550. If the vehicle bumper is off. Always look behind you, being sure to check for other mechanical devices that interfere with URPA performance. •... will flash for 3 seconds and then stay lit to your vehicle's rear bumper free of air brakes on a very large truck or other vehicles, obstructions and blind spots.

Owner's Manual
Page 435
... to boost the vehicle system and charge the battery. #The fuses for tow/haul mode, you are not connected. It is attached to the rear bumper beam. This harness with the seven-wire trailer towing harness.
... to boost the vehicle system and charge the battery. #The fuses for tow/haul mode, you are not connected. It is attached to the rear bumper beam. This harness with the seven-wire trailer towing harness.

Owner's Manual
Page 498
... pins with the vehicle. 4. Turn the bulb socket counterclockwise and pull the bulb socket out of these bulbs, do the following: 1. Reach under the rear bumper for the bulb socket. 2. Press the release tab, if the bulb socket has one of the connector. 498
... pins with the vehicle. 4. Turn the bulb socket counterclockwise and pull the bulb socket out of these bulbs, do the following: 1. Reach under the rear bumper for the bulb socket. 2. Press the release tab, if the bulb socket has one of the connector. 498
Owner's Manual
Page 523
..., or wheel nuts on your wheels, wheel bolts, or wheel nuts, replace them only with bearing life, brake cooling, speedometer or odometer calibration, headlamp aim, bumper height, vehicle ground clearance, and tire or tire chain clearance to replace any of your vehicle, make your vehicle can also cause problems with new...
..., or wheel nuts on your wheels, wheel bolts, or wheel nuts, replace them only with bearing life, brake cooling, speedometer or odometer calibration, headlamp aim, bumper height, vehicle ground clearance, and tire or tire chain clearance to replace any of your vehicle, make your vehicle can also cause problems with new...
Owner's Manual
Page 530
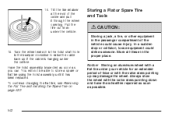
Open the hoist shaft access cover on the bumper to remove the spare tire lock. 4. Be sure the hoist end (F) of the extension (F) through the hole in the rear bumper (G) (hoist shaft access hole). 3. Insert the open end of the extension connects to lower the spare tire. 530 Assemble the two jack handle extensions (I) and wheel wrench (H) as shown. Insert the ignition key, turn it clockwise and then pull it to access the spare tire lock (J). 2. The ribbed square end of the extension is used to the hoist shaft. 1.
Open the hoist shaft access cover on the bumper to remove the spare tire lock. 4. Be sure the hoist end (F) of the extension (F) through the hole in the rear bumper (G) (hoist shaft access hole). 3. Insert the open end of the extension connects to lower the spare tire. 530 Assemble the two jack handle extensions (I) and wheel wrench (H) as shown. Insert the ignition key, turn it clockwise and then pull it to access the spare tire lock (J). 2. The ribbed square end of the extension is used to the hoist shaft. 1.
Owner's Manual
Page 540
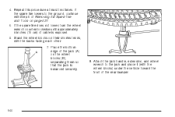
If the spare tire does not lower, turn the wheel wrench counterclockwise until approximately 6 inches (15 cm) of the rear bumper. 540 Stand the wheel blocks on the wheel blocks (B), separating them so that the jack is exposed. 6. If the spare tire lowers to the jack ...
If the spare tire does not lower, turn the wheel wrench counterclockwise until approximately 6 inches (15 cm) of the rear bumper. 540 Stand the wheel blocks on the wheel blocks (B), separating them so that the jack is exposed. 6. If the spare tire lowers to the jack ...

Owner's Manual
Page 541
... be injured by turning the wheel wrench counterclockwise. If the spare tire does not slide off the jack or is held firmly in the bumper and turn the wheel wrench counterclockwise to push against the spare while firmly pulling the jack out from the jack and carefully remove the...
... be injured by turning the wheel wrench counterclockwise. If the spare tire does not slide off the jack or is held firmly in the bumper and turn the wheel wrench counterclockwise to push against the spare while firmly pulling the jack out from the jack and carefully remove the...
Owner's Manual
Page 542
... {CAUTION: Storing a jack, a tire, or other equipment in the passenger compartment of the cable and pull it has been replaced. Store all these in the bumper clockwise to store a spare or flat tire, see Removing the Flat Tire and Installing the Spare Tire on page 532. 542 Have the hoist...
... {CAUTION: Storing a jack, a tire, or other equipment in the passenger compartment of the cable and pull it has been replaced. Store all these in the bumper clockwise to store a spare or flat tire, see Removing the Flat Tire and Installing the Spare Tire on page 532. 542 Have the hoist...

Owner's Manual
Page 544
... the tire fully against the underside of the extension (F) through the hole in the wheel opening. 6. Make sure the tire is seated in the rear bumper (G) (hoist shaft access hole). 5. Insert the open end of the vehicle by turning the wheel wrench clockwise until you hear two clicks or feel it...
... the tire fully against the underside of the extension (F) through the hole in the wheel opening. 6. Make sure the tire is seated in the rear bumper (G) (hoist shaft access hole). 5. Insert the open end of the vehicle by turning the wheel wrench clockwise until you hear two clicks or feel it...
Owner's Manual
Page 599
... be provided through this vehicle without the consent of the owner is responsible for the repair or replacement of enough fuel for coverage. during the Bumper-to-Bumper warranty period and, in Canada, during the Base Warranty coverage period of the New Vehicle Limited Warranty, up to the nearest authorized dealership. Winch...
... be provided through this vehicle without the consent of the owner is responsible for the repair or replacement of enough fuel for coverage. during the Bumper-to-Bumper warranty period and, in Canada, during the Base Warranty coverage period of the New Vehicle Limited Warranty, up to the nearest authorized dealership. Winch...

Owner's Manual
Page 600
.... Pre-authorization, original detailed receipts and a copy of the repair order are the responsibility of the driver. In many instances, mechanical failures are covered under Chevrolet's Bumper-to-Bumper warranty, and the duration of the Base Warranty Coverage for (A) meals (maximum of $50/day), (B) lodging (maximum of $100/night) and (C) alternate ground transportation...
.... Pre-authorization, original detailed receipts and a copy of the repair order are the responsibility of the driver. In many instances, mechanical failures are covered under Chevrolet's Bumper-to-Bumper warranty, and the duration of the Base Warranty Coverage for (A) meals (maximum of $50/day), (B) lodging (maximum of $100/night) and (C) alternate ground transportation...
Owner's Manual
Page 602
... your ownership experience, we and our participating dealers are proud to offer Courtesy Transportation, a customer support program for new vehicles. For warranty repairs during the Bumper-to-Bumper (U.S.) or Base Warranty Coverage period (Canada), provided by the New Vehicle Limited Warranty, interim transportation may be scheduled for service, unless, of the New...
... your ownership experience, we and our participating dealers are proud to offer Courtesy Transportation, a customer support program for new vehicles. For warranty repairs during the Bumper-to-Bumper (U.S.) or Base Warranty Coverage period (Canada), provided by the New Vehicle Limited Warranty, interim transportation may be scheduled for service, unless, of the New...

