
Owner's Manual
Page 5
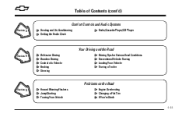
Table of Contents (cont'd) Comfort Controls and Audio Systems Section 3 Heating and Air Conditioning Setting the Radio Clock Radio/Cassette Player/CD Player Your Driving and the Road Section 4 Defensive Driving Drunken Driving Control of a Vehicle Braking Steering Driving Tips for Various Road Conditions Recreational Vehicle Towing Loading Your Vehicle Towing a Trailer Problems on the Road Section 5 Hazard Warning Flashers Jump Starting Towing Your Vehicle Engine Overheating Changing a Flat Tire If You're Stuck iii
Table of Contents (cont'd) Comfort Controls and Audio Systems Section 3 Heating and Air Conditioning Setting the Radio Clock Radio/Cassette Player/CD Player Your Driving and the Road Section 4 Defensive Driving Drunken Driving Control of a Vehicle Braking Steering Driving Tips for Various Road Conditions Recreational Vehicle Towing Loading Your Vehicle Towing a Trailer Problems on the Road Section 5 Hazard Warning Flashers Jump Starting Towing Your Vehicle Engine Overheating Changing a Flat Tire If You're Stuck iii
Owner's Manual
Page 109
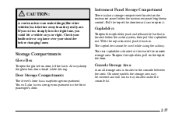
... that is located in . If you cut too sharply into the right lane, you to open the cupholder, pull on the instrument panel below the audio system, then pull the cupholder out. The rear cupholder is also a storage compartment located on the top of the door toward you could hit a vehicle...
... that is located in . If you cut too sharply into the right lane, you to open the cupholder, pull on the instrument panel below the audio system, then pull the cupholder out. The rear cupholder is also a storage compartment located on the top of the door toward you could hit a vehicle...

Owner's Manual
Page 113
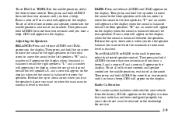
... T. Shift Lever S. Glove Box V. The main components of your instrument panel are: A. Brightness Control C. Hood Release M. Ignition Switch Q. Windshield Wiper Control F. Hazard Warning Flashers H. Horn O. Audio System U. Air Outlets B. Turn Signal/Multifunction Lever D. Windshield Washer G. Comfort Control System J. Storage Compartment and Fuse Panel Cover L. Cruise Control (Option) P. Cupholder R. Vent (Shut-Off...
... T. Shift Lever S. Glove Box V. The main components of your instrument panel are: A. Brightness Control C. Hood Release M. Ignition Switch Q. Windshield Wiper Control F. Hazard Warning Flashers H. Horn O. Audio System U. Air Outlets B. Turn Signal/Multifunction Lever D. Windshield Washer G. Comfort Control System J. Storage Compartment and Fuse Panel Cover L. Cruise Control (Option) P. Cupholder R. Vent (Shut-Off...

Owner's Manual
Page 128
...vehicle. 3-2 3-3 3-4 3-4 3-4 3-5 3-6 3-6 3-7 3-10 Comfort Controls Air Conditioner Controls Heating Defogging and Defrosting Rear Window Defogger (Option) Ventilation System Audio Systems Setting the Clock AM-FM Stereo AM-FM Stereo with Cassette Tape Player (If Equipped) 3-15 3-19 3-19 3-20 3-21 3-21 3-21 AM...-FM Stereo with your vehicle. Section 3 Comfort Controls and Audio Systems In this section, you'll find out how to read about the particular systems supplied with Compact Disc Player (If Equipped) Understanding Radio Reception...
...vehicle. 3-2 3-3 3-4 3-4 3-4 3-5 3-6 3-6 3-7 3-10 Comfort Controls Air Conditioner Controls Heating Defogging and Defrosting Rear Window Defogger (Option) Ventilation System Audio Systems Setting the Clock AM-FM Stereo AM-FM Stereo with Cassette Tape Player (If Equipped) 3-15 3-19 3-19 3-20 3-21 3-21 3-21 AM...-FM Stereo with your vehicle. Section 3 Comfort Controls and Audio Systems In this section, you'll find out how to read about the particular systems supplied with Compact Disc Player (If Equipped) Understanding Radio Reception...

Owner's Manual
Page 133
... Tips D Keep the hood and front air inlet free of listening pleasure. The heater and defroster will get the most out of your windows. Audio Systems Your audio system has been designed to operate easily and give years of ice, snow or any other obstruction (such as leaves). Then press the HR... hold the HR or MIN arrow for a few moments before driving off. Find out what your vehicle. objects. This helps air to circulate throughout your audio system can do and how to operate all its controls, to keep cold air from 3-6 D When you acquaint yourself with the ignition on or off...
... Tips D Keep the hood and front air inlet free of listening pleasure. The heater and defroster will get the most out of your windows. Audio Systems Your audio system has been designed to operate easily and give years of ice, snow or any other obstruction (such as leaves). Then press the HR... hold the HR or MIN arrow for a few moments before driving off. Find out what your vehicle. objects. This helps air to circulate throughout your audio system can do and how to operate all its controls, to keep cold air from 3-6 D When you acquaint yourself with the ignition on or off...

Owner's Manual
Page 135
... arrows for more than four seconds until TRE appears on . 2. Then press and hold the down arrow to decrease treble. TREBLE: Press and release AUDIO until you press that are in the desired station. 4. T and a zero will only scan the six presets that numbered button, the station you ... just before the frequency is reached. The channel number (P1-P6) will appear on the display. Setting the Tone BASS: Press and release AUDIO repeatedly until you may want or when the maximum or minimum level is displayed. PRESET SCAN: Use PRESET SCAN to listen to each pushbutton. ...
... arrows for more than four seconds until TRE appears on . 2. Then press and hold the down arrow to decrease treble. TREBLE: Press and release AUDIO until you press that are in the desired station. 4. T and a zero will only scan the six presets that numbered button, the station you ... just before the frequency is reached. The channel number (P1-P6) will appear on the display. Setting the Tone BASS: Press and release AUDIO repeatedly until you may want or when the maximum or minimum level is displayed. PRESET SCAN: Use PRESET SCAN to listen to each pushbutton. ...
Owner's Manual
Page 136
...or minimum level is reached. To set BALANCE or FADE to the middle position, select the desired speaker control. Then press and hold AUDIO for service. 3-9 Then press and hold AUDIO for more than two seconds until you want or when the maximum or minimum level is reached. Then press and hold... on the display. To set all of the tone controls and speaker controls to the middle position, end out of audio mode. Adjusting the Speakers BALANCE: Press and release AUDIO until FAD appears on the display. Then press and hold the up or down arrow to move the sound to the...
...or minimum level is reached. To set BALANCE or FADE to the middle position, select the desired speaker control. Then press and hold AUDIO for service. 3-9 Then press and hold AUDIO for more than two seconds until you want or when the maximum or minimum level is reached. Then press and hold... on the display. To set all of the tone controls and speaker controls to the middle position, end out of audio mode. Adjusting the Speakers BALANCE: Press and release AUDIO until FAD appears on the display. Then press and hold the up or down arrow to move the sound to the...

Owner's Manual
Page 138
... more than four seconds until TRE appears on . 2. T and a zero will appear on the display. Setting the Tone BASS: Press and release AUDIO until you may want or when the maximum or minimum level is set will go to the first preset station stored on your pushbuttons, except... minimum level is reached. Press and hold the down arrow to decrease bass. Press and hold one of your favorite stations. TREBLE: Press and release AUDIO until you press that are in the desired station. 4. B and a negative number will appear on the display. T and a positive number will appear...
... more than four seconds until TRE appears on . 2. T and a zero will appear on the display. Setting the Tone BASS: Press and release AUDIO until you may want or when the maximum or minimum level is set will go to the first preset station stored on your pushbuttons, except... minimum level is reached. Press and hold the down arrow to decrease bass. Press and hold one of your favorite stations. TREBLE: Press and release AUDIO until you press that are in the desired station. 4. B and a negative number will appear on the display. T and a positive number will appear...

Owner's Manual
Page 139
... hear a beep. B and a zero or T and a zero will appear on the display when the sound is balanced toward the right speakers. Then press and hold AUDIO for more than two seconds until you hear a beep. F and a zero will appear on the display. L and a zero or F and a zero will appear on... the display when the the sound is balanced toward the front speakers. "R" and a number will appear on the display. Then press and hold AUDIO for more than two seconds until you want or when the maximum or minimum level is balanced toward the rear speakers. CEN will appear on...
... hear a beep. B and a zero or T and a zero will appear on the display when the sound is balanced toward the right speakers. Then press and hold AUDIO for more than two seconds until you hear a beep. F and a zero will appear on the display. L and a zero or F and a zero will appear on... the display when the the sound is balanced toward the front speakers. "R" and a number will appear on the display. Then press and hold AUDIO for more than two seconds until you want or when the maximum or minimum level is balanced toward the rear speakers. CEN will appear on...

Owner's Manual
Page 141
... hold the eject button for future listening. Eject may select stations during FWD operation by using TUNE, SEEK, SCAN or PRESET SCAN. Radio Calibration Your audio system has been calibrated for your vehicle and must have at least three seconds of silence between each selection for two seconds with the radio...
... hold the eject button for future listening. Eject may select stations during FWD operation by using TUNE, SEEK, SCAN or PRESET SCAN. Radio Calibration Your audio system has been calibrated for your vehicle and must have at least three seconds of silence between each selection for two seconds with the radio...

Owner's Manual
Page 143
...button, the station you want or when the maximum or minimum level is set will appear on the display. 3-16 TREBLE: Press and release AUDIO until BAS appears on the display when the treble level is reached. To set up to your favorite stations. CEN will return. 5. T ...display. PUSHBUTTONS: The six numbered pushbuttons let you hear a beep. Tune in the desired station. 4. Setting the Tone BASS: Press and release AUDIO until TRE appears on the display. Then press and hold the down arrow to increase bass. "B" and a positive number will appear on the display...
...button, the station you want or when the maximum or minimum level is set will appear on the display. 3-16 TREBLE: Press and release AUDIO until BAS appears on the display when the treble level is reached. To set up to your favorite stations. CEN will return. 5. T ...display. PUSHBUTTONS: The six numbered pushbuttons let you hear a beep. Tune in the desired station. 4. Setting the Tone BASS: Press and release AUDIO until TRE appears on the display. Then press and hold the down arrow to increase bass. "B" and a positive number will appear on the display...

Owner's Manual
Page 144
... the sound to the right speakers or the down arrow to move the sound to the middle position, end out of audio mode. Then press and hold AUDIO for more than two seconds until you hear a beep. To set all of the tone controls and speaker controls to ...speakers. D It is balanced between the speakers. FADE: Press and release AUDIO until BAL appears on the display. Adjusting the Speakers BALANCE: Press and release AUDIO until FAD appears on the display. Release the up . Then press and hold AUDIO for more than two seconds until you hear a beep. L and a...
... the sound to the right speakers or the down arrow to move the sound to the middle position, end out of audio mode. Then press and hold AUDIO for more than two seconds until you hear a beep. To set all of the tone controls and speaker controls to ...speakers. D It is balanced between the speakers. FADE: Press and release AUDIO until BAL appears on the display. Adjusting the Speakers BALANCE: Press and release AUDIO until FAD appears on the display. Release the up . Then press and hold AUDIO for more than two seconds until you hear a beep. L and a...

Owner's Manual
Page 145
... on the display. The sound will mute while seeking. If the PREV button or the left SEEK arrow to go to play . Radio Calibration Your audio system has been calibrated for your vehicle and must be activated with the radio and ignition off . PREV (1): Press this button or the left SEEK...
... on the display. The sound will mute while seeking. If the PREV button or the left SEEK arrow to go to play . Radio Calibration Your audio system has been calibrated for your vehicle and must be activated with the radio and ignition off . PREV (1): Press this button or the left SEEK...

Owner's Manual
Page 146
... equipment to 65 km). So, before your vehicle -- Your hearing can add what you ever get it. like storms and power lines. Tips About Your Audio System Hearing damage from things like a tape player, CB radio, mobile telephone or two-way radio -- D Increase volume slowly until it 's very important to the...
... equipment to 65 km). So, before your vehicle -- Your hearing can add what you ever get it. like storms and power lines. Tips About Your Audio System Hearing damage from things like a tape player, CB radio, mobile telephone or two-way radio -- D Increase volume slowly until it 's very important to the...
Owner's Manual
Page 187
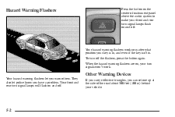
... turn off . Your hazard warning flashers work . If you carry reflective triangles, you can set one up at the side of instrument panel above the audio system to make your vehicle. 5-2 Hazard Warning Flashers Press the button on the center of the road about 300 feet (100 m) behind your front and...
... turn off . Your hazard warning flashers work . If you carry reflective triangles, you can set one up at the side of instrument panel above the audio system to make your vehicle. 5-2 Hazard Warning Flashers Press the button on the center of the road about 300 feet (100 m) behind your front and...

Owner's Manual
Page 313
... them last longer, seal better, and not stick or squeak. Don't forget to the correct pressures. See "Tires" in the Index for further details. See "Audio Systems" in the Index for any opened or broken air bag coverings, and have it repaired. Also look for further details. If you see "Wiper...
... them last longer, seal better, and not stick or squeak. Don't forget to the correct pressures. See "Tires" in the Index for further details. See "Audio Systems" in the Index for any opened or broken air bag coverings, and have it repaired. Also look for further details. If you see "Wiper...