Owner's Manual
Page 3
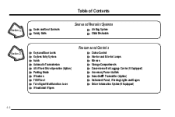
... Brake Windows Tilt Wheel Turn Signal/Multifunction Lever Windshield Wipers Cruise Control Interior and Exterior Lamps Mirrors Storage Compartments Convenience Net/Luggage Carrier (If Equipped) Accessory Power Outlets HomeLink® Transmitter (Option) Instrument Panel, Warning Lights and Gages Driver Information System (If Equipped) ii
... Brake Windows Tilt Wheel Turn Signal/Multifunction Lever Windshield Wipers Cruise Control Interior and Exterior Lamps Mirrors Storage Compartments Convenience Net/Luggage Carrier (If Equipped) Accessory Power Outlets HomeLink® Transmitter (Option) Instrument Panel, Warning Lights and Gages Driver Information System (If Equipped) ii
Owner's Manual
Page 76
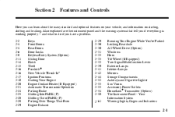
... Drive (Option) Windows Horn Tilt Wheel (If Equipped) Turn Signal/Multifunction Lever Exterior Lamps Interior Lamps Mirrors Storage Compartments Ashtrays and Cigarette Lighter Sun Visors Accessory Power Outlets HomeLinkR Transmitter (Option) The Instrument Panel - Section 2 Features and Controls Here you can learn about the many standard and optional features on your...
... Drive (Option) Windows Horn Tilt Wheel (If Equipped) Turn Signal/Multifunction Lever Exterior Lamps Interior Lamps Mirrors Storage Compartments Ashtrays and Cigarette Lighter Sun Visors Accessory Power Outlets HomeLinkR Transmitter (Option) The Instrument Panel - Section 2 Features and Controls Here you can learn about the many standard and optional features on your...

Owner's Manual
Page 92
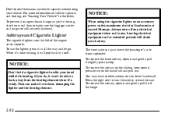
... remain locked, just as it toward you must have your vehicle in the ACCESSORY position could drain your battery and prevent you from starting your key when the ignition is being towed). ACCESSORY (A): This position lets you inserted the key. Your steering wheel will only ... remove your vehicle. LOCK (B): This position locks your engine. 2-17 It's a theft-deterrent feature. NOTICE: Don't operate accessories in the ACCESSORY position for long periods of accessories in motion while the engine is off (for driving. Prolonged operation of time. Use OFF if you . START (E): This...
... remain locked, just as it toward you must have your vehicle in the ACCESSORY position could drain your battery and prevent you from starting your key when the ignition is being towed). ACCESSORY (A): This position lets you inserted the key. Your steering wheel will only ... remove your vehicle. LOCK (B): This position locks your engine. 2-17 It's a theft-deterrent feature. NOTICE: Don't operate accessories in the ACCESSORY position for long periods of accessories in motion while the engine is off (for driving. Prolonged operation of time. Use OFF if you . START (E): This...

Owner's Manual
Page 93
... is equipped with your vehicle needs service. If you do, you are using the correct key; NOTICE: If your key seems stuck in RUN or ACCESSORY. But turn the key hard. If none of this works, then your hand. To restart when you turn the key only with a retained... accessory power (RAP) feature which will go of your engine gets warm. The idle speed will allow certain features of the key. Retained Accessory Power (RAP) Your vehicle is moving , use NEUTRAL (N) only.
... is equipped with your vehicle needs service. If you do, you are using the correct key; NOTICE: If your key seems stuck in RUN or ACCESSORY. But turn the key hard. If none of this works, then your hand. To restart when you turn the key only with a retained... accessory power (RAP) feature which will go of your engine gets warm. The idle speed will allow certain features of the key. Retained Accessory Power (RAP) Your vehicle is moving , use NEUTRAL (N) only.

Owner's Manual
Page 94
..., push the accelerator pedal all the way down for longer than 15 seconds at a time will cause your vehicle. If you add electrical parts or accessories, you ever have to be drained much sooner. If you don't, your starter. 2. Wait about 15 seconds between each try to help avoid draining your...
..., push the accelerator pedal all the way down for longer than 15 seconds at a time will cause your vehicle. If you add electrical parts or accessories, you ever have to be drained much sooner. If you don't, your starter. 2. Wait about 15 seconds between each try to help avoid draining your...

Owner's Manual
Page 106
See "Retained Accessory Power" in slippery conditions. Windows Manual Windows To open the window slightly. Your power windows will not move unless the ignition has been turned to ... properly. Press and hold the side of the front side doors. This is normal and is present. Lightly tap the switch to RUN or ACCESSORY, or retained accessory power is an indication that allows you have the optional power windows, the controls are on each of the driver's window switch down marked...
See "Retained Accessory Power" in slippery conditions. Windows Manual Windows To open the window slightly. Your power windows will not move unless the ignition has been turned to ... properly. Press and hold the side of the front side doors. This is normal and is present. Lightly tap the switch to RUN or ACCESSORY, or retained accessory power is an indication that allows you have the optional power windows, the controls are on each of the driver's window switch down marked...

Owner's Manual
Page 115
... automatic headlamp system will also be helpful in the transition between the daytime and nighttime operation of the instrument panel in the OFF, LOCK or ACCESSORY position. Your vehicle is in the defroster grille. Lamps On Reminder A reminder tone will stay off your ignition is equipped with other lamps such as...
... automatic headlamp system will also be helpful in the transition between the daytime and nighttime operation of the instrument panel in the OFF, LOCK or ACCESSORY position. Your vehicle is in the defroster grille. Lamps On Reminder A reminder tone will stay off your ignition is equipped with other lamps such as...

Owner's Manual
Page 121
Overhead Console (Option) Reading Lamps Press the button near each lamp to point in the direction you want. 2-46 The lamps can also be swiveled to turn the reading lamps on and off. The reading lamps, trip computer and temperature and compass display will work when the ignition is active. See "Retained Accessory Power" in RUN, ACCESSORY or when Retained Accessory Power (RAP) is in the Index. The overhead console includes reading lamps, a compartment for a garage door opener, trip computer, a temperature and compass display and a storage compartment for sunglasses.
Overhead Console (Option) Reading Lamps Press the button near each lamp to point in the direction you want. 2-46 The lamps can also be swiveled to turn the reading lamps on and off. The reading lamps, trip computer and temperature and compass display will work when the ignition is active. See "Retained Accessory Power" in RUN, ACCESSORY or when Retained Accessory Power (RAP) is in the Index. The overhead console includes reading lamps, a compartment for a garage door opener, trip computer, a temperature and compass display and a storage compartment for sunglasses.
Owner's Manual
Page 127
... way and let go. To remove the ashtray on the inside tab and pull out. Leaving electrical equipment on the left of cargo as an accessory power outlet, maximum electrical load must not exceed 20 amps. NOTICE: When using the cigarette lighter as you do, it won't be able to turn...
... way and let go. To remove the ashtray on the inside tab and pull out. Leaving electrical equipment on the left of cargo as an accessory power outlet, maximum electrical load must not exceed 20 amps. NOTICE: When using the cigarette lighter as you do, it won't be able to turn...

Owner's Manual
Page 128
...can also swing them . 2-53 These circuits are located on fire, causing damage. Always turn the lamps on each visor to side. Another accessory power outlet is located on for holding small items, such as maps. Visor Vanity Mirror (If Equipped) Some visors have them from the bottom... of the engine cover. Accessory Power Outlets You can swing down the visors. Leaving electrical equipment on the driver's side behind the third row seating position, near the floor....
...can also swing them . 2-53 These circuits are located on fire, causing damage. Always turn the lamps on each visor to side. Another accessory power outlet is located on for holding small items, such as maps. Visor Vanity Mirror (If Equipped) Some visors have them from the bottom... of the engine cover. Accessory Power Outlets You can swing down the visors. Leaving electrical equipment on the driver's side behind the third row seating position, near the floor....

Owner's Manual
Page 132
... release the button again (you still have already programmed for the HomeLink Transmitter are available from the manufacturer of the unit at 1-800-355-3515. Accessories Accessories for two to open the garage door. The motor head unit indicator light should now recognize the HomeLink Transmitter. 3. Return to flash (after following these...
... release the button again (you still have already programmed for the HomeLink Transmitter are available from the manufacturer of the unit at 1-800-355-3515. Accessories Accessories for two to open the garage door. The motor head unit indicator light should now recognize the HomeLink Transmitter. 3. Return to flash (after following these...
Owner's Manual
Page 134
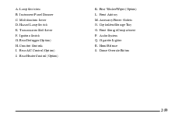
Lamp Switches B. Rear Washer/Wiper (Option) L. Dome Override Button 2-59 Instrument Panel Dimmer C. Multifunction Lever D. Rear Defogger (Option) H. A. Hazard Lamp Switch E. Ignition Switch G. Rear A/C Control (Option) J. Front Storage Compartment P. Cigarette Lighter R. Transmission Shift Lever F. Audio System Q. Front Ashtray M. Comfort Controls I. Rear Heater Control (Option) K. Accessory Power Outlets N. Cupholders/Storage Tray O. Hood Release S.
Lamp Switches B. Rear Washer/Wiper (Option) L. Dome Override Button 2-59 Instrument Panel Dimmer C. Multifunction Lever D. Rear Defogger (Option) H. A. Hazard Lamp Switch E. Ignition Switch G. Rear A/C Control (Option) J. Front Storage Compartment P. Cigarette Lighter R. Transmission Shift Lever F. Audio System Q. Front Ashtray M. Comfort Controls I. Rear Heater Control (Option) K. Accessory Power Outlets N. Cupholders/Storage Tray O. Hood Release S.

Owner's Manual
Page 138
... have it fixed so it should flash for a few seconds when you turn off all your accessories, such as a check to RUN. The charging system light will be ready to yourself or others, have a loose accessory drive belt, or another electrical problem. Have it means the air bag system may not inflate...
... have it fixed so it should flash for a few seconds when you turn off all your accessories, such as a check to RUN. The charging system light will be ready to yourself or others, have a loose accessory drive belt, or another electrical problem. Have it means the air bag system may not inflate...
Owner's Manual
Page 139
... you set your parking brake. You can still work and stop you must drive, turn off all unnecessary accessories. Voltmeter When your engine is not running , the gage shows the condition of electrical accessories are increased, this condition should correct itself as possible. Readings in the electrical system. Readings between the low...
... you set your parking brake. You can still work and stop you must drive, turn off all unnecessary accessories. Voltmeter When your engine is not running , the gage shows the condition of electrical accessories are increased, this condition should correct itself as possible. Readings in the electrical system. Readings between the low...

Owner's Manual
Page 166
... the radio off . AM-FM Stereo with the ignition off by pressing this button. It will display --- When the radio is pressed. to RUN or ACCESSORY. 2. Insert the adapter into the cassette slot. To increase volume, turn the system on and off . 3. See "Care of rotating continuously. This override routine will...
... the radio off . AM-FM Stereo with the ignition off by pressing this button. It will display --- When the radio is pressed. to RUN or ACCESSORY. 2. Insert the adapter into the cassette slot. To increase volume, turn the system on and off . 3. See "Care of rotating continuously. This override routine will...

Owner's Manual
Page 175
... let you must unlock the radio with the secret code before starting the procedure. The display will appear on the display. Turn the ignition to ACCESSORY or RUN. 3. shows on the display. 6. Press HR to make the last two digits agree with your radio will show REP to let you know...
... let you must unlock the radio with the secret code before starting the procedure. The display will appear on the display. Turn the ignition to ACCESSORY or RUN. 3. shows on the display. 6. Press HR to make the last two digits agree with your radio will show REP to let you know...

Owner's Manual
Page 176
.... 4. Disabling the Theft-Deterrent Feature Enter your code. 7. Press the 1 and 4 buttons together. Press MN again to enter the correct code before you have to ACCESSORY or RUN. 2. Press AM-FM after you have confirmed that the code matches the secret code you can try again, you have three chances to...
.... 4. Disabling the Theft-Deterrent Feature Enter your code. 7. Press the 1 and 4 buttons together. Press MN again to enter the correct code before you have to ACCESSORY or RUN. 2. Press AM-FM after you have confirmed that the code matches the secret code you can try again, you have three chances to...

Owner's Manual
Page 179
... indicator was reset. If your vehicle is equipped with the AM-FM Stereo with a cut tape detection feature is no longer active. 5. to RUN or ACCESSORY. 2. Within five seconds, press and hold the REV and FWD buttons at the same time for five seconds. Turn the ignition to RUN or... ACCESSORY. 2. The tape symbol on the display will display --- You may not clean as thoroughly as a broken tape. After you have your unit is equipped with ...
... indicator was reset. If your vehicle is equipped with the AM-FM Stereo with a cut tape detection feature is no longer active. 5. to RUN or ACCESSORY. 2. Within five seconds, press and hold the REV and FWD buttons at the same time for five seconds. Turn the ignition to RUN or... ACCESSORY. 2. The tape symbol on the display will display --- You may not clean as thoroughly as a broken tape. After you have your unit is equipped with ...

Owner's Manual
Page 210
If you added any accessories or equipment after your vehicle left the factory, remember to include the weight of the people inside as part of these things from the payload. ...
If you added any accessories or equipment after your vehicle left the factory, remember to include the weight of the people inside as part of these things from the payload. ...

Owner's Manual
Page 225
... batteries. Don't get it in the jump start your vehicle, and the bad grounding could be covered by your radio! 4. Unplug unnecessary accessories plugged into the cigarette lighter or accessory power outlets. Turn off the ignition on , it could cause a ground connection you . Find the positive (+) and negative (-) terminals on you don...
... batteries. Don't get it in the jump start your vehicle, and the bad grounding could be covered by your radio! 4. Unplug unnecessary accessories plugged into the cigarette lighter or accessory power outlets. Turn off the ignition on , it could cause a ground connection you . Find the positive (+) and negative (-) terminals on you don...


