

Owner's Manual
Page 1
......3-25 Warning Lights, Gages, and Indicators ...3-33 Driver Information Center (DIC) ...3-48 Audio System(s) ...3-80 M Driving Your Vehicle ...4-1 Your Driving, the Road, and Your Vehicle ...4-2 Towing ...4-50 Service and Appearance Care ...5-1 Service ...5-3 Fuel ...5-5 Checking Things Under the Hood ...5-10 All-Wheel Drive ...5-46 Rear Axle ...5-48 Front Axle ...5-49 Bulb Replacement ...5-50 Windshield Wiper Blade Replacement ...5-50 Tires ...5-52 Appearance Care ...5-83 Vehicle Identification ...5-92 Electrical System ...5-92 Capacities and Specifications ...5-102 Maintenance...
......3-25 Warning Lights, Gages, and Indicators ...3-33 Driver Information Center (DIC) ...3-48 Audio System(s) ...3-80 M Driving Your Vehicle ...4-1 Your Driving, the Road, and Your Vehicle ...4-2 Towing ...4-50 Service and Appearance Care ...5-1 Service ...5-3 Fuel ...5-5 Checking Things Under the Hood ...5-10 All-Wheel Drive ...5-46 Rear Axle ...5-48 Front Axle ...5-49 Bulb Replacement ...5-50 Windshield Wiper Blade Replacement ...5-50 Tires ...5-52 Appearance Care ...5-83 Vehicle Identification ...5-92 Electrical System ...5-92 Capacities and Specifications ...5-102 Maintenance...

Owner's Manual
Page 10
... with heated front seats, the buttons are located on the climate control panel display. Heated Seats If your vehicle is one button for the driver and one for the front passenger. The seat will heat to the HI setting. The HI setting has a slightly higher temperature. 1-4 The heated seats can only be used when the ignition is restarted, press the button again. To turn off...
... with heated front seats, the buttons are located on the climate control panel display. Heated Seats If your vehicle is one button for the driver and one for the front passenger. The seat will heat to the HI setting. The HI setting has a slightly higher temperature. 1-4 The heated seats can only be used when the ignition is restarted, press the button again. To turn off...

Owner's Manual
Page 67
... 2 Features and Controls Starting Your Engine ...2-23 Adjustable Throttle and Brake Pedal ...2-23 Engine Coolant Heater ...2-24 Automatic Transmission Operation ...2-25 All-Wheel Drive ...2-28 Parking Brake ...2-28 Shifting Into Park (P) ...2-30 Shifting Out of Park (P) ...2-32 Parking Over Things That Burn ...2-33 Engine Exhaust ...2-33 Running Your Engine While You Are Parked ...2-34 Mirrors ...2-35 Automatic Dimming Rearview Mirror with OnStar® ...2-35 Automatic Dimming Rearview Mirror with OnStar® and Compass ...2-35 Outside Power Heated Mirrors ...2-38 Outside Automatic Dimming...
... 2 Features and Controls Starting Your Engine ...2-23 Adjustable Throttle and Brake Pedal ...2-23 Engine Coolant Heater ...2-24 Automatic Transmission Operation ...2-25 All-Wheel Drive ...2-28 Parking Brake ...2-28 Shifting Into Park (P) ...2-30 Shifting Out of Park (P) ...2-32 Parking Over Things That Burn ...2-33 Engine Exhaust ...2-33 Running Your Engine While You Are Parked ...2-34 Mirrors ...2-35 Automatic Dimming Rearview Mirror with OnStar® ...2-35 Automatic Dimming Rearview Mirror with OnStar® and Compass ...2-35 Outside Power Heated Mirrors ...2-38 Outside Automatic Dimming...
Owner's Manual
Page 77
... time. 2-11 Unlock the door and open it from the ignition when locking your key into the slot next to the rear door security lock label and turn it to disengage the lock. 3. Be sure to remove the key from the outside . Lockout Protection If you press the power door lock switch when the key is in the ignition and any door is on the remote keyless entry transmitter or by lifting...
... time. 2-11 Unlock the door and open it from the ignition when locking your key into the slot next to the rear door security lock label and turn it to disengage the lock. 3. Be sure to remove the key from the outside . Lockout Protection If you press the power door lock switch when the key is in the ignition and any door is on the remote keyless entry transmitter or by lifting...

Owner's Manual
Page 82
... Vehicle Personalization on the driver's door armrest. Window Lockout This feature allows you close the cover. 2-16 Press the button to disable the passenger window switches. The passenger window lockout button is located below the power window switches on page 3-66 for more information. The light on page 2-42 for a built-in use. Lighted Visor Vanity Mirror Pull the visor down the primary visor to disable all passenger windows or only the rear passenger windows...
... Vehicle Personalization on the driver's door armrest. Window Lockout This feature allows you close the cover. 2-16 Press the button to disable the passenger window switches. The passenger window lockout button is located below the power window switches on page 3-66 for more information. The light on page 2-42 for a built-in use. Lighted Visor Vanity Mirror Pull the visor down the primary visor to disable all passenger windows or only the rear passenger windows...

Owner's Manual
Page 83
... the instrument panel cluster. • The vehicle should go off and a door is opened without a key or a remote keyless entry transmitter, the horn will sound and the lamps will illuminate. If the ignition is ajar. Unlocking a door any other way while the system is armed will not arm if you activate the alarm by using the remote keyless entry transmitter or the power door lock switch. 2. If you lock the doors with a key, use the remote keyless entry...
... the instrument panel cluster. • The vehicle should go off and a door is opened without a key or a remote keyless entry transmitter, the horn will sound and the lamps will illuminate. If the ignition is ajar. Unlocking a door any other way while the system is armed will not arm if you activate the alarm by using the remote keyless entry transmitter or the power door lock switch. 2. If you lock the doors with a key, use the remote keyless entry...
Owner's Manual
Page 87
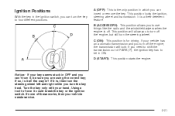
... the ignition switch, you can turn the key to be sure you to turn off the engine, the transmission will allow you are using the correct key; If none of PARK (P), the ignition key has to four different positions. This position locks the ignition, steering wheel and transmission. if so, is off. This position will lock. Notice: If your vehicle needs service. 2-21 Turn the key only with your vehicle has an automatic transmission...
... the ignition switch, you can turn the key to be sure you to turn off the engine, the transmission will allow you are using the correct key; If none of PARK (P), the ignition key has to four different positions. This position locks the ignition, steering wheel and transmission. if so, is off. This position will lock. Notice: If your vehicle needs service. 2-21 Turn the key only with your vehicle has an automatic transmission...
Owner's Manual
Page 147
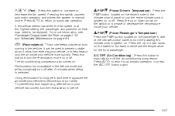
... control panel to prevent outside air from entering your vehicle more information, see Passenger Compartment Air Filter on page 3-32 and Scheduled Maintenance on . It can be replaced. To prevent this from happening, after 10 minutes when defog is selected. y9z (Fan): Press this switch to increase or decrease the temperature for long periods of time may need to be used to turn the passenger...
... control panel to prevent outside air from entering your vehicle more information, see Passenger Compartment Air Filter on page 3-32 and Scheduled Maintenance on . It can be replaced. To prevent this from happening, after 10 minutes when defog is selected. y9z (Fan): Press this switch to increase or decrease the temperature for long periods of time may need to be used to turn the passenger...

Owner's Manual
Page 162
... pass a required Emission Inspection/Maintenance test. This may also result in correctly diagnosing any problem is apparent. This could lead to produce a cleaner environment. Notice: Modifications made to the engine, transmission, exhaust, intake, or fuel system of your vehicle or the replacement of the original tires with this light to costly repairs that there is a problem and service is required. This system...
... pass a required Emission Inspection/Maintenance test. This may also result in correctly diagnosing any problem is apparent. This could lead to produce a cleaner environment. Notice: Modifications made to the engine, transmission, exhaust, intake, or fuel system of your vehicle or the replacement of the original tires with this light to costly repairs that there is a problem and service is required. This system...
Owner's Manual
Page 178
... turning off the accessories. See Scheduled Maintenance on page 6-4 and Recommended Fluids and Lubricants on page 6-4 for the proper fluid and change intervals. The battery should be sure to follow the manufacturer's instructions) to a final destination. See Engine Oil on page 5-16 and Scheduled Maintenance on page 6-11 for more information on resetting the engine oil life system, see Automatic Transmission Fluid on the electrical...
... turning off the accessories. See Scheduled Maintenance on page 6-4 and Recommended Fluids and Lubricants on page 6-4 for the proper fluid and change intervals. The battery should be sure to follow the manufacturer's instructions) to a final destination. See Engine Oil on page 5-16 and Scheduled Maintenance on page 6-11 for more information on resetting the engine oil life system, see Automatic Transmission Fluid on the electrical...

Owner's Manual
Page 286
... be covered by itself. So please read the information in "Weight of the Trailer" that of your vehicle level as the engine, transmission, rear axle, wheel assemblies and tires are forced to operate at all the steps in this section. What's more, the trailer adds considerably to adjust anything. You and your vehicle by your vehicle; Ask your dealer for your vehicle. 4-52 It's automatic - you...
... be covered by itself. So please read the information in "Weight of the Trailer" that of your vehicle level as the engine, transmission, rear axle, wheel assemblies and tires are forced to operate at all the steps in this section. What's more, the trailer adds considerably to adjust anything. You and your vehicle by your vehicle; Ask your dealer for your vehicle. 4-52 It's automatic - you...

Owner's Manual
Page 303
...;re starts while you have finished pumping before removing the nozzle. Leave the area immediately. If you open the fuel cap too quickly. Then unscrew the cap all the way. This would allow fuel to evaporate into the atmosphere. The Check Gas Cap message will appear on page 3-42. See Malfunction Indicator Lamp on the Driver Information Center (DIC...
...;re starts while you have finished pumping before removing the nozzle. Leave the area immediately. If you open the fuel cap too quickly. Then unscrew the cap all the way. This would allow fuel to evaporate into the atmosphere. The Check Gas Cap message will appear on page 3-42. See Malfunction Indicator Lamp on the Driver Information Center (DIC...
Owner's Manual
Page 350
... , automatic transmission, power steering, power brakes, power windows, power seats, and air conditioning. The speed rating is the maximum speed a tire is in compliance with standard and optional equipment including the maximum capacity of the tire. Cords may be made from 1 to Z. Tire Pressure on each square inch of fuel, oil and coolant, but without passengers and cargo. See Inflation - DOT Markings: A code molded into the sidewall of the tread. GVWR: Gross Vehicle Weight Rating, see...
... , automatic transmission, power steering, power brakes, power windows, power seats, and air conditioning. The speed rating is the maximum speed a tire is in compliance with standard and optional equipment including the maximum capacity of the tire. Cords may be made from 1 to Z. Tire Pressure on each square inch of fuel, oil and coolant, but without passengers and cargo. See Inflation - DOT Markings: A code molded into the sidewall of the tread. GVWR: Gross Vehicle Weight Rating, see...

Owner's Manual
Page 351
... the sidewall. Radial Ply Tire: A pneumatic tire in flation pressure for a tire and upon which the ply cords that faces outward when mounted on page 4-45. Sidewall: The portion of curb weight; GAWR RR: Gross Axle Weight Rating for the rear axle, see Loading Your Vehicle on the tire placard. Light Truck (LT-Metric) Tire: A tire used on light duty trucks and some light duty trucks and multipurpose vehicles. Load Index: An...
... the sidewall. Radial Ply Tire: A pneumatic tire in flation pressure for a tire and upon which the ply cords that faces outward when mounted on page 4-45. Sidewall: The portion of curb weight; GAWR RR: Gross Axle Weight Rating for the rear axle, see Loading Your Vehicle on the tire placard. Light Truck (LT-Metric) Tire: A tire used on light duty trucks and some light duty trucks and multipurpose vehicles. Load Index: An...

Owner's Manual
Page 356
... Parking brake. 2. Using the Remote Keyless Entry (RKE) transmitter, lock and unlock the vehicle's doors. 4. Press the lock and unlock buttons, at the same time, on the tire and loading information label. 12. Activate the TPM sensor by turning the ignition switch to OFF. 11. You will need to be matched to the recommended air pressure level as indicated on the RKE transmitter. Turn the ignition switch to the right (passenger...
... Parking brake. 2. Using the Remote Keyless Entry (RKE) transmitter, lock and unlock the vehicle's doors. 4. Press the lock and unlock buttons, at the same time, on the tire and loading information label. 12. Activate the TPM sensor by turning the ignition switch to OFF. 11. You will need to be matched to the recommended air pressure level as indicated on the RKE transmitter. Turn the ignition switch to the right (passenger...

Owner's Manual
Page 389
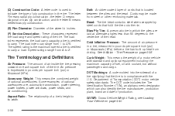
... Switch (ON) Wiring Harnesses BODY W/H I/P W/H ENG W/H FORWARD LAMP J Cases R REAR R REAR L REAR L REAR HI FAN LOW FAN BLOWER STARTER EBCM Usage Wiring Harness Connection Wiring Harness Connection Engine Wiring Harness Connection Forward Lamp Wiring Harness Connection Usage RRPDB (Passenger's Side Rear Power Distribution Box) RRPDB (Passenger's Side Rear Power Distribution Box) LRPDB (Driver's Side Rear Power Distribution Box) LRPDB (Driver's Side Rear Power Distribution Box) High Cooling Fan Motor Low Cooling Fan Motor PWM Fan Motor Assembly Starter Solenoid Electronic Brake Control Module...
... Switch (ON) Wiring Harnesses BODY W/H I/P W/H ENG W/H FORWARD LAMP J Cases R REAR R REAR L REAR L REAR HI FAN LOW FAN BLOWER STARTER EBCM Usage Wiring Harness Connection Wiring Harness Connection Engine Wiring Harness Connection Forward Lamp Wiring Harness Connection Usage RRPDB (Passenger's Side Rear Power Distribution Box) RRPDB (Passenger's Side Rear Power Distribution Box) LRPDB (Driver's Side Rear Power Distribution Box) LRPDB (Driver's Side Rear Power Distribution Box) High Cooling Fan Motor Low Cooling Fan Motor PWM Fan Motor Assembly Starter Solenoid Electronic Brake Control Module...
Owner's Manual
Page 393
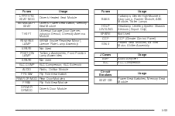
... Lamp Assemblies Not Used ELC Compressor, ELC Solenoid Radio, OnStar Module Flip Fold Seat Switch Flip Fold Seat Module Driver's Door Module Fuses BASS HDLP LEVELING SPARE CCP IGN 3 Usage Taillamps, Center High-Mounted Stop Lamp, Flasher Module, ABS Module, Trailer Lamps Headlamp Leveling System Chassis Sensors (Export Only) Not Used CCP (Climate Control Panel) Heated Seat Modules, Air Inlet Motor, Shifter Assembly Usage Audio Amplifier ELC Compressor J Cases AMP ELC Circuit Breakers SEAT C/B Usage Power Seat Switches, Memory Seat Module REAR DR MOD Rear Door Modules...
... Lamp Assemblies Not Used ELC Compressor, ELC Solenoid Radio, OnStar Module Flip Fold Seat Switch Flip Fold Seat Module Driver's Door Module Fuses BASS HDLP LEVELING SPARE CCP IGN 3 Usage Taillamps, Center High-Mounted Stop Lamp, Flasher Module, ABS Module, Trailer Lamps Headlamp Leveling System Chassis Sensors (Export Only) Not Used CCP (Climate Control Panel) Heated Seat Modules, Air Inlet Motor, Shifter Assembly Usage Audio Amplifier ELC Compressor J Cases AMP ELC Circuit Breakers SEAT C/B Usage Power Seat Switches, Memory Seat Module REAR DR MOD Rear Door Modules...
Owner's Manual
Page 395
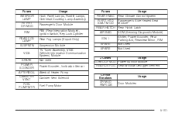
... Courtesy Lamp Assembly Passenger's Door Module RIM (Rear Integration Module), Ignition Switch, Key Lock Cylinder Rear Fog Lamps (Export Only) Suspension Module TV Tuner Assembly, VICS (Vehicle Information Communication System) Module Not Used Power Sounder, Inclination Sensor Afterboil Heater Pump Canister Vent Solenoid Fuel Pump Motor Fuses REAR HVAC R FRT HTD SEAT MOD REAR HATCH AIR BAG IGN 1 SPARE SPARE Usage Rear Climate Control System Passenger's Side Heated Seat Module Rear Hatch Latch SDM (Sensing Diagnostic Module) Shifter, Power Sounder, Rear Parking Aid, Rearview Mirror, RIM Not...
... Courtesy Lamp Assembly Passenger's Door Module RIM (Rear Integration Module), Ignition Switch, Key Lock Cylinder Rear Fog Lamps (Export Only) Suspension Module TV Tuner Assembly, VICS (Vehicle Information Communication System) Module Not Used Power Sounder, Inclination Sensor Afterboil Heater Pump Canister Vent Solenoid Fuel Pump Motor Fuses REAR HVAC R FRT HTD SEAT MOD REAR HATCH AIR BAG IGN 1 SPARE SPARE Usage Rear Climate Control System Passenger's Side Heated Seat Module Rear Hatch Latch SDM (Sensing Diagnostic Module) Shifter, Power Sounder, Rear Parking Aid, Rearview Mirror, RIM Not...

Owner's Manual
Page 438
Passenger Compartment Air Filter ...3-32 Passing ...4-14 Power Accessory Outlets ...3-23 Door Locks ...2-9 Electrical System ...5-93 Lumbar Controls ...1-3 Retained Accessory (RAP) ...2-22 Seat ...1-2 Steering Fluid ...5-35 Windows ...2-14 Pretensioners, Safety Belt ...1-27 Programmable Automatic Door Locks ...2-10 Programming the HomeLink® Transmitter ...2-43 Q Questions and Answers About Safety Belts ...1-14 R Radios ...3-80 Care of Your CD and DVD Player ...3-113 Care of Your CDs and DVDs ...3-113 Navigation/Radio System ...3-111 Radios (cont.) Radio with CD ...3-81 Setting the Time...
Passenger Compartment Air Filter ...3-32 Passing ...4-14 Power Accessory Outlets ...3-23 Door Locks ...2-9 Electrical System ...5-93 Lumbar Controls ...1-3 Retained Accessory (RAP) ...2-22 Seat ...1-2 Steering Fluid ...5-35 Windows ...2-14 Pretensioners, Safety Belt ...1-27 Programmable Automatic Door Locks ...2-10 Programming the HomeLink® Transmitter ...2-43 Q Questions and Answers About Safety Belts ...1-14 R Radios ...3-80 Care of Your CD and DVD Player ...3-113 Care of Your CDs and DVDs ...3-113 Navigation/Radio System ...3-111 Radios (cont.) Radio with CD ...3-81 Setting the Time...
Owner's Manual
Page 440
... ...5-90 Shifting Into Park (P) ...2-30 Shifting Out of Park (P) ...2-32 Signals, Turn and Lane-Change ...3-8 Spare Tire Installing ...5-73 Removing ...5-71 Storing ...5-79 Specifications, Capacities ...5-102 Speedometer ...3-35 Sport Mode Light ...3-45 Stabilitrak® System ...4-10 Starting Your Engine ...2-23 Status of Vehicle Systems, DIC ...3-49 Steering ...4-12 Steering Wheel Controls, Audio ...3-111 Steering Wheel, Tilt Wheel ...3-6 Storage Areas Cargo Management System ...2-49 Cell Phone Storage Area ...2-47 Center Console Storage...
... ...5-90 Shifting Into Park (P) ...2-30 Shifting Out of Park (P) ...2-32 Signals, Turn and Lane-Change ...3-8 Spare Tire Installing ...5-73 Removing ...5-71 Storing ...5-79 Specifications, Capacities ...5-102 Speedometer ...3-35 Sport Mode Light ...3-45 Stabilitrak® System ...4-10 Starting Your Engine ...2-23 Status of Vehicle Systems, DIC ...3-49 Steering ...4-12 Steering Wheel Controls, Audio ...3-111 Steering Wheel, Tilt Wheel ...3-6 Storage Areas Cargo Management System ...2-49 Cell Phone Storage Area ...2-47 Center Console Storage...


