eMachines T3418 Support Question
eMachines T3418 Support Question
Find answers below for this question about eMachines T3418.Need a eMachines T3418 manual? We have 1 online manual for this item!
Question posted by Drexholliday on June 22nd, 2014
3 Power Button Wires
Where on the motherboard do the 3 wires coming from the power button connect? What jumpers on power supply board if that is correct place?
Current Answers
Related eMachines T3418 Manual Pages
NG3 Hardware Reference - Page 5
... the colors on your Windows desktop 110 Changing the desktop background 111 Selecting a screen saver 112 Using an extended desktop 113
Changing the mouse settings 114 Changing Power-Saving Settings 115
Changing the power scheme 115 Changing advanced power settings 116 Activating and using Hibernate mode 116 Installing an uninterruptible power supply 118
Chapter 10: Protecting Your...
NG3 Hardware Reference - Page 6
... 162 Adding or replacing a hard drive 163 Replacing the rear fan 165 Replacing the power supply 166 Replacing the heat sink 167 Replacing the front I/O panel 168 Adding or replacing an expansion card 171 Replacing the system board 172
Chapter 14: Troubleshooting 175
Safety guidelines 176 First steps 176 Troubleshooting 177
Add-in...
NG3 Hardware Reference - Page 16
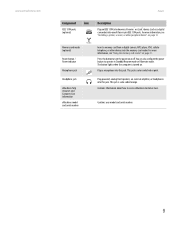
... ports. For more information, see "Using the memory card reader" on page 13. This jack is color-coded red or pink. Memory card reader (optional)
Power button / Power indicator
Microphone jack
Headphone jack
eMachines help resources and Customer Care information eMachines model and serial number
Insert a memory card from a digital camera, MP3 player...
NG3 Hardware Reference - Page 17
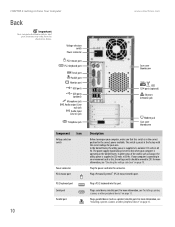
...Serial port Parallel port
Plug a PS/2 keyboard into this port. In the United States, the utility power is supplied at 230 volts at 50 Hz. In other peripheral device" on page 13.
10 Plug a ... computer is in the United States. The switch is operating in the correct position for your area.
The power supply should be set to Know Your Computer
www.emachines.com
Back
Important
Your...
NG3 Hardware Reference - Page 19
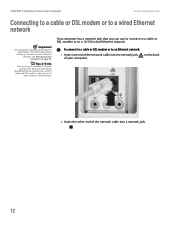
... a cable or DSL modem or to
your computer's Ethernet jack.
Broadband Internet connections, such as cable and DSL modems, also connect to a 10/100 wired Ethernet network. on page 49. To connect to a cable or DSL modem or to a wired Ethernet network
Important
Your computer is equipped with a built-in Ethernet port. CHAPTER 2: Getting to...
NG3 Hardware Reference - Page 25
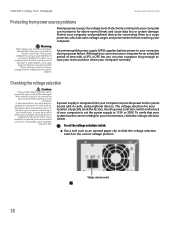
...storm,
unplug both the power cord and the modem connection. Protect your computer and peripheral devices by connecting them from power source problems
Warning
High... the utility power is integrated into your computer to provide power to the correct voltage position. A power supply is supplied at a nominal 115 volts at the factory. In other areas of electricity coming into your ...
NG3 Hardware Reference - Page 26
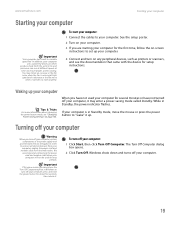
... the on-screen instructions to set up your
computer, unplug the power cord and modem cable from your computer.
4 Connect and turn off your computer, certain components in the fan noise
...power button to
turn off your computer, it up your computer.
19
Both the system fan and processor can run at different speeds at high speed and a decrease in the power supply and
system board...
NG3 Hardware Reference - Page 27
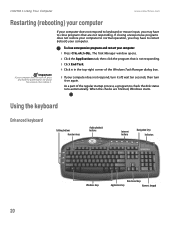
...are finished, Windows starts. Using the keyboard
Enhanced keyboard
Editing buttons Function keys
Audio playback buttons
Internet buttons
Navigation keys Indicators
Windows keys
Directional keys
Application key
Numeric keypad...respond, turn it off, wait ten seconds, then turn off, press and hold the power button for about five seconds, then release it on again. When the checks are not ...
NG3 Hardware Reference - Page 86
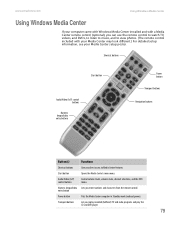
...Let you enter numbers and characters from the remote control.
entry button
Power button
Puts the Media Center computer in Standby mode (reduced power). Shortcut buttons
Start button
Audio/Video (A/V) control buttons
Numeric keypad/data entry buttons
Power button
Transport buttons
Navigation buttons
Button(s)
Functions
Shortcut buttons
Give you direct access to view photos. (The remote...
NG3 Hardware Reference - Page 114

CHAPTER 9
Customizing Your Computer
• Adjusting the screen and desktop settings
• Changing the mouse settings • Changing Power-Saving Settings • Installing an uninterruptible power
supply
NG3 Hardware Reference - Page 124
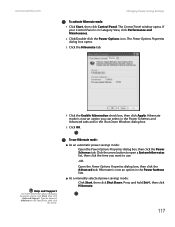
... hold SHIFT, then click Hibernate.
117 Type the keyword hibernate in the Shut Down Windows dialog box.
5 Click OK. Hibernate is in the Power buttons lists.
■ As a manually-selected power savings mode: Click Start, then click Shut Down. Hibernate mode is now an option you want to open a System hibernates list, then...
NG3 Hardware Reference - Page 125
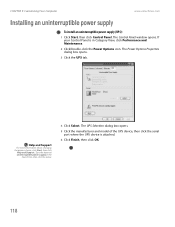
..., click Start, then click
Help and Support. The Control Panel window opens. Type the keyword uninterruptible power supply in Category View, click Performance and Maintenance.
2 Click/Double-click the Power Options icon. The UPS Selection dialog box opens.
5 Click the manufacturer and model of the UPS device, then click the serial port where...
NG3 Hardware Reference - Page 160

... replacing a CD or DVD
drive • Replacing the memory card reader • Adding or replacing a hard drive • Replacing the rear fan • Replacing the power supply • Replacing the heat sink • Replacing the front I/O panel • Adding or replacing an expansion
card • Replacing the system...
NG3 Hardware Reference - Page 161
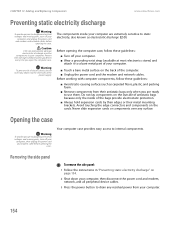
...in your computer.
■ Touch a bare metal surface on the outside of the
power supply.
Before working with computer components, follow these guidelines:
■ Avoid static-causing surfaces ...your computer, then disconnect the power cord and modem, network, and all peripheral device cables.
3 Press the power button to drain any residual power from their metal mounting brackets...
NG3 Hardware Reference - Page 169
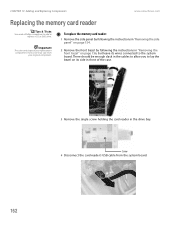
...the front bezel by following the instructions in "Removing the front bezel" on its wires connected to the system board. Important
The color and shape of the case.
3 Remove the single screw ...card reader's USB cable from
your replacement component's front cover may vary from the system board.
162 CHAPTER 13: Adding and Replacing Components
www.emachines.com
Replacing the memory card reader
...
NG3 Hardware Reference - Page 173
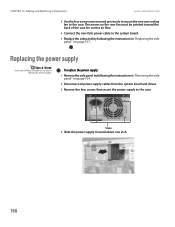
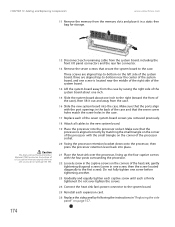
... all power supply cables from the system board and drives.
3 Remove the four screws that secure the power supply to the system board.
7 Replace the side panel by following the instructions in "Replacing the side panel" on the new fan must be pointed toward the back of the case for correct air flow.
6 Connect the new fan's power cable...
NG3 Hardware Reference - Page 174
... the case.
8 Reconnect the power supply cables to the system board and to the drives.
9 Replace the side panel by following the instructions in "Removing the side panel" on page 154.
2 Place the computer case on page 157. www.emachines.com
Tips & Tricks
On some models, you may first need a Phillips screwdriver to add...
NG3 Hardware Reference - Page 181
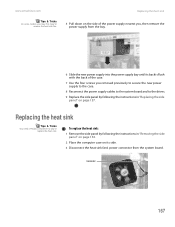
...Make sure that the processor is aligned correctly by following the instructions in one screw, then the screw located diagonally to the new system board.
19 Place the processor into the processor socket. Use...from the case.
16 Slide the new system board into place.
21 Place the heat sink over -tighten the screws.
24 Connect the heat sink fan's power connector to the case. Caution
The heat sink ...
NG3 Hardware Reference - Page 210
... 13
pointer 22 moving 23
ports See connections
power advanced settings 116 button 9 changing advanced settings 116 changing schemes 115 connector 10 Hibernate mode 9, 116 indicator 9 schemes 115 source problems 18 Standby/Resume 9 troubleshooting 189 turning off computer 19
turning on computer 19 using UPS 118
power button 9
power supply replacing 166 uninterruptible 118
printer default 190...
NG3 Hardware Reference - Page 211
...menus accessing 23
shortcuts adding to desktop 28 closing programs 39 closing ...
speakers configuring 13
Standby mode 9
Start button 26
Start menu 27
starting computer 9, ...selection 10
system battery replacing 159
system board replacing 172
system identification label 9
T...connection speed 181
turning off computer 9, 19, 20
turning on computer 9, 19
tutoring fee-based 192
U
uninterruptible power supply...
Similar Questions

Power Supply Wiring
found a 4 prong plug on power supply where to plug it in at
found a 4 prong plug on power supply where to plug it in at
(Posted by bcraze 9 years ago)

Looking For Jumper And Front Panel Connections For Emachine T3418 Manual?
I upgraded my Emachine T3418 and accidentally pulled the power switch, Harddrive LED and Power LED c...
I upgraded my Emachine T3418 and accidentally pulled the power switch, Harddrive LED and Power LED c...
(Posted by BvPc 9 years ago)


What Type Of Power Source Do I Need For An Emachine T3418
(Posted by aagPYWA 10 years ago)

Power Supply Wiring Schematic For Emachines T3304
The power supply in my eMachines T3304 went out so I removed the side cover to see which power suppl...
The power supply in my eMachines T3304 went out so I removed the side cover to see which power suppl...
(Posted by johnwiseman73 10 years ago)