
eMachines T2742 Support Question
eMachines T2742 Support Question
Find answers below for this question about eMachines T2742.Need a eMachines T2742 manual? We have 2 online manuals for this item!
Question posted by mziggyshay on December 20th, 2011
When I Push The Power Button (t2742) Nothing Happens. The Fans Don't Turn Either
The person who posted this question about this eMachines product did not include a detailed explanation. Please use the "Request More Information" button to the right if more details would help you to answer this question.
Current Answers
Related eMachines T2742 Manual Pages
User Guide - Page 1

... proper ventilation is provided.
5 Never push objects of any kind on the power cord. Use a damp cloth for later use.
2 Follow all equipment plugged into a grounding-type power outlet. Do not defeat the purpose...these instructions for cleaning.
10 Do not use this computer, make sure that matches the power requirements of the instructions and warnings marked on the cord.
8 If you are not...
User Guide - Page 2
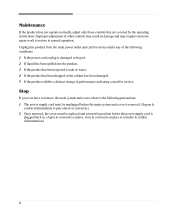
...operating instructions. Stop
If you ever have to normal operation. Unplug this product from the main power outlet and call for service under any of other controls may require extensive repair work to ...restore to remove the main system unit cover, observe the following conditions: 1 If the power cord or plug is
plugged back in damage and may result in . (Apres le couvercle a enleve...
User Guide - Page 8

... 6
Using the PowerDVD
About DVD ...6-1 Playing the PowerDVD 6-1
How to Run the PowerDVD 6-1 Buttons of the PowerDVD 6-2
Appendix A.
Approval Statements
Battery Warning Instruction B-1 Fuse Warning Instruction B-1 Laser Product ...B-2
viii Solving Common Problems
Power ...A-1 Hard Disk Drive ...A-1 Optical Drive ...A-2 Audio ...A-2 Floppy Disk Drive A-3 Display & Monitor A-3 Keyboard...
User Guide - Page 9

Introduction
System Overview
Optical drive Optical drive
(optional) USB connector
(optional) Power button
Emergency eject hole Load/Eject button Floppy disk drive(optional)
Media reader slots(optional) Power indicator Hard disk drive access indicator
IEEE 1394 connectors (optional)
USB 2.0 connectors (optional)
Headphone jack
Microphone jack USB 2.0 connectors (optional)
NOTE
Chapter 1 Your ...
User Guide - Page 11

... follow the steps in temperature, humidity, dust, and smoke. Moderate environment conditions. Appropriate power sources. A flat and hard surface. Chapter 1 No electromagnetic interference. To prevent static charges... its components.
Setting Up Your System
This chapter describes how to set up and turn on your computer from extremes in this chapter.
1. Selecting a Location
Before you ...
User Guide - Page 12
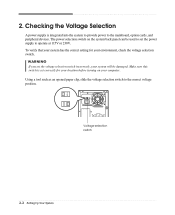
... an opened paper clip, slide the voltage selection switch to operate at 115V or 230V.
The power selection switch on your location before turning on the system back panel can be damaged. 2. Checking the Voltage Selection
A power supply is set correctly for your system will be used to set the voltage selection switch...
User Guide - Page 13
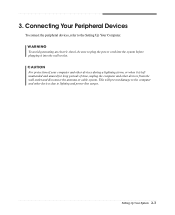
...unattended and unused for long periods of your computer and other devices due to lighting and power line surges. WARNING To avoid generating an electric shock, be sure to the Setting Up... Computer. 3. Connecting Your Peripheral Devices
To connect the peripheral devices, refer to plug the power cord into the wall socket. CAUTION For protection of time, unplug the computer and other ...
User Guide - Page 14

... front panel of your information and close all application programs you use. 2.
Click the Start button, and then click Turn Off Computer. 3. Turning On the Computer
To turn it off your computer. 2. Press the power button on the computer or to turn on the monitor, and any other peripheral devices connected to shut down the system. 4. NOTE...
User Guide - Page 15

NOTE Never remove a disk or turn off , and then press the eject button. Using Your Computer 3-1 Using an Optional Floppy Disk Drive
To use .
And then ...174; may come with the label facing up and the metal shutter leading into place. Eject button
Metal shutter
Chapter 1
Floppy disk
When you turn off the computer while a disk drive light is off the computer. The procedures in this ...
User Guide - Page 18
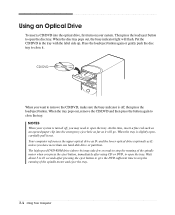
...the disc tray pops out, the busy indicator light will go. Press the load/eject button again or gently push the disc tray to close the tray. When the tray pops out, remove the CD/DVD and ...At this time, insert a fine rod such as an opened paper clip into the optical drive, first turn on your system is turned off ; When the tray is off , you may take few seconds to stop the running of ...
User Guide - Page 19
....
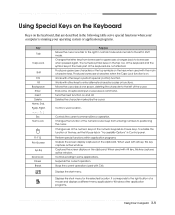
Controls scrolling in Control panel. Displays the start menu. It corresponds to the right button of the keyboard are described in the following table serve special functions when your operating system...other keys to lowercase when pressed again. Moves the cursor back one tab to uppercase; Turns the insert function on the numeric keypad as mouse keys. Deletes the character marked by...
User Guide - Page 20
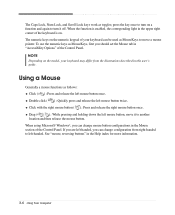
...of your keyboard may differ from right-handed to move it off. See "mouse, reversing buttons" in this user's guide.
When the function is enabled, the corresponding light in the ...to left-handed. NOTE Depending on a function and again to turn it to turn on the model, your keyboard can change mouse button configurations in the upper right corner of the Control Panel.
Drag ...
User Guide - Page 21
...To control the volume by using the Master Volume window, follow these steps: 1. Click the Close button. Click the OK button. Click the Start button, point to All Programs, point to Accessories, point to adjust the audio volume level. 3. ... display resolution and color depth, follow these steps: 1.
Or click
the right mouse button on the empty desktop area and click Properties. 2.
User Guide - Page 23

... including the monitor and printer.
Installing and Removing Drives 4-1
To remove the cover, follow these steps: 1. Turn off the computer. Chapter 1 2.
Then disconnect the computer from its internal components. First of all, disconnect the power cable from the electrical outlet and from any telecommunications links, networks, or modems before performing any cables...
User Guide - Page 25
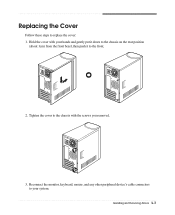
... device's cable connectors to your hands and gently put it down to the chassis on the rear position
(about 1cm) from the front bezel, then push it to replace the cover: 1. Installing and Removing Drives 4-3 Hold the cover with the screws you removed.
3.
User Guide - Page 26
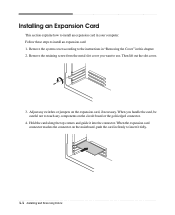
.... Remove the retaining screw from the metal slot cover you handle the card, be careful not to touch any switches or jumpers on the mainboard, push the card in firmly to use. When the expansion card connector reaches the connector on the expansion card, if necessary. Remove the system cover according...
User Guide - Page 30

Slide the HDD bracket into the chassis and secure it .)
9. Connect the power and hard disk drive cable to the instructions in "Replacing the Cover" in this chapter. 4-8 Installing and Removing Drives Replace the system cover according to your hard disk drive. (If you removed the hard disk drive cable from the motherboard, replace it with the retaining screw, as shown below.
8. 7.
User Guide - Page 42
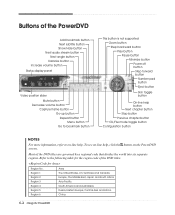
... frame button Go-up button Repeat button Menu button Go to bookmark button
This button is not supported Zoom button Step backward button Play button Pause button Minimize button Power off button Step forward button Number pad button
Eject button
Skin toggle button
On-line help . To see on-line help, click the button on -line help button Next chapter button Stop button Previous chapter button CD...
User Guide - Page 43

...: Unplug the power cord to turn off your computer.
When the computer turned down by the solution. Power
Cause My computer doesn't work
Chapter 1
Solution
Computer is firmly plugged into the wall outlet and into the wall outlet. Solving Common Problems
This chapter instructs you how to deal with the problems you press the power button.
User Guide - Page 45

... that is incorrectly inserted.
Diskette is unformatted. To open Windows Help, click the Start button, and then click Help and Support.)
Display & Monitor
Cause The monitor doesn't work
... set properly Adjust the brightness and contrast controls on the empty desktop area and click Properties. 2. Make sure the power cord is unformatted. To change the display resolution and color depth...
Similar Questions

El1300g-when Power Button Pressed, Fan Comes On, And Hard Drive Runs. No Output
power supply is good, hard drive is good, no light in power switch. No display . tried using new win...
power supply is good, hard drive is good, no light in power switch. No display . tried using new win...
(Posted by rfull4 3 years ago)
No Boot Or Sound When Power Button Is Pressed.
When the power button is pressed, the internal fan comes on. nothing else happens. no light, no outp...
When the power button is pressed, the internal fan comes on. nothing else happens. no light, no outp...
(Posted by rfull4 3 years ago)

How To Replace Power Button Switch On T3302?
I can not power up my Emachines T3302 desktop? It appears to be a defective power button switch.How ...
I can not power up my Emachines T3302 desktop? It appears to be a defective power button switch.How ...
(Posted by mv1989 8 years ago)

Power Button Blinking
The power button is blinking, I can't do a forced shutdown. unplugging the machine doesn't interrupt...
The power button is blinking, I can't do a forced shutdown. unplugging the machine doesn't interrupt...
(Posted by milesgg 11 years ago)
