Xerox 4250 Support Question
Xerox 4250 Support Question
Find answers below for this question about Xerox 4250 - WorkCentre - Copier.Need a Xerox 4250 manual? We have 4 online manuals for this item!
Question posted by suro on January 15th, 2014
How To Change A Xerox Workcentre 4250 Scanner Options From The Computer
The person who posted this question about this Xerox product did not include a detailed explanation. Please use the "Request More Information" button to the right if more details would help you to answer this question.
Current Answers
Related Xerox 4250 Manual Pages
Quick Use Guide - Page 24
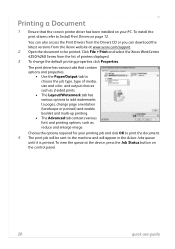
.... 2 Open the document to be sent to pages, change the default printing properties click Properties. Choose the options required for your printing job and click OK to Install Print Drivers on your PC. Click File > Print and select the Xerox WorkCentre 4250/4260 Series from the Xerox website at the device, press the Job Status button...
System Administration Guide - Page 22
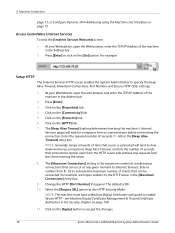
... - 60) in the [Keep Alive Timeout] entry box. Select the [Require SSL] option as the HTTP Security Mode. Access CentreWare Internet Services
To view the [Internet Services Welcome... User Interface on page 148.
11.
At your Workstation, open sockets) to accept the changes.
10
Xerox WorkCentre 4250/4260 Series System Administration Guide Press [Enter].
3. Click on the [HTTP] link.
7....
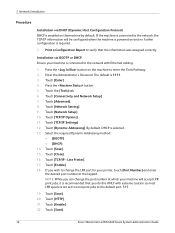
System Administration Guide - Page 26
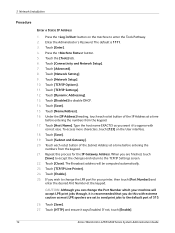
...Options]. 11. Touch [Disabled] to the TCP/IP Settings screen. 22. Touch each octet button of 515.
26. Touch [TCP/IP-Line Printer...changes and return to disable DHCP. 14. To access more characters, touch [123] on the machine to change the Port Number which your printer... 27. If not, touch [Enable].
14
Xerox WorkCentre 4250/4260 Series System Administration Guide Press the button on...
System Administration Guide - Page 28
... [TCP/IP - Touch [HTTP]. 21. Touch [Save].
16
Xerox WorkCentre 4250/4260 Series System Administration Guide Press the button on and no further configuration is recommended that the information was assigned correctly. Enter the Administrator's Password. Touch [Enter]. 4. Touch [Network Setting]. 9. Touch [Save]. 15. Line Printer]. 17. Touch [Enable]. 18. Touch [Save]. 20.
By...
System Administration Guide - Page 30
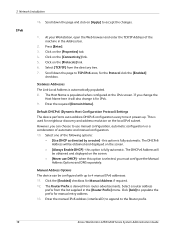
... machine in the [Router Prefix] menu. The DHCPv6 Address will also change the
Host Name here it will be obtained and displayed on the screen.
• [Always Enable DHCP] - Manual Address Options The device can choose to the Router prefix.
18
Xerox WorkCentre 4250/4260 Series System Administration Guide Stateless Addresses The Link-Local Address...
System Administration Guide - Page 34
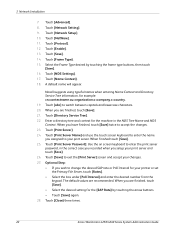
... Tree Name and NDS Context. Optional Step: • If you assigned to accept the changes. 23. Touch [Name Context]....company.c=country. 19. When you setup your changes. 27. Touch [Close] three times.
22
Xerox WorkCentre 4250/4260 Series System Administration Guide Touch [abc...when you have finished, touch [Save] twice to your printer or set
the Primary File Server, touch [Rates]. ...
System Administration Guide - Page 58
... change the default SNMP settings, click on [SNMP Community
Name] and enter the required information. 5. If you can be set to be installed. Installable Options
1.
Right-click on the [OK] button. Click on the printer. 3.
NOTE: Job Storage requires the Save Job for Reprint feature to close your print driver Properties.
46
Xerox WorkCentre 4250/4260...
System Administration Guide - Page 61

... Options].
Xerox WorkCentre 4250/4260 Series System Administration Guide
49 Click on [Print Test Page]. If you cannot see [Printers and Faxes] in the [Start] menu, then click on [Manual] and enter the IP Address or Host Name of the window. e) Ensure that the [Paper/Output] tab is available. NOTE: If you want to change the...
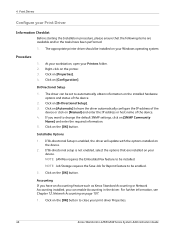
System Administration Guide - Page 62

... Print Driver
1. Click on the machine. 5. Select the options that are specific to close the [Test Page] window. 9. b) Right-click on the [General] tab. 7. Open the CD and select the required language, if necessary.
50
Xerox WorkCentre 4250/4260 Series System Administration Guide Click on the printer icon and select [Properties]. 2. Apple Mac
TCP/IP...
System Administration Guide - Page 64

... on the desktop. 3. Double-click on the hard drive icon on [IP Printing] from the Printer Model list. 25. Double-click on [Add]. Close the [Printer Info] box. 32.
Click on [Applications]. 4. Click on [Installable Options].
52
Xerox WorkCentre 4250/4260 Series System Administration Guide Click on [Internet Protocol Printing] or [LPD/LPR Printing] from the...
System Administration Guide - Page 65
... device. Options are located on the [Apply Changes] button. 10. For further information refer to use the Save Job for the driver. Refer to [Installed].
9. Xerox WorkCentre 4250/4260 Series System Administration Guide
53 Printing Preferences contains all pages, only odd pages, or only even pages. saved job or fax), 2 sided, output destination.
4. Unix printer drivers...
System Administration Guide - Page 70
...the Computer Name.
2. Create a shared folder to accept the changes. Procedure
1. NOTE: If the Default File Destination has previously... (SMB Server / Workstation) is 139).
58
Xerox WorkCentre 4250/4260 Series System Administration Guide Click on the ...Select [SMB] from a PC with full access rights to Optional Step: Configure General Settings - If prompted, enter the Administrator's...
System Administration Guide - Page 71
... on the system, i.e a database. b) Press [Enter]. d) Click on [Login]. 18. Xerox WorkCentre 4250/4260 Series System Administration Guide
59 Select the [Select to accept the changes. If prompted, enter the Administrator's User ID [admin] and Password [1111], and click on ... require server-side scripts to allow files to be transferred to Optional Step: Configure General Settings -
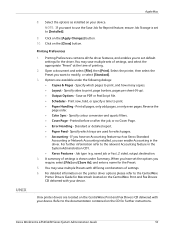
System Administration Guide - Page 73

...File Destinations Setup
5. Click on the [File Repository Setup] link. 7. Xerox WorkCentre 4250/4260 Series System Administration Guide
61 Optional Step: Enter a name to save new password] checkbox. 16.
Select the... The supplied Username must have only setup 1 filing destination, go to accept the changes. File Destinations Setup
You can setup one Default filing destination and up to 3...
System Administration Guide - Page 74
... the [Allow users to accept the changes. The alternate Network Scanning destination will now appear in the Default Template will have the option to your Workstation, open the web browser, enter the TCP/IP Address of Month • Month • Year • Time (24 hour)
62
Xerox WorkCentre 4250/4260 Series System Administration Guide When...
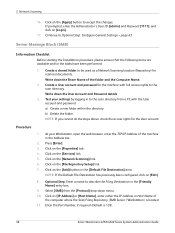
System Administration Guide - Page 76
... created using Internet Services will see 2 options:
• File • Fax
64
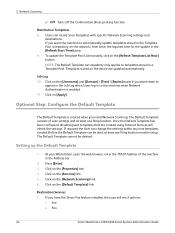
Xerox WorkCentre 4250/4260 Series System Administration Guide Optional Step: Configure the Default Template
The Default...the [Refresh Template List Now] button. The Default Template cannot be setup. Users can change the settings within any new templates created. Click on the [Username] and [Domain]...
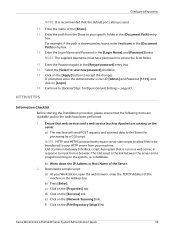
System Administration Guide - Page 77
...Management Fields can be setup prior to send the fax at the machine. Xerox WorkCentre 4250/4260 Series System Administration Guide
65 Optional Step: Configure the Default Template
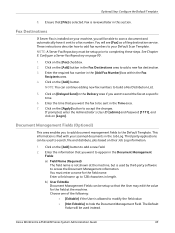
8. NOTE: A Server Fax Repository must...fax to be able to scan a document and automatically have it sent to accept the changes.
Enter the time that [File] is installed on page 90.
1. Fax Destinations
...
System Administration Guide - Page 78
...
Xerox WorkCentre 4250/4260 Series System Administration Guide
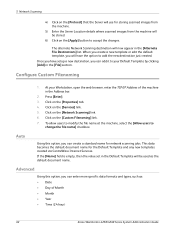
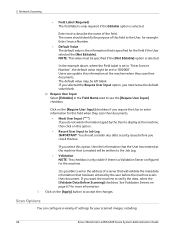
Users can configure a variety of this box. 5 Network Scanning
• Field Label (Required) The field label is only required if the Editable option is set to verify the data, select the [Validate Data Before Scanning] checkbox. Click on this option.
• Record User Input to accept the changes...
System Administration Guide - Page 79
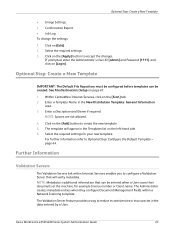
... when a User scans their documents at the machine, for your new template. Select the required settings. 3. Optional Step: Create a New Template
IMPORTANT: The Default File Repository must be configured before templates can be created.... the new template. 5. Click on the [Add] button to accept the changes. Click on [Edit]. 2. Xerox WorkCentre 4250/4260 Series System Administration Guide
67
System Administration Guide - Page 84

Select the printer icon for your job in the selected folder, the system will automatically append information to the file name to choose from: a) TIFF (1 File per Page)
72
Xerox WorkCentre 4250/4260 Series System ...-down menu and select the [Saved Job...] option. 6. Touch [OK]. 6. Use the onscreen touch pad to change the format. Touch the [File Format...] button to enter the new
file ...
Similar Questions

How To Check Workcentre 4250 Firmware Update
(Posted by baninja 10 years ago)

How To Change The Date And Time On A Xerox Workcentre 4250 Copier
(Posted by fuggogree 10 years ago)

How To Change Xerox 4250 Toner Cartridge
(Posted by lrlusMK1 10 years ago)
How To Change Xerox Workcentre 4250 Scan Settings
(Posted by Magsh 10 years ago)
Xerox Workcentre 4250 Network Scanner Cannot Scan To Folder Error
(Posted by FRN2chef42 10 years ago)