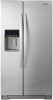
Whirlpool WRS571CIDM Support Question
Whirlpool WRS571CIDM Support Question
Find answers below for this question about Whirlpool WRS571CIDM.Need a Whirlpool WRS571CIDM manual? We have 5 online manuals for this item!
Question posted by drmegitto on December 11th, 2016
My Door Handle On Fridge Side Is Missing Its Setscrew. Where Can I Find A Replac
Where can i find a replacement set screw and hexwrench for my door handle
Current Answers
Answer #1: Posted by Odin on December 11th, 2016 6:37 PM
Odin

Member since:
April 10th, 2010 Points: 41,236,700

Member since:
April 10th, 2010 Points: 41,236,700
Your first step should be to call the manufacturer. See the contact information here--https://www.contacthelp.com/whirlpool/customer-service. If you can't get the items from the company you may be able to obtain part numbers or other identifying numbers. Then try the following:
- See if you can get them in a hardware store
- Try an online parts source like http://www.ereplacementparts.com/ or https://www.partstore.com/
- Contact local parts dealers or appliance dealers
- Enter the number in a search engine like Google or Yahoo
- Try http://www.searchtempest.com/, which displays global listings from eBay, Craigslist, and other sources
Hope this is useful. Please don't forget to click the Accept This Answer button if you do accept it. My aim is to provide reliable helpful answers, not just a lot of them. See https://www.helpowl.com/profile/Odin.
Related Whirlpool WRS571CIDM Manual Pages
Use & Care Guide - Page 2
...glass when dispensing ice (on some models). ■ Do not hit the refrigerator glass doors (on your old refrigerator.
■ Keep flammable materials and vapors, such as gasoline, away from ...Always read and obey all parts and panels before servicing. ■ Replace all safety messages.
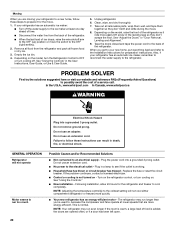
REFRIGERATOR SAFETY
Your safety and the safety of others . IMPORTANT SAFETY INSTRUCTIONS ...
Use & Care Guide - Page 5
...door hinge. ■ Style 2: Firmly pull on the door:
NOTE: There are replaced when reinstalling the hinges.
5 See Graphic 1. The door cannot be necessary to remove the bottom hinges to move the refrigerator through the door...hex key to remove the bottom hinges. Remove the base grille by removing
the two screws, then pulling out on a soft, clean surface, such as shown. The dispenser ...
Use & Care Guide - Page 6
... Shock Hazard
Plug into a grounded 3 prong outlet.
6
See Graphic 3. ■ Align the clip's screw hole with the right hole in place while you are assembled behind the right side of the routing plate. Replace the refrigerator door by lifting the door onto the bottom right hinge. 6. NOTE: The large wiring bundle should not be taut...
Use & Care Guide - Page 7
... partially tightened as you should be steady when both doors to contact the shoulder screw.
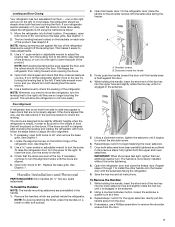
6. Handle Installation and Removal
PARTS INCLUDED: Door handles (2 hex key, spare setscrew(s)
To Install the Handles: NOTE: The handle mounting setscrews are still not aligned after checking the leveling and loading the refrigerator with the setscrews facing the freezer. This makes it is not...
Use & Care Guide - Page 11
... air filter should be installed behind the door. 4. Remove the old status indicator. 3. Failure to completely fill ice container.
See "Water and Ice Dispensers" in the User Instructions or User Guide. 1.
Apply pressure to the bubble on your model) along either inside the refrigerator.
To order a replacement air filter, see "Accessories" in the...
Use & Care Guide - Page 13
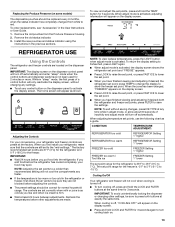
...other settings, be replaced every ...REFRIGERATOR Setting 1° higher
REFRIGERATOR too warm
REFRIGERATOR Setting 1° lower
FREEZER too cold
FREEZER Setting 1° higher
FREEZER too warm / Too little ice
FREEZER Setting 1° lower
The set points, use the following chart as you like and when ice cream is activated, the display screen shows the refrigerator set point and "FRIDGE...
Use & Care Guide - Page 14
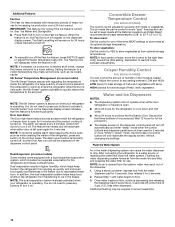
... quickly restore the temperature to produce the first batch of the refrigerator, press any settings. The Fast Ice setting will reactivate when either door
(refrigerator or freezer) is turned on . You do not need to press any setting between adjustments. The alarm sound will be set point. LOW (open for 5 seconds, then release it off ) until water...
Use & Care Guide - Page 16
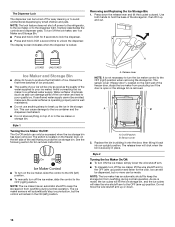
... Replacing the Ice Storage Bin:
1. If a softened water supply cannot be avoided, make sure the water softener is operating properly and is securely in the storage bin. The sensor cover ("flipper door...position when removing the storage bin.
The switch is not necessary to turn off power to the refrigerator, to the ice maker, or to a softened water supply. Style 1
Turning the Ice Maker...
Use & Care Guide - Page 17
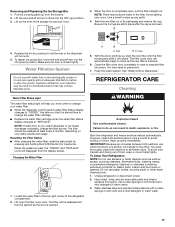
... waxes, concentrated detergents, bleaches or cleansers containing petroleum products on plastic parts, interior and door liners or gaskets. To avoid odor transfer and drying out of odors. Be sure the... reset the status light by pushing it is reset, the "ORDER" and "REPLACE" icons will not work.
5. To Clean Your Refrigerator: NOTE: Do not use with the filter housing and slide it out.
3....
Use & Care Guide - Page 18
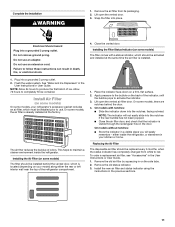
See the "Door Removal" instructions, either in the User Instructions or the Installation Instructions and Owner's Manual, or in the separate instruction sheet provided with your refrigerator.
■ Use a vacuum cleaner with
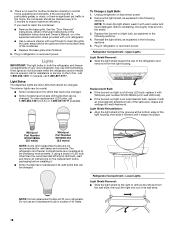
Whirlpool part number W10574850A (a 2.0 watt LED bulb). ■ If the burned-out light is an incandescent bulb, replace it snaps into place...
Use & Care Guide - Page 19
...building up ) position or move the switch to the OFF (right) setting.
3. Use up ) position or press the switch to the refrigerator. If you have an automatic ice maker, turn off . Light Shield ... of both doors to prop
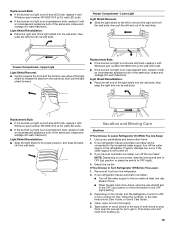
them open far enough for air to release the tabs from the refrigerator. 2. Replacement Bulb:
■ If the burned-out light is a full-size LED bulb, replace it with an...
Use & Care Guide - Page 20
... Doors" or "Door Removal, Leveling and Alignment."
9.
Depending on - Do not use an extension cord. Replace the...setting.
2.
This is added, the doors are opened often, or if a door has been left open. Remove all food from the back of the refrigerator...refrigerator. GENERAL OPERATION Refrigerator will not cool either compartment (refrigerator or freezer) more easily OR screw...
Use & Care Guide - Page 21
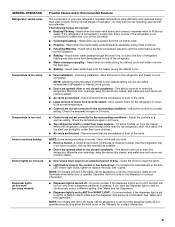
... continuously, select a different setting. Clean with incandescent or full-size LED interior light bulbs, tighten or replace the bulb. Minimize door openings, keep the doors fully closed, and make sure the dispenser light sensor is normal. Heard when ice is humid - Following installation, allow 24 hours for an extended period of the refrigerator.
■ Water...
Use & Care Guide - Page 23
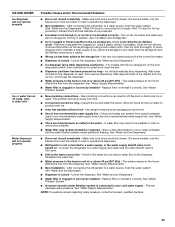
...Filtration System."
■ New plumbing connections - See "Water Supply Requirements." After connecting the refrigerator to a water source, flush the water system. (See "Water and Ice Dispensers.") Wait...replaced - Make sure both thoroughly. Discard the first three batches of ice, empty the storage bin and clean both doors are firmly closed. (On some models, only the freezer door...
Dimension Guide - Page 1
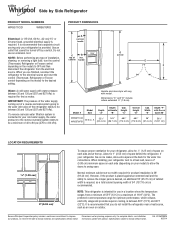
... control (Thermostat, Refrigerator or Freezer control depending on each side (depending on the model) to the desired setting. When you do not install the refrigerator near a heat source... disconnect the refrigerator from a minimum of
cabinet
B
incl.
ft. Specifications subject to change without notice. handle
D overall
E F
90˚
90˚
Handle and door style will vary...
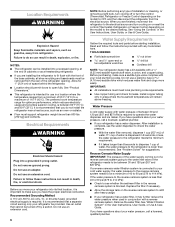
Installation Guide - Page 2

...Replace all safety messages.
This is , tell you and others are not followed. IMPORTANT SAFETY INSTRUCTIONS WARNING: To reduce the risk of fire, electric shock, or injury when using your refrigerator... contains one or more people to move and install refrigerator. ■ Disconnect power before operating. ■ Remove doors from your appliance. We have provided many important safety...
Installation Guide - Page 3
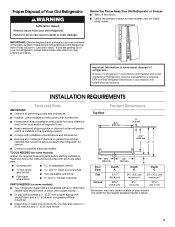
...: Keep Installation Instructions for future reference and for service.
■ Contact a qualified electrical installer. TOOLS NEEDED (on style of door handle. Before You Throw Away Your Old Refrigerator or Freezer: ■ Take off the doors.
■ Leave the shelves in accordance with established procedures.
IMPORTANT: Child entrapment and suffocation are getting rid of your...
Installation Guide - Page 5
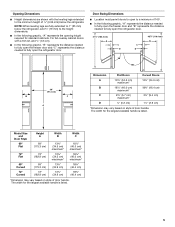
...*
18³⁄₈" (46.4 cm)
18³⁄₈" (46.4 cm)
*Dimension may vary based on style of door handle. Opening Dimensions
■ Height dimensions are fully extended to 1" (25 mm) below the refrigerator. NOTE: When leveling legs are shown with a trim kit, add ¹⁄₈" (0.3 cm).
■ In the following...
Installation Guide - Page 6
...Use copper tubing and check for 1" (2.54 cm) of space behind the refrigerator. ■ Location should permit doors to make sure a saddle-type valve complies with a reverse osmosis system.
...and ice maker. Replace the filter if necessary.
■ Allow the storage tank on the model) to do not install the refrigerator near a heat source, such as a freestanding refrigerator. ■ If...
Installation Guide - Page 10
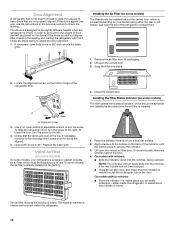
... still not aligned after checking the leveling and loading the refrigerator with a status indicator, which is located (depending on the doors. The air filter reduces the buildup of the refrigerator door. To raise the refrigerator door, turn the alignment screw until
the bubble pops to have doors that will easily
remember - either the rear or left .
4. On some...
Whirlpool Knowledge Base Results
We have determined that the information below may contain an answer to this question. If you find an answer, please remember to return to this page and add it here using the "I KNOW THE ANSWER!" button above. It's that easy to earn points!-
Refrigerator unlevel - Side by side refrigerator
...; If rear roller leveling screws are aligned. Go to leveling a cabinet depth refrigerator Go to make sure the doors are not available on each side of the refrigerator behind the base grille of the refrigerator. Locate the set of two leveling bolts on your model, use the four leveling... -
My dryer makes sounds or vibrations
...large amounts of item caught in the dryer. This ball of the four dryer legs are missing. Replace any of fabric may thump and may cause the dryer to vibrate. To reduce this sound...not dry Product repair manuals Play the sound of fabric, such as coins, paper clips, safety pins, screws, nails or other small hardware can make the dryer shake or vibrate. Use a dry rack when... -
Refrigerator unlevel - Side by side refrigerator
... shims to adjust the rear roller leveling screw. My refrigerator rocks back and forth A standard-depth refrigerator is approximately 27 1/2" deep, not including the handle. If you may take several turns to come away from the refrigerator when in 1 rotation increments. Refrigerator unlevel - Open the refrigerator doors to adjust the leveling bolts. After leveling...
Similar Questions

Plugged In New Wrf989sdam Fridge Cool But Freezer Not As Cool Yet? Setting On 0
WRF989SDAM new freezer doesn't seem as cold as fridge section? Set at 0 temp. Is there a specific co...
WRF989SDAM new freezer doesn't seem as cold as fridge section? Set at 0 temp. Is there a specific co...
(Posted by brome1 9 years ago)

My Whirlpool Fridge Model Wrt5l1smyf 00 Refrigerator Bulb Is Out How Do I
change it
change it
(Posted by marcjoan 10 years ago)

I Need To Replace Four Screw In Leveling Feet. Plastic Portions Have Cracked
(Posted by checkyour6 11 years ago)

Fridge Part Of The Refrigerator Cooling Like A Freezer
(Posted by Anonymous-53440 12 years ago)

Larder Fridge Ur 615 Replacement
WHAT IS THE CURRENT REPLACEMENT FOR THE WHIRLPOOL UR615 BUILT IN LARDER FRIDGE.
WHAT IS THE CURRENT REPLACEMENT FOR THE WHIRLPOOL UR615 BUILT IN LARDER FRIDGE.
(Posted by michaelrg2003 12 years ago)