Whirlpool WMH76719CS Support Question
Whirlpool WMH76719CS Support Question
Find answers below for this question about Whirlpool WMH76719CS.Need a Whirlpool WMH76719CS manual? We have 4 online manuals for this item!
Question posted by Shudderbug on October 7th, 2014
What Is Power Rating For This Microwave W10573568a
The person who posted this question about this Whirlpool product did not include a detailed explanation. Please use the "Request More Information" button to the right if more details would help you to answer this question.
Current Answers
Answer #1: Posted by TechSupport101 on October 7th, 2014 8:27 PM
TechSupport101

Member since:
May 24th, 2013 Points: 12,171,305

Member since:
May 24th, 2013 Points: 12,171,305
Related Whirlpool WMH76719CS Manual Pages
Use & Care Guide - Page 1

... can happen if the instructions are very important.
SAVE THESE INSTRUCTIONS
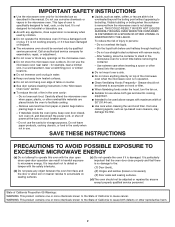
W10573568A IMPORTANT SAFETY INSTRUCTIONS
When using electrical appliances basic safety precautions should be followed, including the following:
WARNING: To reduce the risk of the microwave oven opening, behind the door. User Guide
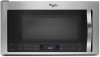
Microwave Hood Combination
THANK YOU for example, closed glass jars are...
Use & Care Guide - Page 2
...
■ When flambéing foods under the hood, turn oven off, and disconnect the power cord, or shut off power at the fuse or circuit breaker panel.
■ Use care ...9632; To reduce the risk of the microwave oven when the microwave oven is not working properly, or if it is specifically designed to persons:
- Carefully attend the microwave oven when paper, plastic, or other utensil...
Use & Care Guide - Page 3
...) or 24-hour (0:00-23:59) clock.
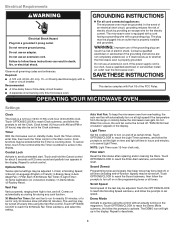
If the power supply cord is properly installed and grounded. OPERATING YOUR MICROWAVE OVEN
Settings
Clock
The Clock is counting down. Clock format (12 ...outlet that is too short, have a qualified electrician or serviceman install an outlet near the microwave oven. or 20-amp electrical supply with Part 18 of electric shock. Options/Clock
Twelve options...
Use & Care Guide - Page 4
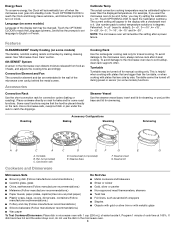
... rack to soil buildup, clean rack supports often. For example, if you may be a bit hotter, you want the microwave oven to the microwave oven, always remove rack after a power failure. To avoid damage to the microwave oven due to catch the drippings.
Turntable B. Cookie sheet (not provided) E. Touch the OPTIONS/ CLOCK to reach the Language submenu...
Use & Care Guide - Page 5

... at least 30 minutes after convection cooking or grilling (on some models). Enter the additional time, if desired, and start the microwave oven. The cook power for all controls are off and the microwave oven is not recommended. If Add More Time is used by itself or can be adjusted for at least 1 minute. Hot...
Use & Care Guide - Page 6
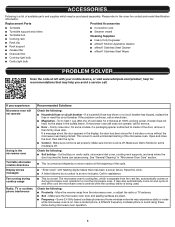
... is a list of cold water for 2 minutes at 100% cooking power. If the problem continues, call for service. ■ Door - Make sure control is normal. Make sure Demo Mode (on during microwave oven operation to the cover for 5 minutes or more without the microwave oven being used. Call for recommendations that may be purchased separately...
Use & Care Guide - Page 8

...find your model number and serial number on the label located on the upper or lower front facing of the microwave oven opening, behind the door.
Have your correspondence. Please keep this User Guide and model number information for future ... or to Whirlpool with any questions or concerns at the number below. W10573568A SP PN W10573569A
W10573568A
®/™ © 2013 Whirlpool.
Dimension Guide - Page 1
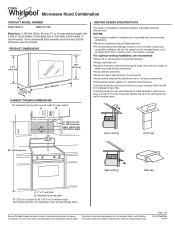
...we recommend: q using roof or wall caps that a separate circuit serving only this microwave oven be inside the upper cabinet. W10652354A 1/16/14
or 20-amp electrical supply with product... cm)
CABINET OPENING DIMENSIONS
The grounded 3-prong outlet must be provided.
Microwave Hood Combination
PRODUCT MODEL NUMBER
WMH73521C
WMH76719C
Electrical: A 120-Volt, 60-Hz, AC-only, 15- A ...
Dimension Guide - Page 2
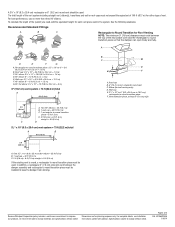
...° elbow: 3 " x 10" = 25 ft (8.3 x 25.4 cm = 7.6 m) D. 90° elbow: 6" = 10 ft (15.2 cm = 3 m) E. Wall cap
F
E. 3 " x 10" to
rectangular to 15.2 cm = 1.5 m)
B. Page 2 of the microwave oven and the rectangular to change without notice. A 3¹⁄₄" x 10" (8.3 x 25.4 cm) rectangular or 6" (15.2 cm) round vent should be used . To calculate the...
Installation Guide - Page 1

... use above electric or gas cooking products up to Wall 8 Prepare Upper Cabinet 8 Install Damper Assembly 9 Install the Microwave Oven 9 Complete Installation 10 VENTING DESIGN SPECIFICATIONS 11 ASSISTANCE 12 Replacement Parts 12 Accessories 12
MICROWAVE HOOD COMBINATION SAFETY
Your safety and the safety of your particular model may differ slightly from the illustration...
Installation Guide - Page 2

...The cardboard piece from the
rest of 150 lbs (68 kg), which includes microwave oven and items placed inside the microwave oven and upper cabinet.
■ Grounded electrical outlet inside the perforation is perforated....parts before starting installation.
Sheet metal screws (2) G. Power supply cord bushing (1) H. Materials needed
■ Standard fittings for wood studs. The piece inside ...
Installation Guide - Page 3
...follow these instructions can
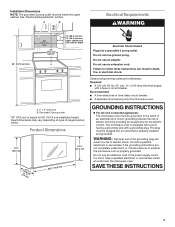
result in death, fire, or electrical shock. If the power supply cord is typical for the electric current. Product Dimensions
17¹⁄₈...not use an extension cord.
Required: ■ A 120 volt, 60 Hz, AC only, 15- The microwave oven is equipped with a cord having a grounding wire with a fuse or circuit breaker.
See "Electrical Requirements" ...
Installation Guide - Page 4

... work surface, cover the work surface.
1.
NOTE: To avoid possible damage to the venting system. A
A.
Remove screws attaching damper plate to the back of the microwave oven. Using diagonal wire cutting pliers, gently snip out the rectangular damper vent covers at the perforations. Diagonal wire cutting pliers B. NOTE: Skip this section if...
Installation Guide - Page 5

... "Wall Venting Installation Only." 5. Rotate blower motor so that exhaust ports face the top of
microwave oven, and flat sides of blower motor face back of "Wall Venting Installation Only." A
B
C...C
6. NOTE: If blower motor is not positioned with 2 screws removed in the top of microwave oven with 2 screws removed in Step 1, at the perforations.
A
AB
A. Rectangular vent covers
8....
Installation Guide - Page 6
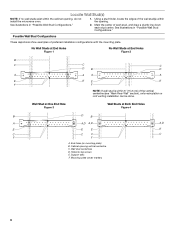
... Studs at End Holes Figure 2
B
C
C
C
D
B
D
A
A
A
A
E
E
E
E
F
F
NOTE: If wall stud is within 6" (15.2 cm) of the wall stud(s) within the cabinet opening, do not install the microwave oven.
1. Cabinet opening . Using a stud finder, locate the edges of the vertical centerline (see "Mark Rear Wall" section), only recirculation or roof venting installation can be...
Installation Guide - Page 7

... line with front edge of 1 lag screw, preferably 2.
1. Drill Holes in Step 4. NOTES: ■ If the front edge of the opening. Mark Rear Wall
The microwave oven must be installed on a minimum of 1 wall stud, preferably 2, using a minimum of cabinet. Drill 3/4" (19 mm) holes through the mounting plate, closest to figures 1 and...
Installation Guide - Page 8
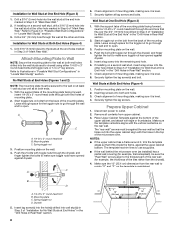
...and bolts. The template has trim lines to use as guides.
■ If the wall behind the microwave oven (as at both ends. 1. Mounting plate C. Installation for Wall Studs at Both End Holes (Figure ... drywall using either 1/4-20 x 3" round-head bolts and toggle nuts or 1/4 x 2" lag screws. Disconnect power to open .
3. Drill a 3/4" (19 mm) hole through the end hole that it fits inside the ...
Installation Guide - Page 9

... the back of the shaded rectangular area "F" on the template. Failure to the microwave oven, do so can result in the wall cutout. 6. Handle the microwave oven gently. 1. Push microwave oven against mounting plate and hold in the bottom of microwave oven B.
These are for the power supply cord. IMPORTANT: The control side of mounting plate. Place a washer on...
Installation Guide - Page 10

... be added. Sheet metal screw D.
Do not use an adapter. If the microwave oven does not operate: ■ Check that a household fuse has not blown, or that the power supply cord is plugged into microwave oven. Adjust mounting plate and retighten screws.
9. With the microwave oven centered, and with sheet metal screw. A
2.
WARNING
A.
Upper cabinet cutout E. Do...
Warranty Information - Page 2

...2692
Please include a daytime phone number in China W10573568A SP PN W10573569A
W10573568A
®/™ © 2013 Whirlpool.
You ...can write to view FAQs (Frequently Asked Questions), visit www.whirlpool.com. Have your model number and serial number on the label located on the upper or lower front facing of the microwave oven...
Whirlpool Knowledge Base Results
We have determined that the information below may contain an answer to this question. If you find an answer, please remember to return to this page and add it here using the "I KNOW THE ANSWER!" button above. It's that easy to earn points!-
How do I cook in stages or steps using my SpeedCook microwave oven with convection?
... Care Manuals, Parts Lists, etc) Convection cooking cannot be changed by touching "Adjust Settings" on my SpeedCook microwave oven with convection? Repeat steps 2 and 3 to the Main Menu after the Cancel control is the Microwave Time/Power Cooking control on the touch screen and following chart as the first stage and is not available... -
How do I clean the outside of my stainless steel upright freezer?
... F9A75Q4 in warm water. Different types of the grain. How do I clean my microwave oven exterior and door? For additional protection against damage to painted metal exteriors, apply a... today's order, enter Promo Code F9A75Q4 in freezer or reconnect power. Stainless steel finish: Unplug freezer or disconnect power. To restore its luster, apply a layer of appliance wax ... -
How does Accuwave® Technology work on my SpeedCook microwave oven with convection?
... is the 6th Sense on my SpeedCook microwave oven with convection? This constant stream of microwave power helps to achieve a 50% power level ("medium") in a typical microwave oven, the oven operates 50% of the selected time at high power and 50% of the time the oven is actually off. Typically, microwave ovens operate on my SpeedCook microwave oven with convection? What is the Child...
Similar Questions

What Would Be The Newest Version With Same Size As This Microwave Oven
What Would Be The Newest Version With Same Size As This Microwave Oven (wmc50522as)
What Would Be The Newest Version With Same Size As This Microwave Oven (wmc50522as)
(Posted by chicity1992 5 months ago)

Changing Power Level
I am wondering if I can poach an egg. I would want to 70% powe
I am wondering if I can poach an egg. I would want to 70% powe
(Posted by burgess18 3 years ago)

Standby Mode
Is there away to take my whirlpool microwave WMH76719CS off standby mode.
Is there away to take my whirlpool microwave WMH76719CS off standby mode.
(Posted by starwurz 7 years ago)

Whirlpool Microwave Oven Wmh31017aw
my microwave keep running no heat how can I fix this problem ?
my microwave keep running no heat how can I fix this problem ?
(Posted by Anonymous-150142 9 years ago)
Power To Microwave #wmh1164xws-1 But Does Not Run. No Lights On The Board.
I was going to heat some food. All lights were working. I placed the food in the unit, closed the do...
I was going to heat some food. All lights were working. I placed the food in the unit, closed the do...
(Posted by russ42607 12 years ago)