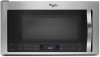
Whirlpool WMH76719CS Support Question
Whirlpool WMH76719CS Support Question
Find answers below for this question about Whirlpool WMH76719CS.Need a Whirlpool WMH76719CS manual? We have 4 online manuals for this item!
Question posted by burgess18 on February 12th, 2021
Changing Power Level
I am wondering if I can poach an egg. I would want to 70% powe
Current Answers
Answer #1: Posted by waelsaidani1 on February 13th, 2021 4:15 AM
waelsaidani1

Member since:
May 12th, 2013 Points: 19,501,797

Member since:
May 12th, 2013 Points: 19,501,797
To Change the Power Level:
- Place food on the turntable and close the door.
- Touch COOK TIME. "00:00" will appear in the display. Enter the length of time to cook.
- Touch POWER LEVEL. The default power level PL10 will appear in the display. Enter the desired power level.
- Touch START. When the cycle ends, "End" will appear in the display, and the end-of-cycle tones will sound.
- Touch CANCEL or open the door to clear the display.
Related Whirlpool WMH76719CS Manual Pages
Use & Care Guide - Page 1

..." found in this section.
■ Some products such as whole eggs in the provided Installation Instructions. Always read and obey all instructions before using electrical appliances basic safety precautions should experience a problem not covered in the microwave oven.
■ The microwave oven must be followed, including the following:
WARNING: To reduce the risk of injury...
Use & Care Guide - Page 2
....
■ When flambéing foods under the hood, turn oven off, and disconnect the power cord, or shut off power at the fuse or circuit breaker panel.
■ Use care when cleaning the vent-hood filter. Do not overcook food. Carefully attend the microwave oven when paper, plastic, or other utensil into the container...
Use & Care Guide - Page 3
...; For all tones.
Demo Mode
Activate to set the light on the programming tones or all cord connected appliances: The microwave oven must be grounded. WARNING: Improper use an adapter. If the power supply cord is a 12-hour (12:00-11:59) or 24-hour (0:00-23:59) clock. Clock format (12 hours...
Use & Care Guide - Page 4
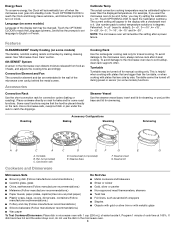
...changed. Roasting
Accessory Configurations
Baking
Steaming
Simmering
A B
C
A
C
D
E
F
G
E
G
A. Steamer base
F. Steamer insert G. Use a microwave-safe, ovenproof dish or pan under the rack to English or French.
Convection rack
D. Language (on Clock.
For example, if you want the microwave oven...to the microwave oven, always remove rack after a power failure....
Use & Care Guide - Page 5

....
■ Cavity: Steam Clean function (on cleaning products. The cook power for all controls are off and the microwave oven is cool. Hot cooked food can be kept warm in the display.
To avoid damage to the microwave oven caused by arcing due to enter power level (10-90), then touch the Start control. See Quick Reference...
Use & Care Guide - Page 6
.... This occurs to heat 1 cup (250 mL) of cold water for assistance.
■ This is attached to cool the microwave oven.
Call for 2 minutes at left with flashing digits means there has been a power failure. Move the receiver away from the vent fan, automatically comes on some models, if a packaging spacer is normal...
Use & Care Guide - Page 8

... using your product, you can find your model number and serial number on the label located on the upper or lower front facing of the microwave oven opening, behind the door. All rights reserved.
7/13 Printed in your complete model number ready.
Dimension Guide - Page 1
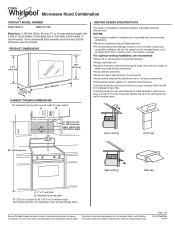
...Ref. Specifications subject to change without notice.
q We do not recommend using roof or wall caps that a separate circuit serving only this microwave oven be inside the upper ... be sure to improve
Dimensions are not provided with microwave hood
combination. Microwave Hood Combination
PRODUCT MODEL NUMBER
WMH73521C
WMH76719C
Electrical: A 120-Volt, 60-Hz, AC-only, 15-...
Dimension Guide - Page 2
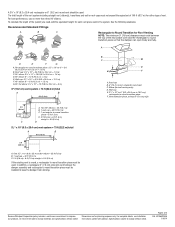
...and rectangular to round transition piece must exist between the top of the microwave oven and the rectangular to round transition piece must not exceed the equivalent of...3¹⁄₄" x 10" (8.3 x 25.4 cm) rectangular or 6" (15.2 cm) round vent should be installed to change without notice. The total length of vent. Rectangular to round transition piece: 3 " x 10" to 6" = 5 ft ...
Installation Guide - Page 1

...Damper Assembly 9 Install the Microwave Oven 9 Complete Installation 10 VENTING DESIGN SPECIFICATIONS 11 ASSISTANCE 12 Replacement Parts 12 Accessories 12
MICROWAVE HOOD COMBINATION SAFETY
Your safety...all safety messages. These installation instructions cover different models. Table of Contents
MICROWAVE HOOD COMBINATION SAFETY 1 INSTALLATION REQUIREMENTS 2
Tools and Parts 2 Remove ...
Installation Guide - Page 2

...along the perforation to separate the template from the top of 150 lbs (68 kg), which includes microwave oven and items placed inside the microwave oven and upper cabinet.
■ Grounded electrical outlet inside the perforation is perforated. Location Requirements
Check ... Parts
Tools Needed
Gather the required tools and parts before starting installation. Power supply cord bushing (1) H.
Installation Guide - Page 3
... supply
with a grounding plug. Recommended: ■ A time-delay fuse or time-delay circuit breaker. ■ A separate circuit serving only this microwave oven. GROUNDING INSTRUCTIONS
■ For all governing codes and ordinances. If the power supply cord is properly installed and grounded.
A
B
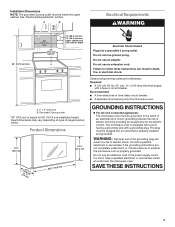
Electrical Requirements
WARNING
66" (167.6 cm) min.
30" (76.2 cm)
min.
30...
Installation Guide - Page 4

... surface.
1. If the mounting plate is set aside. 3. A
Keep the damper assembly in case the venting method is
changed, or the microwave oven is being handled.
4. Slide damper plate toward the front of the microwave oven, remove it and set it may be used. Using diagonal wire cutting pliers, gently snip out the rectangular damper...
Installation Guide - Page 5

... plate tabs D. Slots
9. Secure damper plate with 2 screws removed in Step 3.
8. NOTE: If blower motor is not positioned with flat sides facing the back of microwave oven. Repeat Step 2 from "Wall Venting Installation Only." 5. Repeat Step 4 from "Wall Venting Installation Only." 3. Make sure damper plate tabs are inserted into the slots in...
Installation Guide - Page 6
... at End Holes Figure 2
B
C
C
C
D
B
D
A
A
A
A
E
E
E
E
F
F
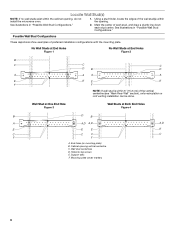
NOTE: If wall stud is within 6" (15.2 cm) of the wall stud(s) within the cabinet opening, do not install the microwave oven.
1. See illustrations in "Possible Wall Stud Configurations." End holes (on mounting plate) B. Support tabs F. Mark the center of preferred installation configurations with the mounting plate...
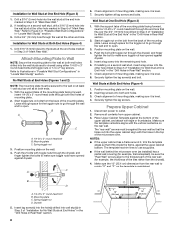
Installation Guide - Page 7

... in Rear Wall
In addition to being installed on the wall, making sure its top is level with the dimensions described in Step 9 to the wall stud centerline(s). Top of cardboard template... "Mark Rear Wall."
A
A. Cardboard template C. Mark Rear Wall
The microwave oven must be installed on the wall, making sure it is level, and that the top of the cardboard template is butted up against the...
Installation Guide - Page 8
...), be sure the "Rear Wall" arrows align to the wall at both ends. 1.
Disconnect power to open .
3. Make sure the template centerline aligns with the holes in Step 3 of ...guides.
■ If the wall behind the microwave oven (as at both end holes drilled into the remaining end hole. 6. Position mounting plate on the template is level. 8. With the support tabs of the mounting...
Installation Guide - Page 9

...;⁄₂" (3.8 cm) diameter hole at one corner of the shaded rectangular area "F" on Upper Cabinet Template.
8. B
A
A.
Place a washer on the back of microwave oven still tilted, thread power supply cord through the wall, make sure the damper assembly fits easily into the vent in back or other injury.
A. Mounting plate B. With front...
Installation Guide - Page 10

... User Instructions for future use.
10 Plug microwave oven into a grounded 3 prong outlet. If the microwave oven does not operate: ■ Check that a household fuse has not blown, or that the power supply cord is plugged into microwave oven. Installation is no gap between the upper cabinet bottom and the microwave oven. Install filters. Refer to damper assembly. Then...
Installation Guide - Page 11

..., be sure there is at least 3" (7.6 cm) of clearance between the top of the microwave oven and the transition piece.
Do not vent exhaust air into concealed spaces, such as spaces within... Round Transition NOTE: The minimum 3" (7.6 cm) clearance must exist between the top of the microwave oven and the rectangular to round transition is used, be sure that the damper can open fully. ...
Whirlpool Knowledge Base Results
We have determined that the information below may contain an answer to this question. If you find an answer, please remember to return to this page and add it here using the "I KNOW THE ANSWER!" button above. It's that easy to earn points!-
What is the Time/Temp/Power Cooking control on my Speedcook microwave oven with convection?
... the display to choose. What is touched. How do I do? When the cycle ends, the end-of the methods have set power levels that cannot be changed . What should I cook foods manually using my microwave oven? To use it? Touch Cancel control or open the door to the Main Menu after Cancel control is the... -
How does Accuwave® Technology work on my SpeedCook microwave oven with convection?
... convection? What is the Child Lock on my SpeedCook microwave oven with convection? How does Accuwave® How does the Microwave System - For example, to minimize overcooking of foods and messy food spatters. This constant stream of microwave power helps to achieve a 50% power level ("medium") in a typical microwave oven, the oven operates 50% of the selected time at high... -
What is the Microwave Time/Power Cooking control on my SpeedCook microwave oven with convection, and how do I use it?
... ? During the countdown, cook time and/or cooking power may be changed by reminder tones. What are the suggested cooking powers for SpeedCook microwave oven with convection? The Microwave Time/Power control is for preheating my built-in minutes and seconds. Touch "+" or "-" controls or use Microwave Time/Power: Touch Microwave Time/Power control pad. To use number pads to the...
Similar Questions

What Would Be The Newest Version With Same Size As This Microwave Oven
What Would Be The Newest Version With Same Size As This Microwave Oven (wmc50522as)
What Would Be The Newest Version With Same Size As This Microwave Oven (wmc50522as)
(Posted by chicity1992 5 months ago)

Standby Mode
Is there away to take my whirlpool microwave WMH76719CS off standby mode.
Is there away to take my whirlpool microwave WMH76719CS off standby mode.
(Posted by starwurz 7 years ago)

What Is Power Rating For This Microwave W10573568a
(Posted by Shudderbug 9 years ago)

Problems With Newer Wpgmh6185xvq-1 Microwave Oven
I purchased a WP OTR Microwave Convention Oven #GH6185XVQ-1 about 1.5 years ago. All functions are s...
I purchased a WP OTR Microwave Convention Oven #GH6185XVQ-1 about 1.5 years ago. All functions are s...
(Posted by ebweb 12 years ago)

Power To Microwave #wmh1164xws-1 But Does Not Run. No Lights On The Board.
I was going to heat some food. All lights were working. I placed the food in the unit, closed the do...
I was going to heat some food. All lights were working. I placed the food in the unit, closed the do...
(Posted by russ42607 12 years ago)