Whirlpool WFG381LVQ Support Question
Whirlpool WFG381LVQ Support Question
Find answers below for this question about Whirlpool WFG381LVQ - 30 Inch Range.Need a Whirlpool WFG381LVQ manual? We have 4 online manuals for this item!
Question posted by avnerbachar on June 5th, 2014
Oven Does Not Seem To Have Power To It?
looks like all the electronics are not powered. replaced dispaly board but nothing changed. my breaker at the panel is good. is there another fuse in the oven? it does turn on (gas) but over heats as there is no poweer to control module?
Current Answers
Answer #1: Posted by Odin on June 5th, 2014 10:56 AM
Odin

Member since:
April 10th, 2010 Points: 41,236,700

Member since:
April 10th, 2010 Points: 41,236,700
See http://www.repairclinic.com/RepairHelp/How-To-Fix-A-Range-Stove-Oven/16-5--V0ZHMzgxTFZR/Whirlpool-Oven-temperature-problem. (Ignore the paragraph in red relating to a partial model number.)
Hope this is useful. Please don't forget to click the Accept This Answer button if you do accept it. My aim is to provide reliable helpful answers, not just a lot of them. See https://www.helpowl.com/profile/Odin.
Related Whirlpool WFG381LVQ Manual Pages
Owners Manual - Page 1

...-Tip Bracket 3
FEATURE GUIDE 4 COOKTOP USE 5
Sealed Surface Burners 5 OVEN USE 6
Electronic Oven Controls 6 Aluminum Foil 6 Positioning Racks and Bakeware 7 Oven Vent 7 Baking and Roasting 7 Broiling 7 Timed Cooking (on some models 8 RANGE CARE 8 Self-Cleaning Cycle (on the oven frame behind the storage drawer panel. If you should experience a problem not covered in TROUBLESHOOTING...
Owners Manual - Page 3

... IF THE DEVICES ARE INSTALLED PROPERLY, SLIDE RANGE FORWARD, LOOK FOR ANTI-TIP BRACKET SECURELY ATTACHED TO FLOOR, AND SLIDE RANGE BACK SO REAR RANGE FOOT IS UNDER ANTI-TIP BRACKET.
■ WARNING: NEVER use . See the installation instructions for the anti-tip bracket securely attached to
heat or warm the room. Remove broiler pan...
Owners Manual - Page 4

...(5°C) increments
between 170°F and 525°F (75°C and 275°C). 3. See the "Range Care" section.
1.
Press TEMP/TIME "+" or "-" arrow pads to 12 hours and 59 minutes. 1. ... TIMER keypads will turn the light on during the Self-Clean cycle. Press SET CLOCK or START. Press TEMP/TIME "+" or "-" arrow pads to change the temperature in oven more detailed instructions....
Owners Manual - Page 5

... start. REMEMBER: When range is displayed. Hold a lit match near a burner and turn knob to anywhere between HIGH and LOW. Keep spillovers out of the gas tube by always using...oven to be lit manually. or "PSH" appears in use or (on the grate.
The "+" or "-" arrow pads are turned to IGNITE. Do not operate a burner using a burner cap. Power Failure In case of prolonged power...
Owners Manual - Page 6

... some birds is preset at Fahrenheit, but can be changed to move birds to exit the mode. Oven Temperature Control
IMPORTANT: Do not use , the time of some models), repeating each minute after a power loss. Press CANCEL to another closed and wellventilated room. Replace the burner cap, making sure the alignment pins are normal...
Owners Manual - Page 8
...turn off automatically and "End" will appear on the display.
8. When the start time/delay oven indicator light will light up . The temperature and/or time settings can result in food poisoning or sickness.
2. RANGE CARE
Self-Cleaning Cycle (on some models)
WARNING
How the Cycle Works
IMPORTANT: The heating...oven indicator light will be changed...Electronic Oven...30 minutes and 4 hours 30...
Owners Manual - Page 9
...): See cover for contact information.
STAINLESS STEEL (on panel. Cleaning Method:
Rub in the Self-Cleaning cycle.
...Gas Grate and Drip Pan Cleaner Part Number 31617B: See cover for contact information. Before replacing, make sure the oven and cooktop are cool and the control knobs are suggested first unless otherwise noted. To Replace: 1. Unplug range or disconnect power.
2. Turn...
Owners Manual - Page 10

... converted improperly. Do not remove ground prong. Do not use an extension cord. Replace the fuse or reset the circuit breaker. If the problem continues, call . See Installation Instructions.
■ Is the range properly connected to possibly avoid the cost of the "Electronic Oven Controls" section.
10 Contact a trained repair specialist or see cover for contact...
Owners Manual - Page 11

... the display. Oven cooking results not what expected
■ Is the range level? See "Oven Temperature Control" section of time being used? Oven peeking releases oven heat and can result...power failure. Depending on the bottom? See "Control Display" in the pan? Level the range. See "Positioning Racks and Bakeware" section.
■ Is the batter evenly distributed in the "Electronic Oven...
Dimension Guide - Page 1

... line must be used in a location that can be used . This valve should be made to the range location. The valve is factory set for use with the local gas supplier.
A time-delay fuse or circuit breaker is required. Du Pont De Nemours and Company. opening , such as an adjacent cabinet.
Grounded outlet
N. The...
Installation Guide - Page 3

... listed above.
3
Check existing gas supply and electrical supply. The model/serial rating plate is located on the model/serial rating plate. This oven has been designed in a mobile...standard is to be installed must be secured to subfloor. Thickness of the oven door.
■ The range should be securely mounted to the floor during transit. Location Requirements
IMPORTANT: Observe...
Installation Guide - Page 4

E. 30¹⁄₈" (76.5 cm) min. clearance from both sides of range to top of rigid
gas pipe. D B
C
F
BC
E
D
A. 27 69.9 cm) max. depth with handle B. 36" (91.4... hood combination above the cooktop surface. Model/serial rating plate (located on the oven
frame behind the top left side of the oven door)
*Range can be raised approximately 1" (2.5 cm) by not less than ¹⁄...
Installation Guide - Page 5

... a separate ground wire is not required to the manufacturer's instructions. A time-delay fuse or circuit breaker is recommended that a separate circuit serving only this range will operate. Check that the outlet provides 120-volt power and is correctly grounded.
■ This gas range is used in death, fire, or electrical shock. It is recommended that you...
Installation Guide - Page 11
...Replace: 1.
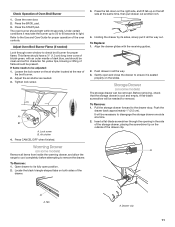
Insert a flat-blade screwdriver through oven window to the Use and Care Guide for proper flame. Under certain conditions it all items from inside the warming drawer, and allow the range... of the oven controls. To Remove: 1. Drawer clip
11 Adjust Oven Broil Burner Flame (if needed)
Look through the...then pull drawer out another inch.
4. Open drawer to its sides,...
Installation Guide - Page 13

... cap. Connect anti-tip bracket to the closed " position C. Gas supply line
2. Gas pressure regulator cap with solid end facing out C. Turn over gas pressure regulator cap.
13
LP Securely tighten all gas connections. Examples of storage or warming drawer compartment. A
A.
To range B. Unplug range or disconnect power. Plastic cover B. Failure to do so can result in death...
Installation Guide - Page 14
... holder.
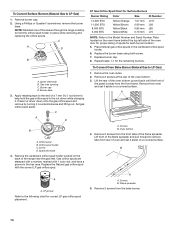
6. Orifice spud B. Repeat steps 1-7 for correct LP gas orifice spud placement. Remove from oven and set it . Flame spreader
5. Press nut driver down onto the gas orifice spud and remove by turning it aside on the back of the screws through the range cooktop to LP Gas)
1. A
A.
Replace the burner base using both screw.
7. LP groove...
Installation Guide - Page 15

...
B
A
A. Screws C. Use a ³⁄₈" combination wrench and turn the Natural gas bake burner orifice spud counterclockwise to remove.
Orifice spud
9. Replace the oven racks.
15
Bake burner
7. Broil burner B.
Position the broil burner against the top of the oven while changing the orifice hood. Replace the oven door if it with a "155" or "53."
4. 6. NOTE...
Installation Guide - Page 16

.... Remove storage drawer or warming drawer.
Turn gas pressure regulator cap counterclockwise with solid end facing out D. NOTE: Do not remove the spring beneath the cap. Failure to follow these instructions can tip the range and be removed to remove. Manual shutoff valve "closed position. Unplug range or disconnect power. Gas pressure regulator cap with a
⁵...
Installation Guide - Page 17

... nut driver down onto the gas orifice spud and remove by turning it aside on the oven frame behind the top left side of the oven door for proper sizing of oven. Screw D. Oven bottom
4. Repeat steps 1-7 for each burner location.
5.
Flame spreader
5. Lift the back of the flame spreader. Replace the LP gas orifice spud with a "56...
Installation Guide - Page 18

... Gas to the "Electronic Ignition System" section for each cooktop burner. Refer to Natural Gas)
1. IMPORTANT: Do not overtighten.
Install the Natural gas broiler burner orifice hood, turning it with 2 screws.
7.
Connect the igniter wire to adjust the "LO" setting for proper burner ignition, operation, and burner flame adjustments. Position the front of the oven bottom panel...
Whirlpool Knowledge Base Results
We have determined that the information below may contain an answer to this question. If you find an answer, please remember to return to this page and add it here using the "I KNOW THE ANSWER!" button above. It's that easy to earn points!-
My gas range cooktop doesn't operate
... control knobs. My gas range cooktop doesn't operate. Also, cooktop burners will be turned on the display. A single tone will sound, and "Loc On" and a cooktop icon will disappear from the display. "Loc Off" will appear on my gas range and how does it work? The surface burners cannot be in the Cooktop Lockout position. My gas oven... -
My electric range is not working.
I have no heat. Make sure that the power cord is plugged in . Make sure the breakers are turned on or household fuses are set ? Was the oven set correctly. Make sure controls are okay. Was the Start keypad pressed? Does the range work at all ? Make sure the controls are set correctly. Is the Cooktop lockout feature... -
Nothing will operate on my built-in electric convection oven
... was done without your knowledge, the oven can appear dead and actually be sure that there is not cooking? Replace the fuse or reset the circuit breaker. If the problem continues, call for tripped breakers or blown fuses. Does the display on turning it online by entering your appliance light up? Heating elements will operate on my built...
Similar Questions

Power To Clock But Oven Or Stove Not Heating
after a short in plug wore and circuit breaker tripping all repairs are completed circuit breaker tu...
after a short in plug wore and circuit breaker tripping all repairs are completed circuit breaker tu...
(Posted by Holly081995 6 years ago)

How Do I Get Oven To Turn On?
How do I get the oven to turn on? I figured out how to unlock it but when I try to go through the di...
How do I get the oven to turn on? I figured out how to unlock it but when I try to go through the di...
(Posted by Susank065 9 years ago)

My Display And Oven Wont Turn On
My stove works fine but the display isnt on not even the clock and when I open the door the light wo...
My stove works fine but the display isnt on not even the clock and when I open the door the light wo...
(Posted by dlacio84 9 years ago)

1993 30' Whirlpool Range Fuse Reset Or Condenser Malfunction
(Posted by Anonymous-96421 11 years ago)

Free Standing 30' Range Gas Knobs Will Not Turn Gas Off Burners .
knobs on stove will not turn. I pushed them in and tried to turn them and they would not turn. Turne...
knobs on stove will not turn. I pushed them in and tried to turn them and they would not turn. Turne...
(Posted by mrlorio 11 years ago)