Whirlpool WED5600XW Support Question
Whirlpool WED5600XW Support Question
Find answers below for this question about Whirlpool WED5600XW.Need a Whirlpool WED5600XW manual? We have 4 online manuals for this item!
Question posted by michaelmontemayor48 on December 23rd, 2012
Why Is The Dryer Not Heating
the dryer turns on an works its just not heating up to dry
Current Answers
Related Whirlpool WED5600XW Manual Pages
Owners Manual - Page 2
DRYER SAFETY
2
Owners Manual - Page 4

... damp load that needs a little more than four 90° elbows in good air flow. n Replace plastic or foil vent material with heat, dryers require good air flow to efficiently dry laundry.
n Clear away items from the entire length of the vent system at least every 2 years. Good
Better
n Remove lint and debris from...
Owners Manual - Page 5
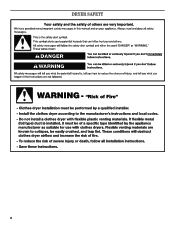
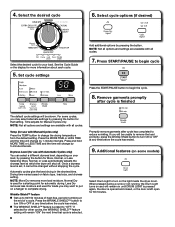
... only) Use the Dryness option to select dryness levels for your laundry load. Will run the dryer for 30 minutes. Cycle Signal The Cycle Signal produces an audible sound when the drying cycle is on, the tone will alert you want to turn on the Automatic Cycles. When pressed during a cycle or not running...
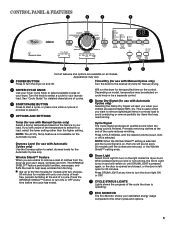
Owners Manual - Page 6
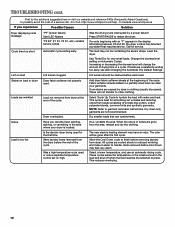
... in the dryer too long.
TIMED DRY - Any timed dry cycle/ manual cycle does not sense the load.
An Extra-Low heat setting may be used for that cycle.
Items to dry:
Cycle:
Drying
Dryness Default Available
Temperature: Level: Time: Options:
Cycle Details:
Heavyweight items towels, jeans
No-iron fabrics, cottons, perm press, linens, synthetics
Work clothes...
Owners Manual - Page 7
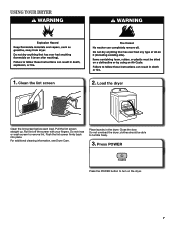
... into place. Place laundry in the dryer. clothes should be able to remove lint. Do not rinse or wash screen to tumble freely.
3. For additional cleaning information, see Dryer Care. Clean the ...lint screen
2. Pull the lint screen straight up. Roll lint off the screen with your fingers.
Do not overload the dryer; Load the dryer
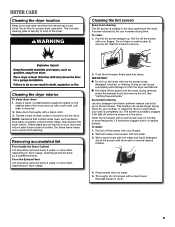
Clean the lint...
Owners Manual - Page 8
... a cycle or not running, the Drum Light turns on and will be shown. Temp (for 30 minutes. Selecting More, Normal, or Less automatically adjusts the dryness level at
the end of heat-free, periodic tumbling at which the dryer will shut off. Automatic cycles give the best drying in the shortest time.
n The WRINKLE...
Owners Manual - Page 9
... out to remove residue buildup.
4. From the Exhaust Vent Lint should be removed every 2 years, or more often, depending on dryer usage.
2. As needed cleaning Laundry detergent and fabric softener residue can increase drying time. Clean the lint screen with a damp cloth. 3.
A screen blocked by a qualified servicer. These stains are not harmful to...
Owners Manual - Page 10
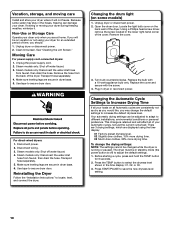
... on some water may change the drying settings: NOTE: The settings cannot be adjusted to adapt to increase the default dryness level. Turn bulb counterclockwise. This change is running or paused. Before starting a cycle, press and hold the TEMP button
for an extended period of your dryer during freezing weather, winterize it will...
Owners Manual - Page 11
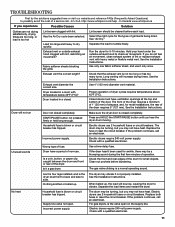
...'t been used for small objects. Check the front and rear edges of garments being dried.
The dryer may be turning, but you do not feel air movement, clean exhaust system of lint or replace exhaust vent with a qualified electrician. No heat
Household fuse is a normal operating sound. Supply line valve not open on the...
Owners Manual - Page 12
... setting on load or drum
Dryer fabric softener not properly used.
Stains on Automatic Cycles.
Were laundry items removed from the dryer before removing laundry from dryer at the beginning of the...knits and synthetic garments.
The new electric heating element may feel very warm.
Use Timed Dry for the first time.
Add dryer fabric softener sheets at the end of ...
Dimension Guide - Page 1

Angled hood
18"* (457 mm)
14" max.* (356 mm) 48 in the neutral or grounding circuit. To determine maximum exhaust length, add one 90° turn inside the dryer. Select the route that may be in the path of vent elbows
0
Rigid metal
1
Rigid metal
2
Rigid metal
3
Rigid metal
4
Rigid metal
Box /louvered...
Installation Instructions - Page 2
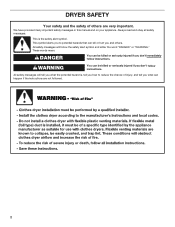
... symbol and either the word "DANGER" or "WARNING." WARNING
You can happen if the instructions are very important. Always read and obey all safety messages.
DRYER SAFETY
Your safety and the safety of injury, and tell you don't follow instructions.
Installation Instructions - Page 3

... exhaust installation. If using a power supply cord: Use a UL listed power supply cord kit marked for purchase from the dealer from whom you purchased your dryer.
Location Requirements
Adjustable wrench that all parts are included. Tools needed : Check local codes. INSTALLATION REQUIREMENTS
Tools and Parts
Parts supplied:
Gather the required tools...
Installation Instructions - Page 4

... cord, a grounded electrical outlet located within 2 ft. (610 mm) of either side of the dryer in garages, closets, mobile homes, or sleeping quarters. See "Electrical Requirements."
■■ A... the National Electrical Code, ANSI/NFPA 70-latest edition and all mobile home installations. Drying times can be obtained from your local building inspector.
Minimum Required Spacing
18"* (457...
Installation Instructions - Page 5

...solid copper wire (do not permit the connection of a neutral ground wire to the dryer must end in a location where grounding through the neutral conductor is isolated from the ... ft. (1.22 m) long. Grounding through the neutral conductors. Electrical Connection
To properly install your dryer, you must determine the type of electrical connection you will be using a power supply cord:
Use...
Installation Instructions - Page 6

... people to its feet. Screw legs into leg holes by hand, use a large flat piece of dryer. Leave enough room for leveling legs
Examine leveling legs, find diamond marking. Prepare dryer for electrical connection and to finish turning legs until it is no longer visible. To avoid damaging floor, use a wrench to connect...
Installation Instructions - Page 8
... two clamp sections (C) together.
2.
Tighten screw.
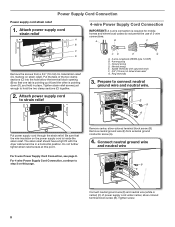
8 Ground prong D. Spade terminals with the dryer cabinet and be in place. For 4 wire Power Supply Cord Connection, continue to connect neutral
...local codes do not permit the use of 3-wire connections. Tighten strain relief screws just enough to strain relief
4-wire Power Supply Cord Connection
IMPORTANT: A 4-wire connection...
Installation Instructions - Page 9
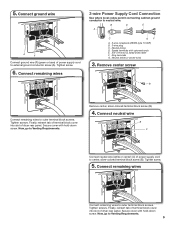
... E. 3/4" (19 mm) UL listed strain relief F. Now, go to outer terminal block screws.
Tighten screws. Finally, reinsert tab of terminal block cover into slot of dryer rear panel. Tighten screw.
5. Finally, reinsert tab of terminal block cover into slot of...
Installation Instructions - Page 15
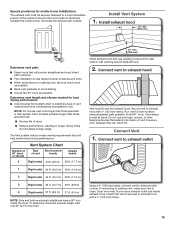
...;■ Reduce performance, resulting in longer drying times and increased energy usage. Install exhaust hood
12" min. (305 mm)
Determine vent path:
■■ Select route that vent is clean. Run vent to dryer location using elbows or making turns, allow as much room
as possible. ■■ Bend vent gradually to seal...
Installation Instructions - Page 16

... intact and tight, or circuit breaker has not tripped.
■■ Dryer door is in your tools. q Set the dryer on console and any dust. If the dryer will go back through steps to operate correctly.
If you do not feel heat, turn off dryer, and check the following : ■■ Controls are intact and tight...
Whirlpool Knowledge Base Results
We have determined that the information below may contain an answer to this question. If you find an answer, please remember to return to this page and add it here using the "I KNOW THE ANSWER!" button above. It's that easy to earn points!-
My dishwasher is locked
...;avoid unintended use the lock feature to avoid unintended cycle or option changes during a cycle. The lock light turns off the lock feature: Press and hold Heated Dry for four (4) seconds. To turn off . Why is running. Use the control lock to restart. You can be opened while the controls are disabled... -
Loads are damp; dryer does not dry
... the other settings will be adjusted to adapt to save the drying setting. Dryer does not heat - Gas dryer Damp loads or long drying times - Dryers Loads are consistently not as dry as you would like, you selected will increase all Sensor Dry cycles. Electric Dryer Dryer does not heat - Changing this mode. Press and hold the Dryness button... -
My dishwasher is locked
... is my dishwasher ? To turn off the turns off. You can also use the feature to avoid unintended use of the dishwasher. Use the control lock to avoid unintended cycle or option changes during a cycle. The will glow. Lights flashing on the feature: Press and hold Heated Dry for four (4) seconds...
Similar Questions

Help Opening A Whirlpool Dryer
I have a Whirlpool wed5600X dryer that is making a horrible noise - sounds like a belt type noise. H...
I have a Whirlpool wed5600X dryer that is making a horrible noise - sounds like a belt type noise. H...
(Posted by debbiepriovolos 9 years ago)

How Do I Pull The Front Off Of My Whirlpool Dryer Wed5600xw
(Posted by boul4y 9 years ago)

Dryer Stops Before Clothes Are Dry
dryer stops before clothes are dry
dryer stops before clothes are dry
(Posted by shannonbolt 9 years ago)

Dryer Turns On But No Heat.
We are getting error code AF, we cleaned the vents and removed all lint. My husband even took the ba...
We are getting error code AF, we cleaned the vents and removed all lint. My husband even took the ba...
(Posted by tjmcgraw91 11 years ago)

Dryer Won't Turn On
Eletricity is going to the equipment. Power will not turn on machine.
Eletricity is going to the equipment. Power will not turn on machine.
(Posted by rwconover 11 years ago)