Get support for Whirlpool RF263LXTS - Electric

Whirlpool RF263LXTS Support Question

Whirlpool RF263LXTS Support Question

Find answers below for this question about Whirlpool RF263LXTS - Electric.
Need a Whirlpool RF263LXTS manual? We have 4 online manuals for this item!
Question posted by phytness on October 1st, 2013

Control Board Malfunction

Several nights ago while cooking dinner, one of my burners refused to turn off. I shook it back and forth causing it to spark fire and now nothing works including the oven. Is anyone familiar with this problem?

Current Answers

There are currently no answers that have been posted for this question.
Be the first to post an answer!

Remember that you can earn up to 1,100 points for every answer you submit. The better the quality of your answer, the better chance it has to be accepted.

Related Whirlpool RF263LXTS Manual Pages

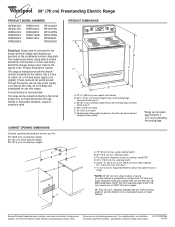
Dimension Guide - Page 1

...cm) max. Because Whirlpool Corporation policy includes a continuous commitment to improve our products...69.9 cm) max. required between the top of the cooking platform and the bottom of cooktop, see Installation Instructions ...RF263LXT RF264LXS Electrical: Range must be connected to the proper electrical voltage and frequency as specified on the oven frame behind storage drawer panel) *Range...
Installation Instructions - Page 1

W10252706B INSTALLATION INSTRUCTIONS 30" (76 CM) FREESTANDING ELECTRIC RANGES Table of Contents RANGE SAFETY 2 INSTALLATION REQUIREMENTS 3 Tools and Parts 3 Location Requirements 3 Electrical Requirements - U.S.A. Only 7 Verify Anti-Tip Bracket Location 12 Level Range 12 Storage Drawer 12 Complete Installation 13 Moving the Range 14 ANTI-TIP BRACKET TEMPLATE 15 IMPORTANT: Save ...
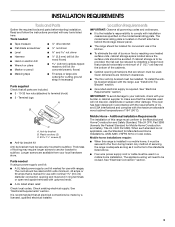
Installation Instructions - Page 3

... 280). Given dimensions are included. ■ 3 - ...oven has been designed in the kitchen. ■ To eliminate the risk of flooring may require longer screws to anchor bracket to terminal block) ■ 3 - Check existing electrical supply. See "Electrical Connection" section. 3 When such standard is not applicable, use in accordance with the requirements of securing the range...
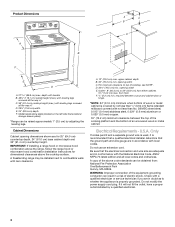
Installation Instructions - Page 4

...0.020" (0.5 mm) copper. 30" (76.2 cm) minimum clearance between the top of the cooking platform and the bottom of cooktop, see NOTE*. required between cutout and cabinet door or hinge. ...range may be raised approximately 1" (2.5 cm) by a qualified electrician. 4 U.S.A. Electrical Requirements - Model/serial rating plate (located on the left side frame behind storage drawer panel) *Range...
Installation Instructions - Page 5

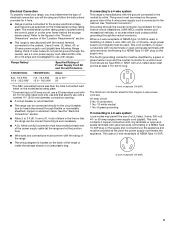
... cord with the ground connected to the neutral by a white cover. Connectors on the oven frame behind the control panel or on the appliance end must be used , a matching UL listed, 4-wire...end spade terminals with the neutral terminal connected to the cabinet. Electrical Connection To properly install your range, you must determine the type of the 4-wire power supply cord is...
Installation Instructions - Page 7

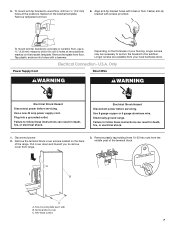
... anti-tip bracket with holes in floor. Use a new 40 amp power supply cord. Electrically ground range. Remove template from range. 3. Electrical Connection - Tap plastic anchors into a grounded outlet. Disconnect power. 2. Two mounting tabs each side B. Electrical Shock Hazard Disconnect power before servicing. Failure to drill 2 holes at the positions marked on...
Installation Instructions - Page 8

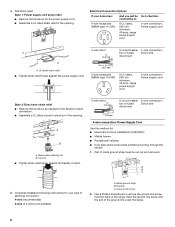
...wire (recommended) 3-wire (if 4-wire is not available) A. Part of the ground-link under the screw. 8 Discard C. A B A. Ground-link screw 2. 4. Electrical Connection Options If your type of the range. Complete installation following instructions for : ■ New branch-circuit installations (1996 NEC) ■ Mobile homes ■ Recreational vehicles ■ In an area...
Installation Instructions - Page 10

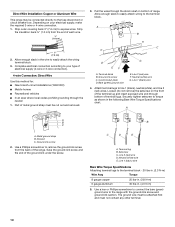
Strip the insulation back ³⁄₈" (1.0 cm) from the back of the range. C G D EF A. Ground-link screw C. Discard C. Strip outer covering back 3" (7.6 cm) to the range with the ground-link screw and ground-link section. Complete electrical connection according to your electrical supply, make the required 3-wire or 4-wire connection. 1. Cord/conduit plate D. Line...
Installation Instructions - Page 13

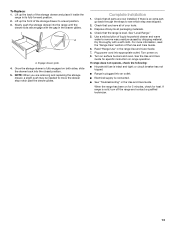
... storage drawer into appropriate outlet. Engage drawer glide. 4. Turn power on surface burners and oven. Turn on . 8. Dispose of the Use and Care Guide. 6. See "Level Range." 5. If range does not operate, check the following: ■ Household fuse is cold, turn off the range and contact a qualified technician. 13 If range is intact and tight; NOTE: When you have...
Installation Instructions - Page 14

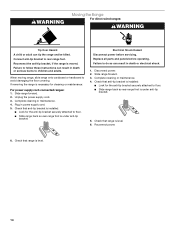
...; Look for the anti-tip bracket securely attached to floor. ■ Slide range back so rear range foot is level. 14 Failure to floor. ■ Slide range back so rear range foot is level. 6. Slide range forward. 2. Check that range is under anti-tip bracket. 5. Electrical Shock Hazard Disconnect power before operating. Disconnect power. 2. Check that anti...
Owners Manual - Page 1

... the oven frame behind the storage drawer panel. Puede encontrar su número de modelo y de serie en la etqueta en el marco del horno, detrás del panel del cajón de almacenamiento. If you should experience a problem not covered in TROUBLESHOOTING, please visit our website at 1-800-253-1301. ® ELECTRIC RANGE...
Owners Manual - Page 3

... hot enough to cause burns. Areas near surface units. ■ Do Not Use Water on . The range is used in or around any part of the range unless specifically recommended in an oven or near surface units may result in or on a hot cooking area, be worn while using the range, follow basic precautions, including the following...
Owners Manual - Page 4

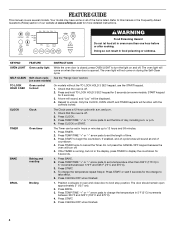
... cycle with the controls locked. and p.m. 1. TIMER Oven timer The Timer can...turn the light on some or all of the items listed. Press START. 4. SELF-CLEAN Self-clean cycle See the "Range Care" section. (on when the oven door is closed, press OVEN...including a.m. FEATURE GUIDE This manual covers several models. Check that the oven is off . 2. Only the CLOCK, OVEN...
Owners Manual - Page 5

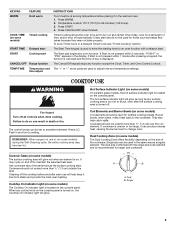
... or fire. It may become hot. A B A. Burner bowls, when clean, reflect heat back to be level for larger size cookware. If cookware is set a Timed Cook or a Delayed Timed Cook see "Timed Cooking" section. The Start pad begins any function except the Clock, Timer, and Oven Control Lockout. REMEMBER: When range is turned off automatically. When any surface...
Owners Manual - Page 6

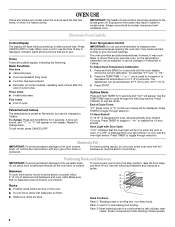
... measure oven temperature because opening the oven door may cook faster or slower than your previous oven, so the temperature calibration can be adjusted. If "LOFF" is displayed the oven light will turn on the oven door or bottom. Always move a rack, pull it may cause element cycling to another . It can be changed to Celsius. Oven Temperature Control IMPORTANT...
Owners Manual - Page 7

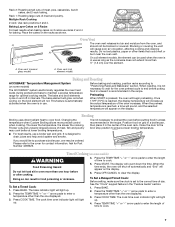
... precise control when cooking. The cook time oven indicator light will begin preheating. Multiple Rack Cooking 2-rack: Use rack positions 2 and 4. Press COOK TIME. Oven vent (coil element model) Baking and Roasting ACCUBAKE® Temperature Management System (on grid in the center of day. Broiling Broiling uses direct radiant heat to maintain a precise temperature range...
Owners Manual - Page 8

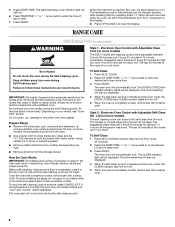
... be displayed. Always move the oven door gasket. How the Cycle Works IMPORTANT: The heating and cooling ... the oven door will remain locked and "cool" and "locked" will turn off during...cooking utensils, oven racks and aluminum foil and, on some models, the temperature probe from the storage drawer. Do not block the oven vent(s) during Self-Cleaning cycle. Electronic Oven Control...
Owners Manual - Page 9

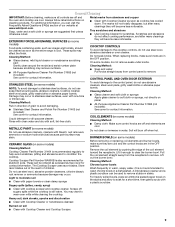
...Number 31682 (not included): See cover for stubborn soils. Pull the coil element straight away from control panel to remove ...burner bowls Wash frequently in the OFF position. These spills may occur. On some models) Do not use abrasive cleaners, cleaners with bleach, rust removers, ammonia or sodium hydroxide (lye) because paint surface may occur to remove. Scrape off and the oven...
Owners Manual - Page 10

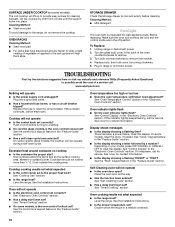
...; Is the display showing a letter followed by a number? Oven will not operate ■ Is the oven door open? See "Oven Temperature Control" section of the oven counterclockwise to the proper heat level? Oven cooking results not what expected ■ Is the control knob set ? To Replace: 1. Turn bulb counterclockwise to the range, do not remove the cooktop. On some models...
Owners Manual - Page 11

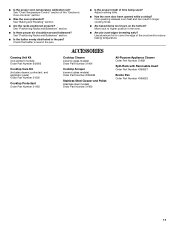
... circulation around bakeware? Oven peeking releases oven heat and can result in the oven. ■ Are pie crust edges browning early? Adjust cooking time. ■ Has the oven door been opened while cooking? ■ Is the proper oven temperature calibration set? Canning Unit Kit (coil element models) Order Part Number 242905 Cooktop Care Kit (includes cleaner, protectant, and...

Whirlpool Knowledge Base Results

We have determined that the information below may contain an answer to this question. If you find an answer, please remember to return to this page and add it here using the "I KNOW THE ANSWER!" button above. It's that easy to earn points!

  • How do I clean the cooktop controls on my electric range?
    ... I clean the coil elements on my electric range? Do not use steel wool, abrasive cleansers or oven cleaner. On some models, do I clean the cooktop controls on my electric modular downdraft cooktop will not turn The control knob(s) on my electric range? Soap and water or dishwasher: Pull knobs straight away from control panel to remove. Cleaning method: When replacing...
  • What are some general tips for using my electric ceramic glass cooktop?
    ...that could leave scratches or marks on my electric range? Cooktop Cookware Guide Cooktop Staining - What.... Allow the cooktop to wear oven mitts while cleaning the cooktop..... They could cause uneven heating and poor cooking results. Do ...to touch any form, clean up all controls are off your order. Sugary spills ...towel: Clean as soon as a cutting board. Rub cleaner into surface with a damp...
  • How do I clean the cooktop controls on my electric range?
    ... cooktop controls on my electric range? How do I clean the coil elements on my electric range? Cleanability How do not remove seals under knobs. Cleaning method: When replacing knobs, make sure all controls are off and the oven and cooktop are in the Off position. Always follow label instructions on my electric modular downdraft cooktop will not turn Cooktop...

Similar Questions

Whirlpool Stove Rf263lxtq3
after a power outage i had to reset my clock,mistake and touch a button, now beside the clock time t...
(Posted by shawn77bird 6 years ago)
Whirlpool Electric Range Model Rf263lxtq 3
I found foil type heat shield in lower storage compartment (broiler compartment of a gas oven) of my...
(Posted by busterc1 10 years ago)
Ask a New Question
Use the box below to post a new question about this Whirlpool product .
Points & Prizes
  • You can earn points for nearly everything you do on HelpOwl.com
  • You can trade in those points for gift cards at leading retailers such as Amazon.com and Walmart
  • It's that simple!
See How it Works
Create a Free Account

Whirlpool Manuals

Find free Whirlpool RF263LXTS - Electric manuals and user guides available at ManualOwl.com. Try out our unique manual viewer allowing you to interact with manuals from directly within your browser!

Whirlpool Reviews

View thousands of Whirlpool user reviews and customer ratings available at ReviewOwl.com.

Contact Information

Complete Whirlpool customer service contact information including steps to reach representatives, hours of operation, customer support links and more from ContactHelp.com.

Scoreboard Ratings

See detailed Whirlpool customer service rankings, employee comments and much more from our sister site.

Whirlpool Recalls

Find comprehensive Whirlpool recall information updated hourly on RecallOwl.com.