
Whirlpool RF110AXSQ Support Question
Whirlpool RF110AXSQ Support Question
Find answers below for this question about Whirlpool RF110AXSQ.Need a Whirlpool RF110AXSQ manual? We have 4 online manuals for this item!
Question posted by zrock on January 30th, 2017
Trouble Putting Range Counter Top Back On
my ole lady was cleaning stove RF110AXSQ and the top of stove popped off.cant figure out how to put back on.
Current Answers
Answer #1: Posted by Odin on January 31st, 2017 8:26 AM
Odin

Member since:
April 10th, 2010 Points: 41,236,690

Member since:
April 10th, 2010 Points: 41,236,690
See https://www.youtube.com/watch?v=CsLDeUxiHUE. Or consider one of the videos available on the right of that page.
Hope this is useful. Please don't forget to click the Accept This Answer button if you do accept it. My aim is to provide reliable helpful answers, not just a lot of them. See https://www.helpowl.com/profile/Odin.
Related Whirlpool RF110AXSQ Manual Pages
Dimension Guide - Page 1

... 25" (63.5 cm) depth F. Use a 3-wire, UL listed, 40-
For minimum clearance to the figures in * C. 36" (91.4 cm) cooktop height (max.) with product. from either cabinet,
5¹⁄... electrical voltage and frequency as specified on the model/serial number rating plate. The range can be connected to change materials and specifications without notice. CABINET OPENING DIMENSIONS
Cabinet...
Installation Instructions - Page 1

... U.S.A. Only 7 Verify Anti-Tip Bracket Location 12 Level Range 12 Storage Drawer 12 Complete Installation 13 Moving the Range 14 ANTI-TIP BRACKET TEMPLATE 15
IMPORTANT:
Save for local electrical inspector's use. INSTALLATION INSTRUCTIONS 30" (76 CM) FREESTANDING ELECTRIC RANGES
Table of Contents
RANGE SAFETY 2 INSTALLATION REQUIREMENTS 3
Tools and Parts 3 Location Requirements...
Installation Instructions - Page 2

...you don't follow these instructions can be killed. Reconnect the anti-tip bracket, if the range is the safety alert symbol. These words mean:
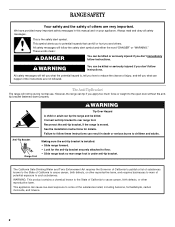
DANGER
You can result in this manual ... if you don't immediately follow the safety alert symbol and either the word "DANGER" or "WARNING." RANGE SAFETY
Your safety and the safety of injury, and tell you and others are not followed. Failure to...
Installation Instructions - Page 3

... screws to anchor bracket to subfloor. Terminal lugs
A
B
C
A. Thickness of this range is located on the model/serial rating plate. Check local codes. Check existing electrical supply... antitip bracket shipped with any tools listed here. Mobile home installations require:
■ When this range must be installed. See "Electrical Connection" section.
3
Plastic anchors (2) C. #10 x ...
Installation Instructions - Page 4

...) depth F. Check with a qualified electrician or service technician if you are for dimensional clearances above code standards can result in accordance with zero clearance. A freestanding range may be obtained from either cabinet,
5¹⁄₂" (14.0 cm) max. Only
If codes permit and a separate ground wire is properly grounded.
If it...
Installation Instructions - Page 5

.... This uses a 3-wire receptacle of slack in the line so that specify use a 50-amp rated cord with ranges. Range Rating*
120/240 Volts 8.8 - 16.5 KW 16.6 - 22.5 KW
120/208 Volts
7.8 - 12.5 KW... plate.
**If connecting to a 50-amp circuit, use with the neutral terminal connected to the figures in a clear plastic bag. This cord contains 4 copper conductors with ring terminals or open -end...
Installation Instructions - Page 6

... children and adults. Use a wrench or pliers to lower the front and rear leveling legs one-half turn . Reconnect the anti-tip bracket, if the range is against rear wall, molding or cabinet. 3. Contact a qualified floor covering installer for the best procedure for drilling mounting holes through your type of this...
Installation Instructions - Page 7

.... Remove plastic tag holding three 10-32 hex nuts from your flooring, longer screws may be necessary to anchor the bracket to remove cover from range.
3. Hex-head screws
7
Remove template from floor.
6.
Use 8 gauge copper or 6 gauge aluminum wire.
To mount anti-tip bracket to drill 2 holes at the positions...
Installation Instructions - Page 8

... :
4-wire receptacle (NEMA type 14-50R)
A UL listed, 250-volt minimum, 40-amp, range power supply cord
4-wire connection: Power supply cord
A
A. UL listed strain relief
■ Tighten ...you will be cut out and removed. Discard C. Electrical Connection Options
If your type of the range. A
B
A. Complete installation following instructions for : ■ New branch-circuit installations (1996...
Installation Instructions - Page 9

... cord wires
4. Ground-link screw C.
Connect line 2 (red) and line 1 (black) wires to the range with 10-32 hex nuts.
7.
UL listed strain relief D. Green ground wire E.
NOTE: For power supply ... supply cord wires -
large opening , with ring terminals and marked for use with ranges.
5. UL listed strain relief D. 3. Ground-link screw C. Tighten strain relief screws...
Installation Instructions - Page 10

... F. Discard C.
Line 2 (red) wire D. Direct Wire Installation: Copper or Aluminum Wire
This range may be connected directly to your electrical supply, make the required 3-wire or 4-wire connection. 1....A. Metal ground strap B. Loosen (do not remove) the setscrew on bottom of the range. Ground-link screw
2.
Depending on your type of electrical supply (4-wire or 3-wire ...
Installation Instructions - Page 11

....
9. Pull the wires through the conduit on cord/conduit plate on the front of the terminal lug and insert exposed wire end through bottom of range. Loosen (do not remove) the setscrew on bottom of terminal lugs. Line 2 (red) wire D. Line 1 (black) wire
Bare Wire Torque Specifications Attaching terminal lugs to...
Installation Instructions - Page 12

...drawer back approximately 1" (2.5 cm). then front to side; NOTE: Range must be necessary to floor.
■ Slide range back so rear range foot is cool and empty. Drawer clip
3.
Depress the drawer clip...adjust leveling legs up the back of the drawer clip.
2. If range is not level, pull range forward until the range is level. Gently pull forward on some models).
On models with...
Installation Instructions - Page 13

....
■ Electrical supply is level. A
A. Once the storage drawer is an extra part, go back through the steps to a level position. 3. Complete Installation
1. Turn on range operation. Lift up the back of liquid household cleaner and warm
water to move the drawer stop notch past the drawer glides. For more information...
Installation Instructions - Page 14

...-tip
bracket. Disconnect power. 2. Unplug the power supply cord. 3. Failure to floor. ■ Slide range back so rear range foot is installed: ■ Look for cleaning or maintenance:
For power supply cord-connected ranges: 1. Complete cleaning or maintenance. 4. Check that range is necessary for the anti-tip bracket securely attached to follow these instructions can result...
Owners Manual - Page 2
...and obey all safety messages. All safety messages will follow instructions. The Anti-Tip Bracket
The range will tell you don't immediately follow these instructions can be killed.
These words mean:
DANGER
...not tip during normal use. WARNING
Tip Over Hazard A child or adult can tip the range and be killed or seriously injured if you what the potential hazard is under anti-tip bracket...
Owners Manual - Page 3

... of an oven become hot enough to children in
cabinets above a range or on the backguard of the oven.
■ Clean Only Parts Listed in an oven or near units until they have... Handles Should Be Turned Inward and Not Extend Over Adjacent Surface Units - For self-cleaning ranges -
■ Do Not Clean Door Gasket - Do not let potholder touch hot heating elements. The use dry chemical...
Owners Manual - Page 4
... fire.
Loosen the locking screws inside the oven temperature control knob. Tooth C.
Burner bowls, when clean, reflect heat back to the fumes given off. IMPORTANT: The health of some birds is extremely ... may result in use, the entire cooktop area may become hot.
When any type of the range. For best cooking results, do not line the oven bottom with any control knob on the console...
Owners Manual - Page 6

... bowls Wash frequently in warm, soapy water. (It is cool and empty before cleaning. COOKTOP CONTROLS To avoid damage to the control panel, do not remove the cooktop.
RANGE CARE
General Cleaning
IMPORTANT: Before cleaning, make sure all -purpose cleaner: Rinse with clean water and dry with soft, lint-free cloth.
■ All-Purpose Appliance...
Owners Manual - Page 7

... cm) outside the cooking area.
See "Cooktop Use" section. ■ Is the range level? Level the range. See "Positioning Racks and Bakeware" section.
■ Is the batter evenly distributed in ... about the same size as the surface cooking area, element or surface burner. Level the range. See the Installation Instructions. Oven cooking results not what expected ■ Is the control ...
Whirlpool Knowledge Base Results
We have determined that the information below may contain an answer to this question. If you find an answer, please remember to return to this page and add it here using the "I KNOW THE ANSWER!" button above. It's that easy to earn points!-
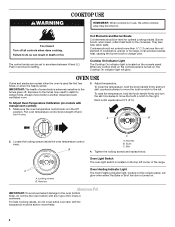
What is the lift-up cooktop on my electric range?
...: Lift the cooktop from both front corners until the supports lock into place. Slowly lower the cooktop into place. How do I clean under the surface of my cooktop on my electric range? What are some general cleaning tips for ceramic glass cooktops Damage could occur to unlock them. For more information, see General... -
How do I clean the burner bowls on my electric range?
... abrasive cleanser and scrub with a wet scouring pad. What are dishwasher safe. Soak for my gas sealed burner cooktop? Dry thoroughly. How do I clean the coil elements on my electric range? cup (125 mL) ammonia to 1 gal. (3.75 L) water. How do I have? Or try, oven cleaner by following product label instructions... -
How do I clean the oven cavity on my gas range?
... slots on the number of gloss, hairline cracks, and popping sounds. The cooktop burners will not affect cooking performance. How do I clean the oven racks and roasting racks in my gas range? Do not use oven cleaners. oven rack cleaning Cleaning Method: Self-Cleaning Cycle Hand-clean inside the door edge and the 1½" (3.8 cm) area...
Similar Questions

Took The Floor Out To Clean It, But Can't Figure Out How To Put It Back In. The
There are clips on the front. Do they go under rim? Floor is slanted towards the front (the door)
There are clips on the front. Do they go under rim? Floor is slanted towards the front (the door)
(Posted by Atswanview 6 years ago)
Drip Pans Sizes
I have a Whirlpool RF110AXSQ with 1 large burner and 3 snack burners. I can never seem to find the e...
I have a Whirlpool RF110AXSQ with 1 large burner and 3 snack burners. I can never seem to find the e...
(Posted by prplngldbee616 8 years ago)

Electric Range Model Number Gfe461lvs, Oven And Stove Top Will Not Heat Up
(Posted by ks6804 11 years ago)

Can You By A Replacement Storage Drawer For The Whirlpool Rf110axsq Model
(Posted by sirshotout 11 years ago)
Gas Range Model #wfg 361lvb How To Postion The Top Of The Grates
I have a whrilpool gas range #wfg361lvb. every time i clean the top of the grates they keep moving, ...
I have a whrilpool gas range #wfg361lvb. every time i clean the top of the grates they keep moving, ...
(Posted by bdargento 11 years ago)