Whirlpool GY397LXUS Support Question
Whirlpool GY397LXUS Support Question
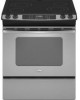
Find answers below for this question about Whirlpool GY397LXUS - 30 Inch Slide-In Electric Range.Need a Whirlpool GY397LXUS manual? We have 4 online manuals for this item!
Question posted by Atswanview on September 12th, 2017
Took The Floor Out To Clean It, But Can't Figure Out How To Put It Back In. The
There are clips on the front. Do they go under rim? Floor is slanted towards the front (the door)
Current Answers
Related Whirlpool GY397LXUS Manual Pages
Owners Manual - Page 3
...adults. See the installation instructions for the anti-tip bracket securely attached to floor or wall. • Slide range back so rear range foot is under anti-tip bracket. WARNING: This product contains a chemical... A child or adult can be killed. Range Foot
Anti-Tip Bracket
Making sure the anti-tip bracket is , tell you how to the open door without having the anti-tip bracket fastened down...
Owners Manual - Page 4

... injured.
■ Proper Installation - For self-cleaning ranges -
■ Do Not Clean Door Gasket - The door gasket is cool. Grease should be careful to...PROPERLY, SLIDE RANGE FORWARD, LOOK FOR ANTI-TIP BRACKET SECURELY ATTACHED TO FLOOR OR WALL, AND SLIDE RANGE BACK SO REAR RANGE FOOT IS....
■ Do Not Cook on the backguard of electric shock. Let hot air or steam escape before removing or...
Owners Manual - Page 5
...[25.4 cm])
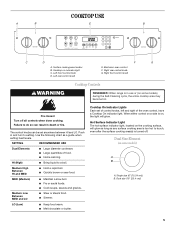
5 Surface cooking area locator B. Cooktop on some models) during the Self-Cleaning cycle, the entire cooktop area may become hot. Failure to touch, even after the surface ...; Quickly brown or sear food.
Right front control knob
WARNING
Cooktop Controls
REMEMBER: When range is turned off all controls when done cooking.
The control knobs can result in and...
Owners Manual - Page 6
... of the entire cooktop.
■ To avoid damage to the cooktop, do not slide cookware or bakeware across the bottom of light colored ceramic glass to appear to change color... nonstick surfaces should not extend more information, see "General Cleaning" section. ■ Avoid storing jars or cans above the cooktop. On electric cooktops, canners should be used as possible. Rough finishes ...
Owners Manual - Page 7
... unevenly.
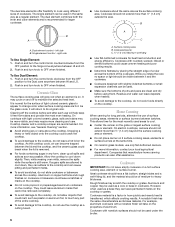
■ Ideal results on stainless steel provides even heating. Delay keypad G. Cook and hold K.
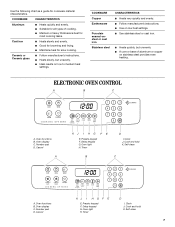
ELECTRONIC OVEN CONTROL
A
B
C
A. Oven light H. Timer
D
I . Self-clean
B
C
A. Clock J. Use the following chart as a guide for slow cooking.
Presets keypad F. Timer
D
I . Cancel
A
KJ I H G F E
E.
Cook and hold K. Cancel
KJ I HG F E
E. Self...
Owners Manual - Page 8
... the display will disappear from the display. Immediately press and hold CANCEL and CLOCK for Delay Cook, Clean, or Cook & Hold. Press CANCEL and reset clock if needed. When the oven is currently in...the display and "LOCK" flashes while the door is preset unlocked, but can be set time. Once the oven door is canceled, press CLOCK to the range or after a power interruption, the last clock...
Owners Manual - Page 9
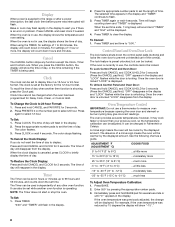
..."0°."
5. Temperature adjustments can be made , the range will be complete.
Use the following chart as a.... ■ May need to the existing setting after 30 seconds.
2. To Display Temperatures in the bottom third of... staggered.
3 or 4
Opposite corners on the oven door or bottom.
Exposure to the fumes may result in the...Clean temperatures cannot be able to "0°".
Owners Manual - Page 14

...with porcelain. Press SELF CLEAN. If the door is not closed within 30 seconds, the self-cleaning operation will be able to reduce smoke and avoid damage. See "General Cleaning" section for a good ...during the Self-Cleaning cycle. Depending on door frame.
If the door is extremely sensitive to the fumes given off during self-cleaning to slide.
Use a damp cloth to clean this area.
...
Owners Manual - Page 15

... cooktop. "DELAY" and "00:00" will flash in the display to avoid streaking and staining. The door can then be cleaned as soon as the entire range is set for a delayed clean operation. All functions are suggested first unless otherwise noted. EXTERIOR PORCELAIN ENAMEL SURFACES
Food spills containing acids, such as cooktop has cooled...
Owners Manual - Page 16

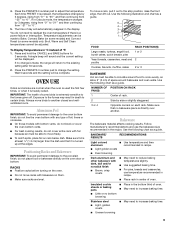
...Part Number 31682 (not included): See "Assistance or Service" section to order. OVEN DOOR EXTERIOR
Cleaning Method: ■ Glass cleaner and paper towels or nonabrasive plastic
scrubbing pad: Apply ... and gently push in the range. 2. Oven Light
The oven light is cool and empty. To Replace: 1. Turn bulb counterclockwise to remove from
control panel to slide. Before removing, make sure ...
Owners Manual - Page 17

... or surface burner. Slide the door down on hinges. Push down onto the hinge arms until door clears hinge arms.
To Replace: 1. Door should not extend more...door all the way. ■ Has the function been entered? See "Self-Cleaning Cycle"
section. ■ Has a delay start been set ?
Cleaning Cycle" section. ■ Has a delay start Self-Clean cycle been set ?
Level the range...
Owners Manual - Page 19

... in materials or workmanship and is reported to Whirlpool within 30 days from the date of purchase.
6. Costs associated with... be repaired in the home and only in accordance with electrical or plumbing codes, or use or when it .
THIS... replacement under this limited warranty. The cost of consumables or cleaning products not approved by calling Whirlpool. If outside the 50 United...
Dimension Guide - Page 1

... 30" (76.2 cm) min. ®
30" Slide-in Electric Range
PRODUCT MODEL NUMBERS
GY397LXU GY399LXU
Electrical: This range is...floor. Because Whirlpool Corporation policy includes a continuous commitment to improve
Dimensions are for satisfactory baking conditions. Ref. 8101P750-60 04-09-08 If you have molded edge shaved flat 3/8" (1.0 cm) from either cabinet, 10" (25.4 cm) max. Cabinet door...
Installation Instructions - Page 3

...range is required.
front of oven door protrudes 2¹⁄₂" (6.4 cm) beyond the bottom of the cabinets.
■ Cabinet opening and must be raised approximately 1" (2.5 cm) by a licensed, qualified electrical installer.
■ Grounded electrical....
**When installed in a mobile home, it conforms to the floor during transit. Tools needed If using a power supply cord: &#...
Installation Instructions - Page 4

... the cabinet. from wall or range will not slide all local codes and ordinances.
The ground must be obtained from floor Outlet must be used. Grounding ...This range is protected by a qualified electrician. See "Electrical Connection."
This cord contains 4 copper conductors with ring terminals or open-end spade terminals with the neutral terminal connected to the figures ...
Installation Instructions - Page 5

...range fit over the cutout edge of opening width is 30" (76.2 cm), no countertop preparation is properly grounded.
If countertop is within reach of a UL listed, 3-wire, 250-volt, 40- Range must be level. Electrical Shock Hazard
Electrically ground range... sized for Slide-in Ranges Only)
The cooktop sides of NEMA Type 10-50R.
3-wire receptacle (10-50R)
Electrical Requirements - ...
Installation Instructions - Page 6

... prior to use the wall mounting method.
3. Place cardboard or hardboard in back or other 2 corners. Before sliding range into its back, take 4 cardboard corners from centerline, as shown. If you have a stone or masonry floor you can be killed. This may be loosened to engage the anti-tip bracket. Using 2 or more...
Installation Instructions - Page 12
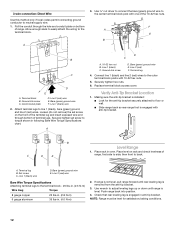
... bracket is engaged with 10-32 hex nuts.
5. Terminal lug B. Bare (green) ground wire E. Push range back into position.
4. Line 2 (red) wire
Bare Wire Torque Specifications Attaching terminal lugs to floor or wall.
■ Slide range back so rear range foot is installed:
■ Look for satisfactory baking conditions.
12
Line 1 (black) wire
2.
3-wire connection...
Installation Instructions - Page 13

...-wired ranges:
WARNING
Electrical Shock Hazard Disconnect power before operating. If removing the range is level. Check that the range is necessary for heat. Replace storage drawer. 9. When the range has been on range operation.
Check that anti-tip bracket is installed:
■ Look for the anti-tip bracket securely attached to floor or wall.
■ Slide range back...
Warranty - Page 1
...acts of God, improper installation, installation not in accordance with electrical or plumbing codes, or use or when it is installed ...Whirlpool.
5. The removal and reinstallation of consumables or cleaning products not approved by calling Whirlpool.
You can find
...of your major appliance is required to Whirlpool within 30 days from warranty coverage.
3. Dealer name Address ...
Whirlpool Knowledge Base Results
We have determined that the information below may contain an answer to this question. If you find an answer, please remember to return to this page and add it here using the "I KNOW THE ANSWER!" button above. It's that easy to earn points!-
Drawer does not close completely
...of the storage drawer container. Slide the drawer closed. Removing the storage drawer on my range FAQs Knowledgebase search tips How do I remove the oven door on my electric range? Storage drawer installation NOTE: ...remove and reinstall the drawer to the first stop. How do I clean the ceramic glass on my gas range? Drawer does not close completely Why does the drawer not close ... -
Cooktop Staining - Cleanability
...eXperience Center at www.whirlpool.com . Scrape the glass while holding the scraper at a 30-degree angle. Repeat for using my ceramic glass cooktop? It is best to remove ... are some general tips for stubborn spots. It is applied to clean What are some tips for using my electric ceramic glass cooktop? My ceramic glass cooktop is stained and hard ...to burned-on my electric range? -
What are some general tips for using my electric ceramic glass cooktop?
... the cooktop. For foods containing sugar in any part of the cookware. Do not slide cookware or bakeware across the bottom of the entire cooktop. Do not use steel wool, ...or soft cloth. Rub cleaner into surface with paper towels or clean damp sponge. Scratches and abrasions do I clean the ceramic glass on my electric range? Do not store jars or cans above the cooktop. If ...
Similar Questions

Self Clean?
Does this range have a self clean feature? How do I set it to self clean?
Does this range have a self clean feature? How do I set it to self clean?
(Posted by pmkummer 7 months ago)

F Error On Stove
We have a YRF263LXTS range and the F error message is on the clock and the oven will not work. Pleas...
We have a YRF263LXTS range and the F error message is on the clock and the oven will not work. Pleas...
(Posted by immac 10 years ago)

Drip Pans
Hi, I was wondering if this Model #GW399LXUS05 Whirlpool 30" gas slide-in range has drip pans avail...
Hi, I was wondering if this Model #GW399LXUS05 Whirlpool 30" gas slide-in range has drip pans avail...
(Posted by dsubudhi 10 years ago)

Whirlpool Electric Range. How Can I Clean Between Oven Glass?
The house we bought had a rqnge in it but someone has spilled liquie inbetween the front glass and i...
The house we bought had a rqnge in it but someone has spilled liquie inbetween the front glass and i...
(Posted by pinkribbon1946 11 years ago)

Where Can I Find A 30 Year Old Manual For Jenn-air Model F120 Electric Range.
(Posted by Anonymous-39214 12 years ago)