Whirlpool MH2175XSS Support Question
Whirlpool MH2175XSS Support Question
Find answers below for this question about Whirlpool MH2175XSS.Need a Whirlpool MH2175XSS manual? We have 4 online manuals for this item!
Question posted by promultis on May 12th, 2014
Template To Drill Holes Into Upper Cabinet
Can you send me a copy of the template to drill holes in the upper cabinet for model no. mh2175xs
Current Answers
Related Whirlpool MH2175XSS Manual Pages
Installation Instructions - Page 2
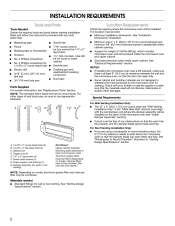
INSTALLATION REQUIREMENTS
Tools and Parts
Tools Needed
Gather the required tools and parts before starting installation.
Read and follow the instructions provided with any tools listed here. The location must provide: Location Requirements
Check the opening where the microwave oven will be installed.
Installation Instructions - Page 3
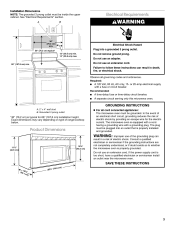
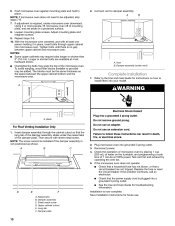
..." section. Failure to follow these instructions can result in death, fire, or electrical shock. Installation Dimensions
NOTE: The grounded 3 prong outlet must be inside the upper cabinet. Electrical Requirements
A
B
WARNING
30" (76.2 cm) min. 30" (76.2 cm) typical* 12" (30.5 cm) min. 14" (35.6 cm) max. Required...
Installation Instructions - Page 4

...Mounting Plate
NOTE: To avoid possible damage to back of microwave oven exterior. Rotate Blower Motor
The microwave oven is reinstalled in another location where wall or roof venting may be...Keep the damper assembly in recessed holes)
4. A
B
A
B
C
A Screws B. Mounting plate B. NOTE: Do not grip or use the door or door handle while the microwave oven is being handled.
2.
Remove ...
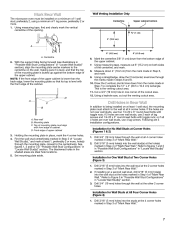
Installation Instructions - Page 5
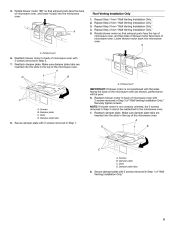
...Damper plate C. Rotate blower motor 180° so that exhaust ports face the top of microwave oven, and flat sides of blower motor face back of "Wall Venting Installation Only."
5 Repeat ...4 from "Wall Venting Installation Only." Lower blower motor back into the slots in the top of microwave oven with 2 screws removed in Step 3 cannot be poor. 6. A
D
B
A. Damper plate C....
Installation Instructions - Page 6
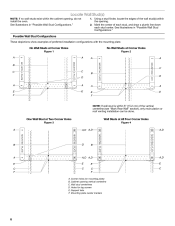
... Wall Stud Configurations."
One Wall Stud at Two Corner Holes
Figure 3
Wall Studs at Corner Holes
Figure 2
A
MOUNTING PLATE MOUNTING PLATE
A
A
MOUNTING PLATE MOUNTING PLATE
A
B C
C D
C D A E
B
A E F
A E F
A E
NOTE: If wall stud is within 6" (15.2 cm) of the wall stud(s) within the cabinet opening, do not install the oven. Wall stud centerlines D. Using a stud finder, locate the...
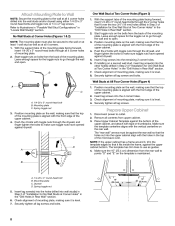
Installation Instructions - Page 7
...are 3 installation configurations. Set mounting plate aside. Wall Venting Installation Only
Centerline Upper cabinet bottom
³⁄₈" (1 cm)
4" (10.2 cm)
A
6" (15.2 cm) 6" (15.2 cm)
A. Drill 3/4" (19 mm) holes through the wall at All Four Corner Holes (Figure 4)
1. Refer to figures 1 and 2 in "Possible Wall Stud Configurations" in Step 7 to complete the 12" x 4" (30.5 x 10...
Installation Instructions - Page 8
... power to make sure toggle nuts have opened against drywall. NOTE: If the upper cabinet has a frame around it, trim the template edges so that it is aligned with tape or thumbtacks. Insert lag screw(s) into the holes drilled into the upper cabinet align with the front edge of the mounting plate. Leave enough space for One...
Installation Instructions - Page 9
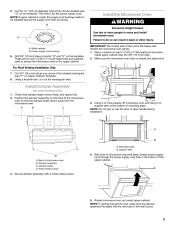
... the upper cabinet. This hole is closed and taped shut. Drill 3/8" (10 mm) holes at the circular shaded area "G" on the template. Using a keyhole saw, cut out the rectangular area. Support tabs
D
A. Damper assembly C. Secure damper assembly with 2 sheet metal screws.
5. Rotate microwave oven up toward upper cabinet. 5. A
A. Place a washer on Upper Cabinet Template. 8. NOTE...
Installation Instructions - Page 10
... bolts until there is required, rotate microwave oven downward. NOTES: Loosen mounting plate screws. NOTE: If microwave oven does not need to be adjusted, skip steps 7-9. 7. Push microwave oven against mounting plate and hold in place, insert bolts through upper cabinet into microwave oven. Using 2 or more people, lift microwave oven off of mounting plate, and set...
Installation Instructions - Page 12
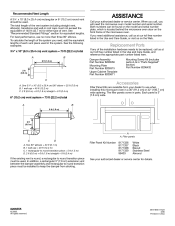
... the microwave oven door on the front frame of the system you will need the microwave oven model number and serial number. To calculate the length of the microwave oven. Both numbers... authorized dealer or service center. Damper Assembly Part Number 8206556 Mounting Plate Part Number 8206315 Upper Cabinet Template Part Number 8205871 Mounting Screw Kit (includes parts A-G in a 36" (91.4 cm...
Use and Care Guide - Page 2

... 6 Display 6 Start 6 Cancel Off 6 Add 30 Seconds 6 Clock 6 Tones 7 Timer 7 Control Lock 7 Vent Fan 7 Cooktop Light 7 Demo Mode 7
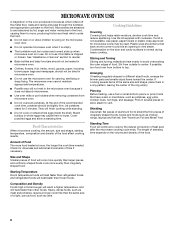
MICROWAVE OVEN USE 8 Food Characteristics 8 Cooking Guidelines 8 Cookware and Dinnerware 9 Aluminum Foil and Metal 9 Microwave Cooking Power 9 Manual Cooking 10 Cooking in Stages (or steps 10 Doneness ...
Use and Care Guide - Page 3
...supervision is necessary when used by qualified service personnel. Remove wire twist-ties from the microwave oven is , tell you how to reduce the chance of injury, and tell you don't ...AVOID POSSIBLE EXPOSURE TO EXCESSIVE MICROWAVE ENERGY" found in use the cavity for example, closed , turn oven off, and disconnect the power cord, or shut off the pad and touch electrical parts involving a...
Use and Care Guide - Page 4

...oven when the microwave oven is no damage to operate this microwave oven outdoors.
It is particularly important that the oven door close properly and that there is in the "PAN BROWN" mode (on models...9632; Do not store anything directly on sealing surfaces.
(c) Do not operate the oven if it is properly grounded.
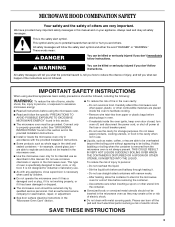
IMPORTANT SAFETY INSTRUCTIONS
■ Suitable for the electric ...
Use and Care Guide - Page 5

... 2 or more evenly. F
G
H I . Cooking rack E. Control panel
Parts and Features not shown Turntable
Turntable
A
B C
A. Remove tape from the illustrations in this microwave oven. The appearance of your particular model may differ slightly from the hub. 2. Cooking Rack
The cooking rack is touched. Insert the rack securely into the rack supports on the...
Use and Care Guide - Page 6

...the input prompt will resume the preset cycle. Touch CLOCK or START.
or p.m. The microwave oven will scroll in use (standby mode), the display shows the time of day or Timer countdown.... Touch CLOCK. 2. Touch 0. 3. Add 30 Seconds
The ADD 30 SEC control automatically starts the microwave oven at any function. To Remove: 1. Clock
This is in the display as a reminder. Touch and hold...
Use and Care Guide - Page 7

....
If no action is operating. Touch the number pads to prevent unintended use , the microwave oven can also operate.
When reminder tones sound, "END TIMER" appears in the display will function....while a cook function is in the display, and then touch CANCEL OFF to cool the microwave oven. Control Lock
The Control Lock shuts down the set time. Cooktop Light
The cooktop light has...
Use and Care Guide - Page 8
... to vent steam. Piercing Before heating, use the microwave oven for microwave ovens may cause them in the microwave oven because it is not available, wax paper, paper towels or...plastic wrap approved for canning, sterilizing or deep frying.
Composition and Density
Foods high in microwave oven.
■ Clothes, flowers, fruit, herbs, wood, gourds, paper, including brown paper bags...
Use and Care Guide - Page 9

... flash of food.
60%
Cooking sensitive foods such as a general guide for use oven mitts or pot holders when removing dishes from the food.
Use the following guidelines: ...poultry pieces and fish fillets. Aluminum foil and some models), aluminum foil for Use
Racks and bakeware supplied with the microwave oven (on the turntable.
Silicone Bakeware
Follow manufacturer's recommendations...
Dimensions - Page 1

... cap. ✔ two elbows should be uniform. ✔ using duct tape to seal all joints in the upper cabinet as close as possible to the microwave oven hood.
See examples below.
3-1/4" x 10" (8.3 x 25.4 cm) vent system
6 ft. wall cap
...feet of rigid metal vent. ®
Microwave Hood Combination
PRODUCT MODEL NUMBERS
MH1160XS MH1170XS
MH2175XS
Electrical: A 120-volt, 60 Hz, AC-only, 15 ...
Parts Guide - Page 7
... Cord, Power
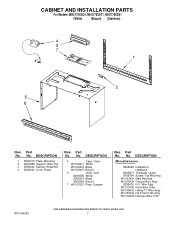
Illus. Part No. No. Part No. DESCRIPTION
Miscellaneous
8205948 Installation, Hardware
8205871 Template, Upper 8169704 Screw, Top Mountng W10163434 Main Harness W10163438 Ground Wire Assy 8206415 H.V. No. No. Wire... W10157207 Plate, Damper
Illus. CABINET AND INSTALLATION PARTS
For Models: MH2175XSQ1, MH2175XST1, MH2175XSS1
(White) (Biscuit) (Stainless)
Illus. Part No.
Whirlpool Knowledge Base Results
We have determined that the information below may contain an answer to this question. If you find an answer, please remember to return to this page and add it here using the "I KNOW THE ANSWER!" button above. It's that easy to earn points!-
The self-cleaning cycle on my gas range will not operate
... white spots can be able to clean this area. How the cycle works The heating and cooling of porcelain on some models) - The oven light will automatically lock. Electric oven control The oven is too high, "cln," "Timed," "On," "cool," and "Locked" will automatically shut off during the self-cleaning cycle. To stop and... -
How does the Style 1 freestanding electronic oven control display operate on my electric range?
.... If "12:00 PM" appears at any other time, a power failure has occurred. The display on the display. and p.m. How does the Style 1 freestanding electronic oven control display operate on some models, this is a 12-hour clock that shows a.m. See "Clock" section below . Depending on my SpeedCook microwave... -
Water supply hookup - Bottom freezer/French door refrigerators
... the refrigerator to the refrigerator cabinet with the following : Clogged or...models To connect to depress and hold the water dispenser lever for 5 seconds, and then release it is under the pipe clamp. Pull on the copper tubing to 414 kPa). If a reverse-osmosis water filtration system is solidly in the ¼" drilled hole...while holding the upper nut in the valve. Slightly...
Similar Questions

Setting A Delayed Start Time On The Oven
Can you set up a delayed start time for the oven to start cooking at a specific time on this model? ...
Can you set up a delayed start time for the oven to start cooking at a specific time on this model? ...
(Posted by cdpitts 6 years ago)
Lamp Out On Microwave
The lamp on the underside of my MH2175XSS Whirlpool Microwave went out. I replaced it with the corre...
The lamp on the underside of my MH2175XSS Whirlpool Microwave went out. I replaced it with the corre...
(Posted by jgmcba 10 years ago)

Upper Oven Not Heating
just moved into a house with this unit installed the upper oven acts normal but does not heat up. lo...
just moved into a house with this unit installed the upper oven acts normal but does not heat up. lo...
(Posted by soundsextreme1 11 years ago)

How Do I Change The Charcoal Filter?
I need to change the charcoal filter on my WMH1162xvs1 microwave. It is a combination hood and under...
I need to change the charcoal filter on my WMH1162xvs1 microwave. It is a combination hood and under...
(Posted by jimruth1972 11 years ago)

Old Oven Hole About 1/2 Inch Too Wide On Each Side.
there appears to be no installation kit to be able to both hide the hole and attach the oven to the ...
there appears to be no installation kit to be able to both hide the hole and attach the oven to the ...
(Posted by blbabin 12 years ago)