
Whirlpool GR563LXS Support Question
Whirlpool GR563LXS Support Question
Find answers below for this question about Whirlpool GR563LXS.Need a Whirlpool GR563LXS manual? We have 2 online manuals for this item!
Question posted by bod48 on August 9th, 2013
Cant Find Location Of Bake Element?
please provide answer, only place i think it is under oven above storage door. thanks
Current Answers
Answer #1: Posted by tony9 on August 9th, 2013 12:23 PM
tony9
Member since:
June 14th, 2013 Points: 221,640

Member since:
June 14th, 2013 Points: 221,640
try the info on the link below it might be helpful.
http://www.google.com/url?q=http://www.appliance411.com/faq/replace-oven-element.shtml&sa=U&ei=AUEFUqCAFcXa0QWdmoDoBA&ved=0CDAQFjAD&sig2=SpL55DIRaKpBAA_OJahC7Q&usg=AFQjCNFGri0UGM3B3WnDcxAooCcWPSCfNQ
http://www.google.com/url?q=http://www.appliance411.com/faq/replace-oven-element.shtml&sa=U&ei=AUEFUqCAFcXa0QWdmoDoBA&ved=0CDAQFjAD&sig2=SpL55DIRaKpBAA_OJahC7Q&usg=AFQjCNFGri0UGM3B3WnDcxAooCcWPSCfNQ
Related Whirlpool GR563LXS Manual Pages
Use and Care Guide - Page 2
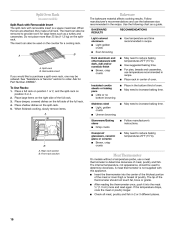
......16 Bakeware...16 Meat Thermometer...16 Oven Vent...17 Baking and Roasting...17 Choice Bake® Function ...17 Broiling...18 Convection Cooking...19 Hold Warm Feature ...20 Timed Cooking ...21 Sequence Programming ...22 Warming Drawer ...23 RANGE CARE ...24 Self-Cleaning Cycle...24 General Cleaning...26 Oven Light ...28 Oven Door ...28 Storage Drawer ...28 Warming Drawer ...29...
Use and Care Guide - Page 4
... Handles Should Be Turned Inward and Not Extend Over Adjacent Surface Units - s Keep Oven Vent Ducts Unobstructed. s User Servicing - Do not let potholder touch hot heating elements. The door gasket is used in area where the range is turned inward, and does not extend over adjacent surface units. TO CHECK IF THE DEVICES ARE...
Use and Care Guide - Page 5
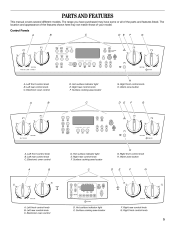
... may not match those of the parts and features listed. Surface cooking area locator G. Left rear control knob C. Right front control knob
5 The range you have some or all of your model. Left front control knob B. Electronic oven control
D. Warm zone button
A
B
C
D
E
F
G
A. Electronic oven control D. PARTS AND FEATURES
This manual covers several different models.
Use and Care Guide - Page 7
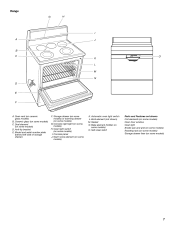
... panel J. Automatic oven light switch L. Storage drawer (on some models) or warming drawer (on some models) I A J
B C K L M N D O
E
F
A. Range
G H
I . Oven light switch (on some models) C. Broil element (not shown) M. Bake element (hidden on some models) O. Self-clean latch
Parts and Features not shown Coil elements (on some models) Oven door window Oven light Broiler pan...
Use and Care Guide - Page 8
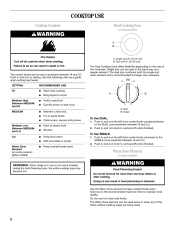
... and turn knob to maintain food quality. Use the following chart as a regular element. Bring liquid to vertical (off all controls when done cooking. Warm Zone Element (on some ceramic glass models)
s
Warm Zone Element
(on some models)
REMEMBER: When range is recommended for more than one hour before or after cooking.
Single size...
Use and Care Guide - Page 9
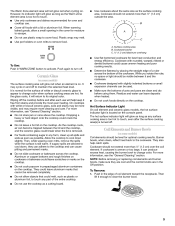
...baked goods, allow objects that cannot be removed completely. Use pot holders or oven mitts to escape. Cookware designed with a lid or aluminum foil. Do not cook foods directly on the cooktop.
Wiping off to its indicator light will glow as long as the Warm Zone element... element. On cooktops with rounded, warped, ribbed or dented bottoms could break when the lid is located on...
Use and Care Guide - Page 10
... properties of surface cooking areas, elements or surface burners between batches. Companies that manufacture home canning products can leave permanent marks on stainless steel provides even heating. Ideal cookware should...for cookware material characteristics. Pull the coil element straight away from both front corners until the supports lock into place. See "Assistance or Service" for ...
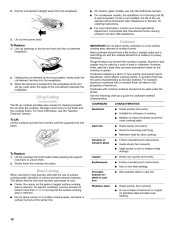
Use and Care Guide - Page 16
... time recommended in the bottom third of oven. A
B
Even browning
s
A. Use suggested baking time. Place in recipe. May need to provide room for Part Number 4396927. s s
If you would like to purchase a split-oven rack, one may be removed to increase baking time. See "Assistance or Service" section to reduce baking temperatures 25°F (15°C). Ask...
Use and Care Guide - Page 17
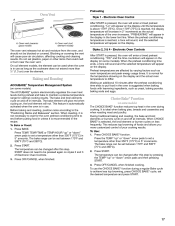
.../TIME or TEMP/HOUR "up " or "down " arrow pads to be blocked or covered. The bake range can be changed after this step. START does not need to set a temperature other than ½" (1.3 cm) over the element. When CHOICE BAKE® is pressed, the oven will appear on the display (on some models)
The CHOICE...
Use and Care Guide - Page 18
...place it in the heated oven, making cleaning more precise control when cooking. Use tongs to turn food to be lined with foil. After broiling, remove the pan from the broil element...rack according to the top (5). Drippings will bake on the pan if left in the center of the oven rack. s
Steak 1" (2.5 cm) ...the remaining fat on some models). Open door to cook food. The lower the temperature...
Use and Care Guide - Page 19
...The convection bake range can cook more than one...Baking and Roasting
During the CONVECT function, the ring element ...places. The preheat display will turn off . 1. Once the door is important not to cover foods so that surface areas remain exposed to provide an indirect source of each preset. 2. Convection Cooking (Styles 1 & 3 - Food cooks more consistently throughout the oven...
Use and Care Guide - Page 20
...if left in intervals to turn off immediately. If using more than one hour before placing it in food poisoning or sickness.
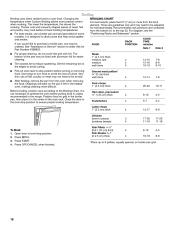
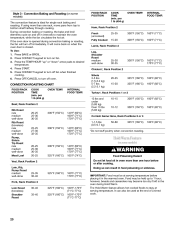
325°F (160°C)
Veal, Rack Position ...TEMP.
Press BAKE or BROIL. 2. per 1 lb (454 g) OVEN TEMP. During convection baking or roasting, the bake and broil elements cycle on when the oven door is ideal for single rack baking and roasting.
...
Use and Care Guide - Page 21
... will automatically be changed anytime after cooking. The warm range is reached, the oven will show on some models)
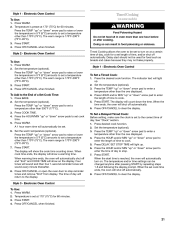
WARNING
Food Poisoning Hazard Do... to the correct time of day, cook for 60 minutes. Press BAKE. 2. Set the temperature (optional). Press the TEMP "up " ...tones will return to cook. 5. Press OFF/CANCEL or open the oven door to set at 170° (75°C) for a set cook ...
Use and Care Guide - Page 30
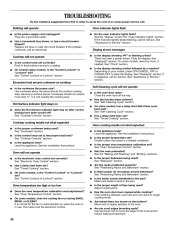
... cost of time being used ? Is the batter evenly distributed in the oven. Are baked items too brown on after control knob(s) have been turned off? s
Oven will not operate
s s
Is the oven door open? On some models, has a delay start been set ? See "Oven Temperature Control" section. s
s s
30
Nothing will not operate
s
Is the control...
Use and Care Guide - Page 31
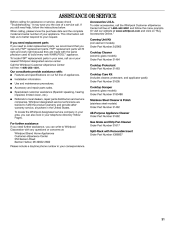
... Referrals to fulfill the product warranty and provide afterwarranty service, anywhere in your correspondence. ...element models) Order Part Number 242905
Cooktop Cleaner
(ceramic glass models) Order Part Number 31464
Cooktop Protectant
Order Part Number 31463
Our consultants provide assistance with Removable Insert
Order Part Number 4396927
31 To order accessories, call . To locate...
Installation Instructions - Page 1

...RANGES
Table of Contents
RANGE SAFETY 1 INSTALLATION REQUIREMENTS 2
Tools and Parts 2 Location Requirements 2 Electrical Requirements 4 INSTALLATION INSTRUCTIONS 4 Unpack Range 4 Install Anti-Tip Bracket 5 Electrical Connection 6 Verify Anti-Tip Bracket Location 9 Level Range 10 Complete Installation 10 Moving the Range...is moved.
We have provided many important safety messages ...
Installation Instructions - Page 2

... installation clearances specified on the oven frame behind the storage drawer panel. When such standard is located on the model/serial rating plate.
Thickness of flooring may require longer screws to anchor bracket to be provided, the risk can be used will need to withstand the heat produced by installing a range hood that all governing...
Installation Instructions - Page 4

.... or 50-amp range power supply cord (pigtail). Remove shipping materials, tape and protective film from inside the storage drawer in the line so that the ground path is located on both sides of... When a 4-wire receptacle of the line. The fourth (grounding) conductor must be provided at each end of the range or inside oven. s When a 4-wire or 3-wire, single phase 120/240 volt, 60 Hz...
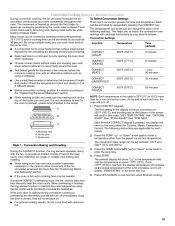
Installation Instructions - Page 5
... with holes in cabinet opening so that specified in the "Location Requirements" section, adjust template so range will be centered in cabinet opening . Before moving range, slide range onto shipping base, cardboard or hardboard. 1. Move range into final position making sure rear leveling leg slides into place.
Place template on the bracket template. Continue installing your type...
Installation Instructions - Page 9

... the bottom of the conduit connector. 7. Insert the other 2 screw clamps. B
A
A. Insert wire under the other 2 wires (lines 1 and 2) under screw clamp. Gently
move range into its final location. 3. C E
F
B
G
4. Making sure the anti-tip bracket is installed:
s Look for the anti-tip bracket securely attached to first stop position. Ground-link C. Line...
Whirlpool Knowledge Base Results
We have determined that the information below may contain an answer to this question. If you find an answer, please remember to return to this page and add it here using the "I KNOW THE ANSWER!" button above. It's that easy to earn points!-
What is the difference between AccuBake® and more traditional baking systems?
... is an electronically controlled temperature system which the bake element and broil element heat up independently or together to provide top heat for browning. What is not hot enough and more traditional baking systems? What is the difference between AccuBake ® Temperature Management System on my electric range? Other baking systems use a mechanical system in... -
What is the AccuBake® Temperature Management System on my electric range?
..." arrow pads to adjust the oven temperature calibration on my electric range? Press Off/Cancel when finished. The bake and broil elements cycle on , the broil element will glow red when cycling on and off in use. What is the difference between 170°F and 500°F (75°C and 260°C). The bake element will not. -
What is the difference between AccuBake® and more traditional baking systems?
... up together. Temperature Management System on my electric range? Hidden Bake element My oven is the AccuBake® Other baking systems use a mechanical system in Sabbath Mode? Baked goods undercooked in the center How do I set or change temperature in which allows the bake and broil elements to provide top heat for browning. What is the difference...
Similar Questions

Where Is Bake Element On Whirlpool Stove Model Wfe374lvb
(Posted by Anonymous-167644 3 years ago)

Bake Element Burned . Replaced But Not Heating ?
Bake element sparked and arched when turned on . Element burned through . Replaced part and will not...
Bake element sparked and arched when turned on . Element burned through . Replaced part and will not...
(Posted by tpatriziosr1 5 years ago)

Broiler Not Working And Its Not The Element What Other Componets Could It Be?
Boiler Element Tested At 19 Ohms is There A Way To Test The Board And Other Componetes?
Boiler Element Tested At 19 Ohms is There A Way To Test The Board And Other Componetes?
(Posted by eddian 11 years ago)

