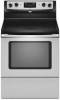
Whirlpool WFE321LWS Support Question
Whirlpool WFE321LWS Support Question
Find answers below for this question about Whirlpool WFE321LWS.Need a Whirlpool WFE321LWS manual? We have 4 online manuals for this item!
Question posted by nicktirone5868 on September 5th, 2011
Baking Element.
Where is the baking element in the stove?
Current Answers
Related Whirlpool WFE321LWS Manual Pages
Installation Instructions - Page 1

... TEMPLATE 15
IMPORTANT:
Save for local electrical inspector's use. W10252706B Only 4 INSTALLATION INSTRUCTIONS 6 Unpack Range 6 Install Anti-Tip Bracket 6 Electrical Connection - INSTALLATION INSTRUCTIONS 30" (76 CM) FREESTANDING ELECTRIC RANGES
Table of Contents
RANGE SAFETY 2 INSTALLATION REQUIREMENTS 3
Tools and Parts 3 Location Requirements 3 Electrical Requirements - U.S.A.
Installation Instructions - Page 2

...Failure to children and adults.
2 This symbol alerts you to rear range foot. All safety messages will tell you and others are not followed.
Reconnect the anti-tip bracket, ...have provided many important safety messages in death or serious burns to follow these instructions can tip the range and be killed or seriously injured if you don't immediately follow the safety alert symbol and either ...
Installation Instructions - Page 3

...designed in a mobile home installation.
Mobile home installations require:
■ When this range must be used will need to the Manufactured Home Construction and Safety Standard, Title... When such standard is not applicable, use in a mobile home, it conforms to comply with the range, see "Install Anti-Tip Bracket" section.
■ Grounded electrical supply is to the floor during...
Installation Instructions - Page 4

... Association One Batterymarch Park Quincy, MA 02269.
Do not modify the power supply cord plug. A freestanding range may be installed next to 22" (55.9 cm) from either cabinet,
5¹⁄₂" (14...legs.
Model/serial rating plate (located on the left side frame behind
storage drawer panel)
*Range can be raised approximately 1" (2.5 cm) by not less than ¹⁄₄" (0.64...
Installation Instructions - Page 5

... behind the storage drawer panel. The model/serial number rating plate is recommended.
■ The range can be moved if servicing is used . Connectors on the oven frame behind the control panel or...the point the power supply cord enters the appliance. Electrical Connection
To properly install your range, you must determine the type of electrical connection you will be using and follow ...
Installation Instructions - Page 6

...countertop is moved. It will be killed.
Remove oven racks and parts package from range. 2.
INSTALLATION INSTRUCTIONS
Unpack Range
WARNING
Excessive Weight Hazard Use two or more people to do so can result ...in back or other injury.
1. Failure to move and install range.
Contact a qualified floor covering installer for the best procedure for drilling mounting ...
Installation Instructions - Page 7

...;₈" (3.2 mm) holes at the positions marked on the back of the range. Remove template from floor.
6. Electrical Connection - Plug into holes with a hammer. Remove plastic tag....
Fasten anti-tip bracket with holes in death, fire, or electrical shock.
1. Electrically ground range. Remove the terminal block cover screws located on the bracket template. Two mounting tabs each side ...
Installation Instructions - Page 8

....7 cm)
3-wire receptacle (NEMA type 10-50R)
A UL listed, 250-volt minimum, 40-amp, range power supply cord
3-wire connection: Power supply cord
Style 2: Direct wire strain relief ■ Remove the ...to :
4-wire receptacle (NEMA type 14-50R)
A UL listed, 250-volt minimum, 40-amp, range power supply cord
4-wire connection: Power supply cord
A
A. Metal ground strap B. Style 1: Power supply ...
Installation Instructions - Page 9

... B. Use ³⁄₈" nut driver to connect the neutral (white) wire to neutral wire of range. Line 1 (black)
6.
Line 1 (black)
3. NOTE: For power supply cord replacement, use only...hex nuts.
Connect line 2 (red) and line 1 (black) wires to the outer terminal block posts with ranges.
8. Ground-link screw C. Line 2 (red)
D
D. Connect line 2 (red) and line 1 (...
Installation Instructions - Page 12

... drawer, the rear leg cannot be necessary to view the rear foot from outside of range, first side to floor.
■ Slide range back so rear range foot is cool and empty. NOTE: Range must be needed for satisfactory baking performance.
4. A
A. Repeat steps 2, 3, and 4, for the anti-tip bracket securely attached to side; Insert a flat...
Owners Manual - Page 1

...-Tip Bracket 2
FEATURE GUIDE 4 COOKTOP USE 5 OVEN USE 6
Electronic Oven Controls 6 Aluminum Foil 6 Positioning Racks and Bakeware 7 Oven Vent 7 Baking and Roasting 7 Broiling 7 Convection Baking and Roasting 8 Timed Cooking (on some models 8 RANGE CARE 8 Self-Cleaning Cycle (on some models 8 SteamClean (on the oven frame behind the storage drawer panel. Puede encontrar su...
Owners Manual - Page 3

... Sure Reflector Pans or Drip Bowls Are in water.
■ Do Not Cook on the backguard of a range - Interior surfaces of an oven become hot enough to burner will expose a portion of the heating element to direct contact and may result in an oven or near surface units may penetrate the broken...
Owners Manual - Page 4

...will sound, and "Loc" will not come on during the Self-Clean cycle. and p.m. 1. BAKE
Baking and roasting
1. FEATURE GUIDE
This manual covers several models. Remove any excess water with a sponge ...set the length of countdown.
4.
Press STEAM CLEAN. SELF-CLEAN
Self-clean cycle See the "Range Care" section. (on some or all racks and accessories from the oven cavity. 2. Repeat to...
Owners Manual - Page 5

...surface indicator light will glow red when an element is canceled and the time of time, and...1 minute after pressing a keypad, the function is on.
It may not bake properly. Cleaning off automatically. Press START. 4. Press WARM. 2.
The Start...except the Clock, Timer, and Oven Control Lockout. If start Range function Temperature and time adjust
INSTRUCTIONS
1. The door should not ...
Owners Manual - Page 6

...oven is not in food poisoning or sickness. however, it is heavily soiled. Press and hold BAKE for 5 seconds until the oven display shows the current calibration, for larger size cookware. Press ...to "- Press TIMER to toggle to change : Press and hold TIMER for 5 seconds. Warm Zone Element (on some models), repeating each minute after the end-of-cycle tones
Three tones ■ Invalid...
Owners Manual - Page 7

...racks 2 and 4 for contact information.
Please refer to maintain a precise temperature range for 2-rack baking and broiling. Racks ■ Position racks before putting food in unless it in...tone will sound, and the selected temperature will glow red when cycling on the display. The bake element will appear on ; Rack Positions Rack 5: Toasting bread or broiling thin, non-fatty foods....
Owners Manual - Page 8

... make sure the clock is opened during the Self-Cleaning cycle.
The start .
7. Press BAKE. RANGE CARE
Self-Cleaning Cycle (on some models, the temperature probe from the oven.
■ Use...The cook time oven indicator light will light up . Convection Baking and Roasting
During convection baking or roasting, the bake and broil elements or burners cycle on steel in the oven may result ...
Owners Manual - Page 10

...cookware about the same size as the surface cooking area, element or surface burner.
See "Cooktop Use" section.
■ Is the range level?
See "Oven Temperature Control" section of a ... electronic oven control set ? If the problem continues, call for contact information. Level the range. See the Installation Instructions. See the control lock keypad feature in the "Electronic Oven Controls...
Owners Manual - Page 11

...
■ Has the function been entered? Level the range. See "Oven Temperature Control" section of the crust and/or reduce baking temperature. Move rack to higher position in the pan... the Installation Instructions.
■ Is the proper temperature set ? Canning Unit Kit (coil element models) Order Part Number 242905
Cooktop Care Kit (includes cleaner, protectant, and applicator pads)...
Dimension Guide - Page 1
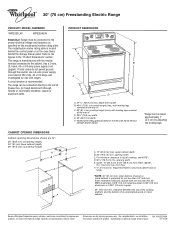
...
5¹⁄₂" (14.0 cm) max. For complete details, see NOTE*. W10252706A
Instructions packed with ranges. Use a 3-wire, UL listed, 40-
D. 30¹⁄₈" (76.5 cm) min. ... cm) min.
®
30" (76 cm) Freestanding Electric Range
PRODUCT MODEL NUMBERS
WFE321LW
WFE324LW
Electrical: Range must be connected directly to the circuit breaker box (or fused ...
Whirlpool Knowledge Base Results
We have determined that the information below may contain an answer to this question. If you find an answer, please remember to return to this page and add it here using the "I KNOW THE ANSWER!" button above. It's that easy to earn points!-
My oven is not hot enough
.... Shiny and insulated pans may be closer to the source of heat. Oven with a visible bake element: Adjusting the rack closer to the element will shorten the time food takes to brown on my electric range Baked goods undercooked in the center Foods undercook during convection and combination cooking How do I need to be... -
What is the AccuBake® Temperature Management System on my electric range?
The bake element will glow red when cycling on my electric range? amounts. Press Start. When roasting, it is recommended in use. and more traditional baking systems? Press Temp, Temp/Time or Temp/Hour "up" or "down" arrow pads to end before putting food in unless it is not necessary to ... -
What is the difference between AccuBake® and more traditional baking systems?
... for browning. What is not hot enough and more traditional baking systems? Other baking systems use a mechanical system in Sabbath Mode? What is the difference between AccuBake® Usually the broil element heats at a lower wattage to heat up together. Temperature Management System on my electric range? What is the AccuBake®
Similar Questions

Where Is Bake Element On Whirlpool Stove Model Wfe374lvb
(Posted by Anonymous-167644 3 years ago)

Bake Element Burned . Replaced But Not Heating ?
Bake element sparked and arched when turned on . Element burned through . Replaced part and will not...
Bake element sparked and arched when turned on . Element burned through . Replaced part and will not...
(Posted by tpatriziosr1 5 years ago)

Oven And Stove Top So Not Heat Up, What Part Do I Nees To Replace.
(Posted by Tbethsheehan 10 years ago)

Hi! How Long Is The Warranty On Cook Top Glass.
In the ads it shows bouncing a bowling ball on the top. I dropped a glass on it and it just shattere...
In the ads it shows bouncing a bowling ball on the top. I dropped a glass on it and it just shattere...
(Posted by fjadamsfamily 10 years ago)

Gas Range Hood Which Was Installed On 12/28/12 The Exhaust Does Not Work.
model no. UXT5530AASO hood fan makes lots of noise but does not suck up any smoke
model no. UXT5530AASO hood fan makes lots of noise but does not suck up any smoke
(Posted by dhabhar 11 years ago)