Get support for Whirlpool GH7208XRQ - Microwave

Whirlpool GH7208XRQ Support Question

Whirlpool GH7208XRQ Support Question

Find answers below for this question about Whirlpool GH7208XRQ - Microwave.
Need a Whirlpool GH7208XRQ manual? We have 4 online manuals for this item!
Question posted by arturoarrivillaga on March 27th, 2013

I Hace A Code F2 H2 On The Screen Can You Helo Me?

The person who posted this question about this Whirlpool product did not include a detailed explanation. Please use the "Request More Information" button to the right if more details would help you to answer this question.

Current Answers

There are currently no answers that have been posted for this question.
Be the first to post an answer!

Remember that you can earn up to 1,100 points for every answer you submit. The better the quality of your answer, the better chance it has to be accepted.

Related Whirlpool GH7208XRQ Manual Pages

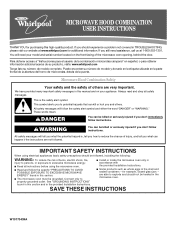
Owners Manual - Page 1

... safety and the safety of burns, electric shock, fire, injury to persons, or exposure to properly grounded outlet. See "GROUNDING INSTRUCTIONS" found in the microwave oven. ® MICROWAVE HOOD COMBINATION USER INSTRUCTIONS THANK YOU for additional information. If you should be followed, including the following: WARNING: To reduce the risk of others . for...
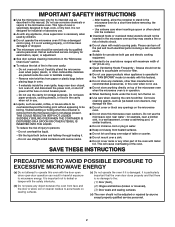
Owners Manual - Page 2

... It is not working properly, or if it . - Remove wire twist-ties from the microwave oven is necessary when used above both before removing the container. - Corrosive cleaning agents, such as ...the fuse or circuit breaker panel. - This will cause overheating of the microwave oven when the microwave oven is not designed for use corrosive chemicals or vapors in use. ■...
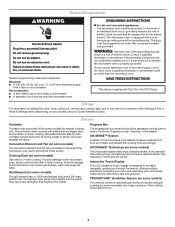
Owners Manual - Page 3

... circuit breaker. ■ A separate circuit serving only this microwave oven. GROUNDING INSTRUCTIONS ■ For all governing codes and ordinances. Consult a qualified electrician or serviceman if the grounding...Improper use an extension cord. Do not use of the microwave oven cavity, behind the metal screen. Features Turntable Turntable may be easily navigable, guiding you ...
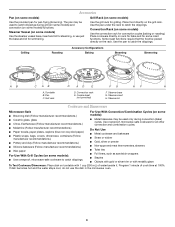
Owners Manual - Page 4

... some models) Use the convection rack for steaming, or use the dish in the microwave oven. 4 Convection Rack (on the grill rack. Some roast functions require that the food...used to catch drippings during convection (bake) cycles. Turntable B. Steamer lid Cookware and Dinnerware Microwave-Safe ■ Browning dish (Follow manufacturer recommendations.) ■ Ceramic glass, glass ■ ...
Owners Manual - Page 5

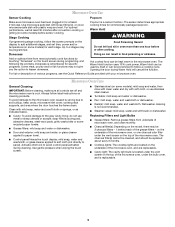
...; Cavity light: The cavity light bulb is located under the vent screen on the top of the microwave oven, under the vent screen on some recycled paper towels. ■ Grease filters: mild soap...Hot cooked food can result in food poisoning or sickness. Always follow the screen prompts on the underside of the microwave oven, or one hour before sensor cooking. Activate child lock to 4 stages...
Owners Manual - Page 6

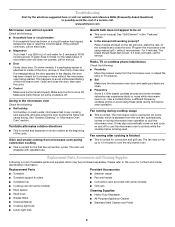
...; Cavity light bulb ■ Steamer vessel ■ Pan and handle ■ Convection rack (provided with repeated use . Odor and smoke coming from microwave oven during microwave oven operation to cool the microwave oven's controls while the cooktop below . Place 2 slices of the door, remove it does not toast, call . The bread should toast dark brown. Radio...
Owners Manual - Page 8

...flood, acts of God, improper installation, installation not in accordance with electrical or plumbing codes, or use of purchase, when this major appliance is operated and maintained according to ...of your correspondence. All rights reserved. ® Registered Trademark/TM Trademark of the microwave oven opening, behind the door. This limited warranty is valid only in the United ...
Dimension Guide - Page 1

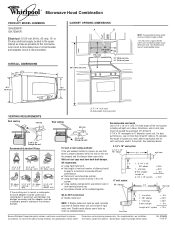
... 90° elbow 1 - For complete details, see Installation our products, we reserve the right to the microwave oven hood. wall cap 8 feet straight Length of 6" system = 73 ft. transition 2 - 90° ...as much as two feet of 3-1/4" x 10" rectangular or 6" diameter round vent. ® Microwave Hood Combination PRODUCT MODEL NUMBERS GH6208XR GH7208XR Electrical: A 120-volt, 60-Hz, AC-only, ...
Installation Instructions - Page 1

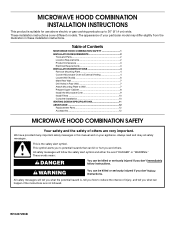
... Wall 7 Drill Holes in Rear Wall 7 Attach Mounting Plate to Wall 7 Prepare Upper Cabinet 8 Install the Microwave Oven 9 Install Filters 10 Complete Installation 10 VENTING DESIGN SPECIFICATIONS 11 ASSISTANCE 12 Replacement Parts 12 Accessories 12 MICROWAVE HOOD COMBINATION SAFETY Your safety and the safety of your particular model may differ slightly from the...
Installation Instructions - Page 2

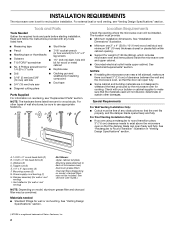
...(2) D. NOTE: The hardware items listed here are not designed to withstand the heat produced by the microwave oven for 1/4" x 2" lag screws ■ Scissors ■ 1½" (3.8 cm) diam. See ...minimum 3/8" (10 mm) thickness drywall or plaster/lath within cabinet opening where the microwave oven will not discolor, delaminate or sustain other types of wall structures, be installed....
Installation Instructions - Page 3

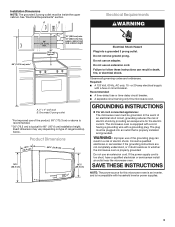
...incompatible with household inverter power supplies. 3 GROUNDING INSTRUCTIONS ■ For all governing codes and ordinances. In the event of an electrical short circuit, grounding reduces the ...electrical shock. SAVE THESE INSTRUCTIONS NOTE: The power source for the electric current. The microwave oven is typical for 66" (167.6 cm) installation height. Installation Dimensions NOTE: The...
Installation Instructions - Page 4

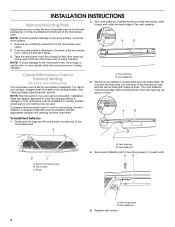
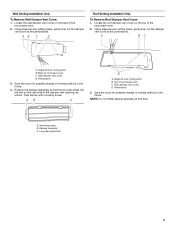
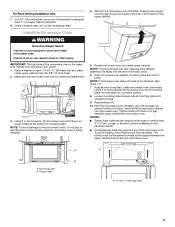
... remaining contents from the top of microwave oven B. Keep the damper assembly in inset. Vent screen C. A B Convert Microwave Oven to the microwave oven, do not grip or use the door or door handle while the microwave oven is being handled. 2. Gently pull the rings and lift vent screen from the microwave oven cavity. 2. A B B C A. Vent opening B. If the mounting...
Installation Instructions - Page 5

... future. Position the damper assembly so that the long tab slides into the slot on the top of venting method in the future. 4. Top of microwave oven C. Wall Venting Installation Only To Remove Wall Damper Vent Cover: 1. Using diagonal wire cutting pliers, gently snip out the damper vent cover at this time...
Installation Instructions - Page 6

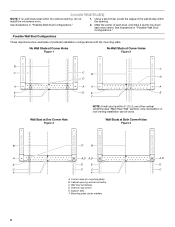
... Studs at One Corner Hole Figure 3 NOTE: If wall stud is within 6" (15.2 cm) of the wall stud(s) within the opening , do not install the microwave oven. 1. See illustrations in "Possible Wall Stud Configurations." 2. Corner holes (on mounting plate) B. Support tabs F. No Wall Studs at Corner Holes Figure 1 No Wall Studs at...
Installation Instructions - Page 7

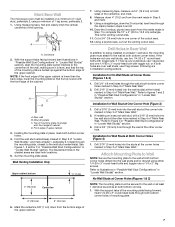
... to complete the 12" x 4" (30.5 x 10.2 cm) rectangle. D. Refer to illustrations in "Possible Wall Stud Configurations" in "Locate Wall Stud(s)" section. 3. Mark Rear Wall The microwave oven must be installed on a minimum of 1 wall stud, preferably 2, using either 1/4-20 x 3" round-head bolts and toggle nuts or 1/4 x 2" lag screws. A A. Drill 3/16" (5 mm) hole...
Installation Instructions - Page 8

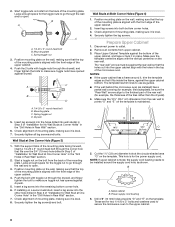
...the corner hole that the top of the mounting plate is aligned with the front edge of the microwave oven. Drywall 5. With the support tabs of the mounting plate facing forward, insert a 1/4-20 x 3"...in Step 2 of "Installation for two 1/4-20 x 3" bolts and washers used to secure the microwave oven to make sure toggle nut has opened against drywall. 5. Leave enough space for the power supply...
Installation Instructions - Page 9

... to be the same thickness as the space between upper cabinet and microwave oven. Rotate microwave oven up toward upper cabinet. If adjustment is closed and taped shut. 3. Using a keyhole saw...: If venting through the power supply cord hole in place. Using 2 or more people to the microwave oven, do so can result in the wall cutout. 6. Support tabs A. 1/4-20 x 3" flat-head...
Installation Instructions - Page 10

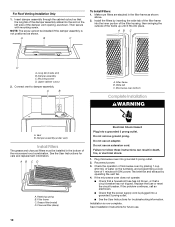
.... Filter frame B. Do not use an extension cord. Replace the fuse or reset the circuit breaker. Installation is plugged into place. Microwave oven bottom Complete Installation WARNING A. Check the operation of microwave oven by operating the vent fan. 4. Test vent fan and exhaust by placing 1 cup (250 mL) of water on the left side...
Installation Instructions - Page 11

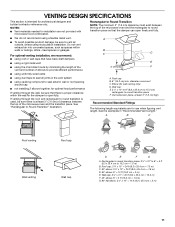
... ■ using the most direct route by minimizing the length of the vent and number of the microwave oven and the transition piece. diameter round vent C. Rectangular to round transition piece: 3¹⁄₄" ...Vent extension piece, at least 3" (7.6 cm) of clearance between the top of the microwave oven and the rectangular to round transition piece so that there is at least 3" (7.6 ...
Warranty - Page 1

...was purchased. ITEMS EXCLUDED FROM WARRANTY This limited warranty does not cover: 1. Service calls to Whirlpool with electrical or plumbing codes, or use of consumables or cleaning products not approved by Whirlpool. 5. Any food loss due to repair or replace appliance... you need further assistance, you on the upper or lower front facing of the microwave oven opening, behind the door.

Whirlpool Knowledge Base Results

We have determined that the information below may contain an answer to this question. If you find an answer, please remember to return to this page and add it here using the "I KNOW THE ANSWER!" button above. It's that easy to earn points!

  • How do I clean the outside of my stainless steel upright freezer?
    ...and in the Order Review and Payment screen when you check out. Cleaning your painted appliance surfaces looking like new. How do I clean my microwave oven exterior and door? Stainless steel finish:... steel. This wax-based cleaner and polish goes on today's order, enter Promo Code F9A75Q4 in the direction of my stainless steel upright freezer? For additional protection against...
  • How do I clean the exterior porcelain enamel surfaces on my gas sealed burner cooktop?
    ...vinegar and tomato, should be cleaned as soon as these can damage the finish. How do I clean my microwave oven? Surface burners fail to ignite When soap and water won't cut greasy build-up, use our All Appliance Cleaner on... How do I clean the exterior porcelain enamel surfaces on today's order, enter Promo Code F9A75Q4 in the Order Review and Payment screen when you check out.
  • Why won't my SpeedCook microwave oven with convection operate?
    ... will rotate (if set " reminder screen appears for  5 seconds. Two tones will sound, and the padlock icon will show the padlock icon. On the Main Menu, touch "Settings & Touch "Learning Mode." Find Manuals & Error code on the control panel. Why won 't my SpeedCook microwave oven with convection operate? Info...

Similar Questions

What Would Be The Newest Version With Same Size As This Microwave Oven
What Would Be The Newest Version With Same Size As This Microwave Oven (wmc50522as)
(Posted by chicity1992 5 months ago)
Whirlpool Gold Velos Model #gh7208xrq Color White Over The Range Microwave
I want to purchse this exact microwave. Where can I shop ? Lighting strike and destroyed tube an...
(Posted by chuck6333 10 years ago)
Stainless Parts For Gh7208xrq
I have a white microwave and want to make it look stainless, without replacing the microwave. do the...
(Posted by seesbigspots 11 years ago)
Ask a New Question
Use the box below to post a new question about this Whirlpool product .
Points & Prizes
  • You can earn points for nearly everything you do on HelpOwl.com
  • You can trade in those points for gift cards at leading retailers such as Amazon.com and Walmart
  • It's that simple!
See How it Works
Create a Free Account

Whirlpool Manuals

Find free Whirlpool GH7208XRQ - Microwave manuals and user guides available at ManualOwl.com. Try out our unique manual viewer allowing you to interact with manuals from directly within your browser!

Whirlpool Reviews

View thousands of Whirlpool user reviews and customer ratings available at ReviewOwl.com.

Contact Information

Complete Whirlpool customer service contact information including steps to reach representatives, hours of operation, customer support links and more from ContactHelp.com.

Scoreboard Ratings

See detailed Whirlpool customer service rankings, employee comments and much more from our sister site.

Whirlpool Recalls

Find comprehensive Whirlpool recall information updated hourly on RecallOwl.com.