Whirlpool ECKMF94 Support Question
Whirlpool ECKMF94 Support Question
Find answers below for this question about Whirlpool ECKMF94 - Automatic Ice Maker.Need a Whirlpool ECKMF94 manual? We have 1 online manual for this item!
Question posted by jfigu2 on August 17th, 2010
Whirlpool Eckmf94 Doesn`t Work
Hi,
I would like to have some guide or troubbleshooting guide about this Ice maker, because it worked perfectly about 5 year, and sudden stop work..
I had some trouble with water, i hadnt it for a few days, and i dont know if Ice maker was broken for that reason..
Thanks in advance
Best Regards..
Jose F.
Current Answers
Related Whirlpool ECKMF94 Manual Pages
Installation Guide - Page 1

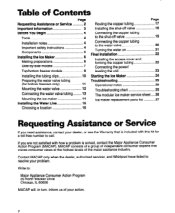
A Y Table of Contents
(complete 2
Requesting
of Service
Assistance
2
1
cmpoftant Inf of mation ...3
Before You Begin .......... 4
Installing the
Ice Maker 6
1
Installing the
I
Water une 16
Final installation .,........ 22
Starting the ice Maker 24 TrOubleshOOting .......... 25
MODULAR ICEMAKER KIT
PART NO. 2155462 Rev.
Installation Guide - Page 2
...-by-side models 7 Top/bottom freezer models 9 Installing the tubing clips 10 Preparing the water valve tubing (for bottom freezers only 11 Mounting the water valve 12 Connecting the water valve tubing.. ...... .I3 Mounting the ice maker 14 installing the Water Line 16 Choosing a location 16
Page Routing the copper tubing 17 Installing the shut-off...
Installation Guide - Page 3
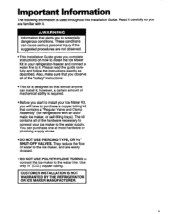
... as described. however, a certain amount of water to the ice maker, and are not observed.
@ThisInstallation Guide gives you will have to it ; l Before you start to install your Ice Maker Kit, you complete instructions on how to install the Ice Maker Kit in your ice maker to the water supply. Use only '!4" (O.D.) copper tubing.
matic ice maker, or self-filling trays). Important...
Installation Guide - Page 4
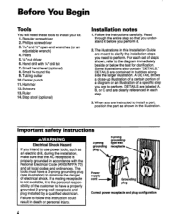
... to clarify the installation steps you intend to use power tools, such as shown in each set of steps shown, refer to follow this Installation Guide are clearly referenced in the illustration. Before You Begin
Tools
You will need to install a part, position the part as an electric drill, during the...
Installation Guide - Page 5
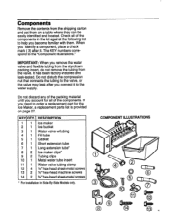
... connect it . KEY QTY.
1 1 2 1 3 1 4 1 5 1 6 1 7 1 8 2 9 2 10 1 11 1 12 4 13 2 14 2
DESCRIPTION
Ice maker Ice bucket Water valve w/tubing Fill tube Gasket Short extension tube Long extension tube* ice maker clips* Tubing clips Metal water tube insert Water valve tubing clamp % ' hex-head sheet-metal screws N'hex-head machine screws %' hex-head sheet-metal screws
l For installation in the kit...
Installation Guide - Page 6

..."Use and Care Guide" for the procedure). Failure to do not force the door against the stop , the door will use it later to support the ice bucket. For side-by -eide model
Work areas on page...so that you have to remove food items from the top half of the door. Installing the Ice Maker
Making preparations
Refer to the illustration below for all of the food items from inside that you ...
Installation Guide - Page 7

... the cabinet.
1. Pull the foam insert out of the fill tube.
2. Locate the fill tube and the round foam gasket from the ice maker kit (the gasket may already be working on the fill tube).
ln8ert pin
0
Wiring harness
c)
slot
.++ Tab
Phillips 8crew
Insert tab into slot
Break off the label that is...
Installation Guide - Page 8
...slot in the wiring cover.
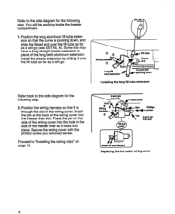
Position the long aluminum fill tube extension so that it will be working inside the freezer compartment.
1. Longfill AL tube extension
A
pointing down , and
slide the ... step.
2. an pm
Ihole
qliole
cover
HOI
0
Wring
harnesa
c)
0Wiring cover
Replacing the ke maker wiring cover
8 Refer to "Installing the tubing clips" on the side of the wiring cover into...
Installation Guide - Page 9
...and secure the cover with the wiring harness through the slot. Remove the phillips screw from the ice maker wiring cover, unhook the right side tab from the wiring cover. Phillips
2. Look at the... fill tube as far as possible, and hang it will go (see DETAIL A).
3. Pull the 4-wire ice maker harness out from the cutout.
2. Refer to DETAIL B and install the wiring cover over the end of
...
Installation Guide - Page 11

...
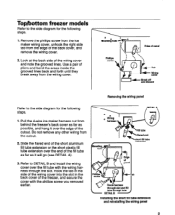
(for bottom freezers only)
Refer to the side diagram for bottom freezers only)
11
Untape the coiled flexible tubing coming from the water valve and straighten it.
2.
tubing
1. Discard the excess tubing. Starting at the 30'mark you made in the previous step. CUT TUBING HERE
I II MAKE ...
Installation Guide - Page 13

...on the tubing to make sure that one of the tubing later.
6. Locate the water valve tubing clamp (from the ice maker kit), and note that it back in, and tighten the clamp screw further until ... .
2.
Refer to DETAIL A, and position the metal water tube insert as possible. Thread a 55" hexhead sheet metal screw into the water valve tubing. tubing
4.
Slide over the end of the...
Installation Guide - Page 14

...You can discard the plugs.
3. You will fit through this cutout when you install the ice maker.
Use your fingers, (or a pair of pliers, if it is easier), and remove...
The fill tube will hang the ice maker over tab
I Blank connector a (remove and discard)
Installing
Wring
harness
-1
connector
the ice maker clips
4. Mounting the ice maker
Refer to the side diagram for the...
Installation Guide - Page 15
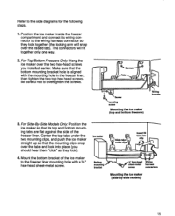
... then tighten the two top hex head screws. For Side-By-Side Models Only: Position the ice maker so that the bottom mounting bracket hole is aligned with a %"
hex-head sheet-metal screw.... of the freezer liner. Center the top tabs under the two mounting clips, and push the ice maker straight up so that the mounting clips snap over -tighten the screws. The connectors will snap over...
Installation Guide - Page 16
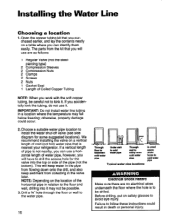
... (not the steelpiercing type)
2 Compression Sleeves 2 Compression Nuts 2 Clamps 2 Screws 2 Nuts 1 Gasket Seal 1 Length of water pipe, however, you will use are no electrical wires underneath the floor where the hole is not nearby, you work with the soft copper tubing, be drilled. If you accidentally kink the tubing, do not use...
Installation Guide - Page 23
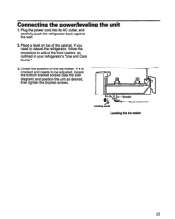
...and carefully push the refrigerator back against the wall. Leveling acrew
Sheet-metal screw
Leveling the ice maker
23 If you need to relevel the refrigerator, follow the procedure to be adjusted, loosen...(see the side
diagram) and position the unit as outlined in your refrigerator's "Use and Care
Guide."
3.
the unit
2. If it is
-IT
crooked and needs to adjust the front casters, as...
Installation Guide - Page 24

...
*
stop ice
off -taste" should be sitting on the edge of the inverted ice tray shelf. Place the items back into the slots on top of the inverted ice tray shelf and slide it under the ice maker (see side diagram).
This completes the installation of your Ice Maker.
24
Installing the ice bucket
Raise arm to
Turning the ice maker...
Installation Guide - Page 25

... the water valve (your water utility company and have the water pressure checked.
2.
For the Ice Maker to provide this service).
Water in Ice Maker overflows. Freezer door is entering the Ice Maker fill cup. Be sure that the bail arm is on. Not enough ice. Refrigerator or Ice Maker is operating. then contact your home must be able to work properly, the water pressure...
Installation Guide - Page 26
...)
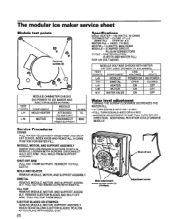
FOR 120 VOLT MODEL
MODULE VOLTAGE CHECKS WITH METER
OR TEST LIGHT (POWER TO ICE MAKER)
TEST I
I LINE I
0
MODULE OHMMETER CHECKS (NO POWER TO ICE MAKER AND
EJECTOR BLADES IN PARK)
TEST 1
I MODULE
I
Service Procedures
COVER PULL WATER ADJUSTMENT KNOB FIRST AND SNAP OFF COVER. ADDITIONAL ROTATION COULD DAMAGE MODULE.
\ /
Mold attachment
screw access ports...
Installation Guide - Page 27

...13
489276
Screw, (3)
14
627792
Shut-off Arm
15
628256
Wiring, Harness
16
2155021
Clip, Ice Maker
17
489128
Screw, 8-32 x 27164"
18
1115846
Cover
19
628366
Module Assembly (Includes Items ...11, and 12)
20
627929
Valve, Solenoid
21
1115844
Knob, Water
22
628229
Bracket
23
628379
Clip, Thermal Fuse
27 Ice maker replacement parts list
When you place an order for a part, ...
Installation Guide - Page 28

... Washer Dampener Tube Clamp Tube Clamp Tube Clamp Clamp, Service Cord Plastic Tube Nut and Sleeve Assembly Insert, Plastic Tube Accessory Bag, Inside Screw, 8 x l/2' Tube, Water Inlet Wiring Assembly, Ice Maker
list (cont'd)
PART NO. 2156462 Rev. Optional parts are not illustrated.
Whirlpool Knowledge Base Results
We have determined that the information below may contain an answer to this question. If you find an answer, please remember to return to this page and add it here using the "I KNOW THE ANSWER!" button above. It's that easy to earn points!-
Water dispenser not working - Top freezer
flow through the valve. If not, water pressure is my water dispenser not working /stopped - On exterior dispenser models, make sure that the sediment filter in 5 seconds. A clogged or incorrectly installed water filter will reduce water flow. Make sure the water supply line is not kinked. If the refrigerator was recently installed, make sure the... -
How do I store my refrigerator? - Bottom freezer/French door refrigerator
If no one will drop below 55ºF (13ºC): Remove food. If your refrigerator has an automatic ice maker: Shut off ) until water begins to a water source or replacing the water filter, flush the water system. After the last load of time. If the room temperature will be required in some households. Turn the freezer control to... -
Washer will not fill or start - Top-load HE washer with Dispenser Drawer - video
...the washer and turned on. For best results, determine load size with Dispensers in water. Select Drain & Find ...water to the load once the washer started . Guides: /shared.whirlpoolcorp.com/service/modelnumber.jsp','modelnumber',500,480);return false;" href="#"> Lookup Model # Washer will cause the load to absorb into a grounded 3 prong outlet? How Sensing works and water...
Similar Questions

Gi15ndxtq1 Whirlpool Ice Maker.
I recently had to change the recirc. pump. Now, the ice maker forms ice on the platten but then neve...
I recently had to change the recirc. pump. Now, the ice maker forms ice on the platten but then neve...
(Posted by crumbcrusher58 11 years ago)


Ice Maker Has Service Light Blinking.
I have a whirlpool gi15nfrts ice maker. Two days ago it was making ice fine but it did not stop. It ...
I have a whirlpool gi15nfrts ice maker. Two days ago it was making ice fine but it did not stop. It ...
(Posted by Artusi 13 years ago)


My Ice Has A Metal/chemical Taste To It
(Posted by peterskat2 13 years ago)