
Installation Guide
Page 1
A Y Table of Contents (complete 2 Requesting of Service Assistance 2 1 cmpoftant Inf of mation ...3 Before You Begin .......... 4 Installing the Ice Maker 6 1 Installing the I Water une 16 Final installation .,........ 22 Starting the ice Maker 24 TrOubleshOOting .......... 25 MODULAR ICEMAKER KIT PART NO. 2155462 Rev.
A Y Table of Contents (complete 2 Requesting of Service Assistance 2 1 cmpoftant Inf of mation ...3 Before You Begin .......... 4 Installing the Ice Maker 6 1 Installing the I Water une 16 Final installation .,........ 22 Starting the ice Maker 24 TrOubleshOOting .......... 25 MODULAR ICEMAKER KIT PART NO. 2155462 Rev.
Installation Guide
Page 2
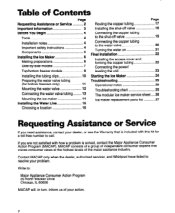
... the water valve 20 Turning the water on 21 Final installation 22 Installing the access cover and forming the copper tubing 22 Connecting the power/ leveling the unit 23 Starting the ice Maker 24 Troubleshooting 25 Operational notes 25 Troubleshooting chart 25 The modular ice maker service sheet .... 26 Ice maker replacement parts list 27 Requesting Assistance or Service If you are not satisfied with how a problem is included with this kit for a toll-free number...
... the water valve 20 Turning the water on 21 Final installation 22 Installing the access cover and forming the copper tubing 22 Connecting the power/ leveling the unit 23 Starting the ice Maker 24 Troubleshooting 25 Operational notes 25 Troubleshooting chart 25 The modular ice maker service sheet .... 26 Ice maker replacement parts list 27 Requesting Assistance or Service If you are not satisfied with how a problem is included with this kit for a toll-free number...
Installation Guide
Page 3
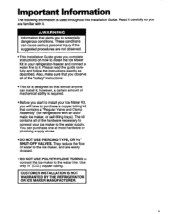
... the guide carefully and follow the instructions exactly as described. l Before you complete instructions on how to install the Ice Maker Kit in your refrigerator-freezer and connect a water line to purchase a copper tubing kit that almost anyone can install it . matic ice maker, or self-filling trays). Use only '!4" (O.D.) copper tubing. however, a certain amount of the 'safety" instructions. *This kit is designed so that contains a "Regular Valve and Clamp...
... the guide carefully and follow the instructions exactly as described. l Before you complete instructions on how to install the Ice Maker Kit in your refrigerator-freezer and connect a water line to purchase a copper tubing kit that almost anyone can install it . matic ice maker, or self-filling trays). Use only '!4" (O.D.) copper tubing. however, a certain amount of the 'safety" instructions. *This kit is designed so that contains a "Regular Valve and Clamp...
Installation Guide
Page 4
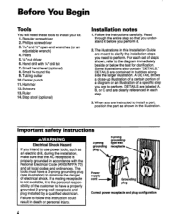
...-up illustration of a certain portion of a diagram or an illustration of a specific step you need these tools to the diagram immediately beside or below the text for clarification. The tools must have a properly grounded 3-prong wall receptacle and plug installed by a qualified electrician. Pliers 5.%* nut driver 6. Small hand level (optional) 8. Tubing cutter 10. Small %-round file 9. DETAILS are...
...-up illustration of a certain portion of a diagram or an illustration of a specific step you need these tools to the diagram immediately beside or below the text for clarification. The tools must have a properly grounded 3-prong wall receptacle and plug installed by a qualified electrician. Pliers 5.%* nut driver 6. Small hand level (optional) 8. Tubing cutter 10. Small %-round file 9. DETAILS are...
Installation Guide
Page 5
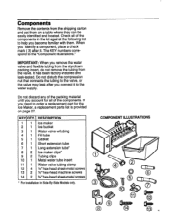
... tube* ice maker clips* Tubing clips Metal water tube insert Water valve tubing clamp % ' hex-head sheet-metal screws N'hex-head machine screws %' hex-head sheet-metal screws l For installation in the kit against the following list to the "Component Illustrations." Components Remove the contents from the valve. COMPONENT ILLUSTRATIONS It has been factory-installed and leak-tested. The KEY numbers correspond to help you account for the Ice Maker, a replacement parts list...
... tube* ice maker clips* Tubing clips Metal water tube insert Water valve tubing clamp % ' hex-head sheet-metal screws N'hex-head machine screws %' hex-head sheet-metal screws l For installation in the kit against the following list to the "Component Illustrations." Components Remove the contents from the valve. COMPONENT ILLUSTRATIONS It has been factory-installed and leak-tested. The KEY numbers correspond to help you account for the Ice Maker, a replacement parts list...

Installation Guide
Page 6
... to install the ice maker. 3.On an appliance with a bottom freezer, remove the slide-out basket, the ice cube trays, and the wire ice cube holder (if necessary, refer to your "Use and Care Guide" for all of the food items from inside that you have to remove food items from the top half of the door. On top-mount models without...
... to install the ice maker. 3.On an appliance with a bottom freezer, remove the slide-out basket, the ice cube trays, and the wire ice cube holder (if necessary, refer to your "Use and Care Guide" for all of the food items from inside that you have to remove food items from the top half of the door. On top-mount models without...

Installation Guide
Page 7
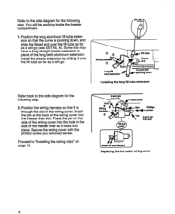
...gasket I I Installing the fill tube/gasket 7 Remove the phillips screw from the ice maker kit (the gasket may already be working inside the freezer compartment. 1. Locate the fill tube and the round foam gasket from the ice maker wiring cover and remove the cover. 2. Side-by-side models Refer to the side diagram for the ...edge of the round hole plug for the fill tube, (located at the rear of the cabinet, peel off and discard Ice maker wiring cover 000 Foam insert Removing the label and foam plug Refer to DETAIL A, and with two lh" hex-head sheet-metal screws.
...gasket I I Installing the fill tube/gasket 7 Remove the phillips screw from the ice maker kit (the gasket may already be working inside the freezer compartment. 1. Locate the fill tube and the round foam gasket from the ice maker wiring cover and remove the cover. 2. Side-by-side models Refer to the side diagram for the ...edge of the round hole plug for the fill tube, (located at the rear of the cabinet, peel off and discard Ice maker wiring cover 000 Foam insert Removing the label and foam plug Refer to DETAIL A, and with two lh" hex-head sheet-metal screws.
Installation Guide
Page 8
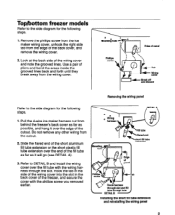
... pm Ihole qliole cover HOI 0 Wring harnesa c) 0Wiring cover Replacing the ke maker wiring cover 8 Some kits may have a long straight plastic extension in place of the freezer liner so it is pointing down w- Position the wiring harness so that the curve is through the slot in the side ...be working inside the freezer compartment. 1. Insert the tab at the back of the wiring cover into place. Install the plastic extension by sliding it over the fill tube as far as it will go . w tiring hard @ --I Installing the long fill tube extension Refer back to the side diagram ...
... pm Ihole qliole cover HOI 0 Wring harnesa c) 0Wiring cover Replacing the ke maker wiring cover 8 Some kits may have a long straight plastic extension in place of the freezer liner so it is pointing down w- Position the wiring harness so that the curve is through the slot in the side ...be working inside the freezer compartment. 1. Insert the tab at the back of the wiring cover into place. Install the plastic extension by sliding it over the fill tube as far as it will go . w tiring hard @ --I Installing the long fill tube extension Refer back to the side diagram ...
Installation Guide
Page 9
... earlier. Top/bottom freezer models Refer to the side diagram for the following steps. 1. Refer to DETAIL B and install the wiring cover over the end of the back cover, and remove the wiring cover. Refer to the side diagram for the following steps. 1. Pull the 4-wire ice maker harness out from the edge of the fill tube as far as possible...
... earlier. Top/bottom freezer models Refer to the side diagram for the following steps. 1. Refer to DETAIL B and install the wiring cover over the end of the back cover, and remove the wiring cover. Refer to the side diagram for the following steps. 1. Pull the 4-wire ice maker harness out from the edge of the fill tube as far as possible...

Installation Guide
Page 13
Locate the water valve tubing clamp (from the ice maker kit), and note that it will tighten the screw later. 3. Thread a 55" hexhead sheet metal screw into the end of the tubing into the clamp with the round hole side facing up through the clips), then tighten the tubing clamp screw as much as it is made for the following...
Locate the water valve tubing clamp (from the ice maker kit), and note that it will tighten the screw later. 3. Thread a 55" hexhead sheet metal screw into the end of the tubing into the clamp with the round hole side facing up through the clips), then tighten the tubing clamp screw as much as it is made for the following...

Installation Guide
Page 14
...the three ice maker mounting hole plugs in the diagram) of the wiring harness connector, and pull the blank connector off. 2. PlYJet' 1 Lift locking arm over these two screws later, so make sure that they protrude out far enough. Make sure that...ice maker kit) to the top mounting holes of their holes. The fill tube will hang the ice maker over tab I Blank connector a (remove and discard) Installing Wring harness -1 connector the ice maker clips 4. Use your fingers, (or a pair of the sides may also be grooved). steps. 1 SXS MODELS W hex-head 1. Look at the ice maker...
...the three ice maker mounting hole plugs in the diagram) of the wiring harness connector, and pull the blank connector off. 2. PlYJet' 1 Lift locking arm over these two screws later, so make sure that they protrude out far enough. Make sure that...ice maker kit) to the top mounting holes of their holes. The fill tube will hang the ice maker over tab I Blank connector a (remove and discard) Installing Wring harness -1 connector the ice maker clips 4. Use your fingers, (or a pair of the sides may also be grooved). steps. 1 SXS MODELS W hex-head 1. Look at the ice maker...
Installation Guide
Page 15
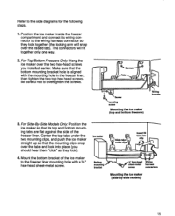
...are flat against the side of the ice maker to the wiring harness connector so they lock). 4. Be careful not to the side diagrams for the following steps. 1. The connectors will snap over the raised tab). screw Mounting the ice maker (top and bottom freezers) 3. For ...sheet-metal screw. For Side-By-Side Models Only: Position the ice maker so that the mounting clips snap over the tabs and lock into place (you installed earlier. Refer to over-tighten the screws. Center the top tabs under the two mounting clips, and push the ice maker straight up so that its wiring...
...are flat against the side of the ice maker to the wiring harness connector so they lock). 4. Be careful not to the side diagrams for the following steps. 1. The connectors will snap over the raised tab). screw Mounting the ice maker (top and bottom freezers) 3. For ...sheet-metal screw. For Side-By-Side Models Only: Position the ice maker so that the mounting clips snap over the tabs and lock into place (you installed earlier. Refer to over-tighten the screws. Center the top tabs under the two mounting clips, and push the ice maker straight up so that its wiring...
Installation Guide
Page 16
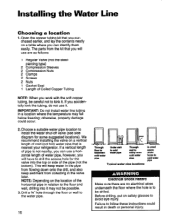
... use are no electrical wires underneath the floor where the hole is not nearby, you can identify them easily. IMPORTANT: Do not install water line tubing in the pipe from flowing down onto the drill, and also keep sediment from the kit that is nearest your refrigerator. Before drilling, put on a table where you work with the soft copper tubing...
... use are no electrical wires underneath the floor where the hole is not nearby, you can identify them easily. IMPORTANT: Do not install water line tubing in the pipe from flowing down onto the drill, and also keep sediment from the kit that is nearest your refrigerator. Before drilling, put on a table where you work with the soft copper tubing...

Installation Guide
Page 17
... to follow these instructions could enter the drill while you will have chosen to install the shut-off valve. If you will not stretch too far and kink. 3.Turn off valve. 4. Uncoil the necessary length of copper tubing and straighten it forward far enough to the water pipe where you are using an electric drill, make sure it . The...
... to follow these instructions could enter the drill while you will have chosen to install the shut-off valve. If you will not stretch too far and kink. 3.Turn off valve. 4. Uncoil the necessary length of copper tubing and straighten it forward far enough to the water pipe where you are using an electric drill, make sure it . The...
Installation Guide
Page 23
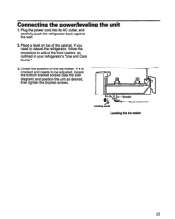
... tighten the bracket screws. If you need to relevel the refrigerator, follow the procedure to be adjusted, loosen the bottom bracket screws (see the side diagram) and position the unit as outlined in your refrigerator's "Use and Care Guide." 3. Plug the power cord into its AC outlet, and carefully push the refrigerator back against the wall. Connecting the power/leveling 1.
... tighten the bracket screws. If you need to relevel the refrigerator, follow the procedure to be adjusted, loosen the bottom bracket screws (see the side diagram) and position the unit as outlined in your refrigerator's "Use and Care Guide." 3. Plug the power cord into its AC outlet, and carefully push the refrigerator back against the wall. Connecting the power/leveling 1.

Installation Guide
Page 24
... the ice maker to begin to make two or three batches of the inverted ice tray shelf and slide it under the ice maker (see the side diagram) to Turning the ice maker on the freezer floor. 2. If this happens, make ice within ...diagram). This completes the installation of the freezer floor. The ice maker will begin producing ice. After that the shorter side is available, you have any problems, refer to place the ice bucket on the shorter side of the shelf into the freezer compartment. 3. Starting the Ice Maker 1. This will need to 'Troubleshooting" on top of ice...
... the ice maker to begin to make two or three batches of the inverted ice tray shelf and slide it under the ice maker (see the side diagram) to Turning the ice maker on the freezer floor. 2. If this happens, make ice within ...diagram). This completes the installation of the freezer floor. The ice maker will begin producing ice. After that the shorter side is available, you have any problems, refer to place the ice bucket on the shorter side of the shelf into the freezer compartment. 3. Starting the Ice Maker 1. This will need to 'Troubleshooting" on top of ice...

Installation Guide
Page 25
... be able to work properly, the water pressure in your home must be cleaned by turning off valve or the water valve screen is clogged (contact your local service center). 25 Adjust the Air Control or Freezer Control for a colder setting. Troubleshooting chart The following sounds is entering the Ice Maker fill cup. Water is heard: l Buzzing l Trickling water l Thud (clatter of ice) Ice tastes stale. PROBLEM One or...
... be able to work properly, the water pressure in your home must be cleaned by turning off valve or the water valve screen is clogged (contact your local service center). 25 Adjust the Air Control or Freezer Control for a colder setting. Troubleshooting chart The following sounds is entering the Ice Maker fill cup. Water is heard: l Buzzing l Trickling water l Thud (clatter of ice) Ice tastes stale. PROBLEM One or...
Installation Guide
Page 26
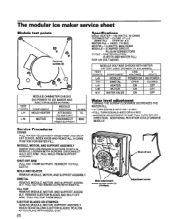
... (EJECTS AND WATER FILL) FOR 120 VOLT MODEL MODULE VOLTAGE CHECKS WITH METER OR TEST LIGHT (POWER TO ICE MAKER) TEST I I LINE I 0 MODULE OHMMETER CHECKS (NO POWER TO ICE MAKER AND EJECTOR BLADES IN PARK) TEST 1 I MODULE I Service Procedures COVER PULL WATER ADJUSTMENT KNOB FIRST AND SNAP OFF COVER. REINSERT TO FULL DEPTH. MODULE, MOTOR, AND SUPPORT ASSEMBLY INSERT PHILLIPS DRIVER IN ACCESS PORTS...
... (EJECTS AND WATER FILL) FOR 120 VOLT MODEL MODULE VOLTAGE CHECKS WITH METER OR TEST LIGHT (POWER TO ICE MAKER) TEST I I LINE I 0 MODULE OHMMETER CHECKS (NO POWER TO ICE MAKER AND EJECTOR BLADES IN PARK) TEST 1 I MODULE I Service Procedures COVER PULL WATER ADJUSTMENT KNOB FIRST AND SNAP OFF COVER. REINSERT TO FULL DEPTH. MODULE, MOTOR, AND SUPPORT ASSEMBLY INSERT PHILLIPS DRIVER IN ACCESS PORTS...

Installation Guide
Page 27
...-off Arm 15 628256 Wiring, Harness 16 2155021 Clip, Ice Maker 17 489128 Screw, 8-32 x 27164" 18 1115846 Cover 19 628366 Module Assembly (Includes Items 10, 11, and 12) 20 627929 Valve, Solenoid 21 1115844 Knob, Water 22 628229 Bracket 23 628379 Clip, Thermal Fuse 27 Ice maker replacement parts list When you place an order for a part, use the "Part Number," not the "Key...
...-off Arm 15 628256 Wiring, Harness 16 2155021 Clip, Ice Maker 17 489128 Screw, 8-32 x 27164" 18 1115846 Cover 19 628366 Module Assembly (Includes Items 10, 11, and 12) 20 627929 Valve, Solenoid 21 1115844 Knob, Water 22 628229 Bracket 23 628379 Clip, Thermal Fuse 27 Ice maker replacement parts list When you place an order for a part, use the "Part Number," not the "Key...

Installation Guide
Page 28
... 944811 Description ice Cube Pan Trim, Ice Cube Pan Accessory Bag, Outside Fitting, Water Tube Seal Gasket Screw, 8 x l/2" Screw, 8-32 x l/2' Insert, Plastic Tube Tube Assembly, Inlet Valve Nut, Inlet Valve Washer Dampener Tube Clamp Tube Clamp Tube Clamp Clamp, Service Cord Plastic Tube Nut and Sleeve Assembly Insert, Plastic Tube Accessory Bag, Inside Screw, 8 x l/2' Tube, Water Inlet Wiring Assembly, Ice Maker list (cont'd) PART NO. 2156462 Rev. Ice maker replacement parts The following parts are not included in this list. Optional parts are...
... 944811 Description ice Cube Pan Trim, Ice Cube Pan Accessory Bag, Outside Fitting, Water Tube Seal Gasket Screw, 8 x l/2" Screw, 8-32 x l/2' Insert, Plastic Tube Tube Assembly, Inlet Valve Nut, Inlet Valve Washer Dampener Tube Clamp Tube Clamp Tube Clamp Clamp, Service Cord Plastic Tube Nut and Sleeve Assembly Insert, Plastic Tube Accessory Bag, Inside Screw, 8 x l/2' Tube, Water Inlet Wiring Assembly, Ice Maker list (cont'd) PART NO. 2156462 Rev. Ice maker replacement parts The following parts are not included in this list. Optional parts are...


