Vivitar S529 Support Question
Vivitar S529 Support Question
Find answers below for this question about Vivitar S529.Need a Vivitar S529 manual? We have 2 online manuals for this item!
Question posted by ghooley43 on September 26th, 2013
Time And Date Setting
how do i set time and date on my vivitar s529
Current Answers
Answer #1: Posted by TommyKervz on September 26th, 2013 3:12 AM
TommyKervz

Member since:
January 10th, 2013 Points: 17,776,823

Member since:
January 10th, 2013 Points: 17,776,823
Greetings. Refer to page 6 of the "Camera Manual" available on the link below in pdf.
Related Vivitar S529 Manual Pages
Camera Manual - Page 1

All other trademarks are registered trademarks of their respective companies. ViviCam S529 Digital Camera
User Manual
© 2009-2011 Sakar International, Inc.
All rights reserved. Windows and the Windows logo are the property of Microsoft Corporation.
Camera Manual - Page 2

Macintosh 8 Using Your Digital Camera ...9 Changing Camera Mode ...9 Navigating the Menus...10 Photo Capture Mode ...11 Photo Playback Mode ...27 Video Capture Mode ...33 Video Playback Mode...45 Installing the Software ...49 Connecting the Camera to the Computer 50 Getting Photos and Videos from your Camera to Your Computer 51 Get started!...52 Transfer media from...
Camera Manual - Page 3

...
software Installation CD 5. SD Memory cards are not included and need to get the most out of your camera. What Your Camera Includes
1. Lithium Battery 3. Wrist Strap
Note: SD Memory Card not included 2 Everything you for normal use. Digital Camera 2. Vivitar makes capturing those special moments as easy as possible. USB cable 4. Please read this...
Camera Manual - Page 4
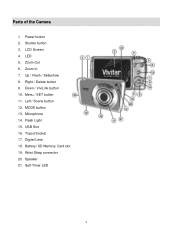
... 12. Battery/ SD Memory Card slot 19. Speaker 21. Self-Timer LED
3 Flash Light 15. Down / ViviLink button 10. Parts of the Camera
1. Menu / SET button 11. USB Slot 16. Digital Lens 18. Right / Delete button 9. Microphone 14. MODE button 13. Tripod Socket 17. Wrist Strap connector 20. LCD Screen 4. Up / Flash / Slideshow...
Camera Manual - Page 5

... have been inserted properly into your digital camera. 2) Make sure an SD card has been inserted into your camera. 3) Press the POWER button to 32GB) needed for normal use (not included)
Using the Camera
Selecting the modes
Accessing the menu
When powering the camera ON for the first time the camera will take you through the initial...
Camera Manual - Page 6

... exit the setup.
Highlight the
desired default social network and press the M (MENU)/SET button to confirm the selection. 3) After the ViviLink Video option is confirmed the camera is to set the date and time on the camera. The Language selection
menu will be set the default ViviLink destination for photos and videos taken with the initial...
Camera Manual - Page 7
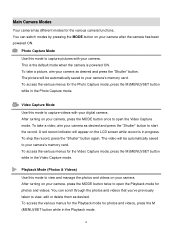
...;s memory card. To take a video, aim your digital camera.
Video Capture Mode Use this mode to open the Video Capture mode. To stop the record, press the "Shutter" button again. To access the various menus for photos and videos, press the M (MENU)/SET button while in the Video Capture mode. After turning on...
Camera Manual - Page 10

... will see a "Goodbye" splash screen and then the camera will be set from the Auto Power Off settings menu. The Auto Power Off settings
can press the Power button
again at any point to view the photos and videos
you have been inserted properly into your digital camera. Use this mode to capture videos with a rechargeable...
Camera Manual - Page 11

...the Menus
Each camera mode has a set of menus specific to that are not remembered by the camera, a selection ...icon will display on the top-left corner of the LCD display
When in Video Capture Mode, this icon will appear to the
right of the LCD display
When in Playback Mode, this icon when selected. 7) At any time...
Camera Manual - Page 12
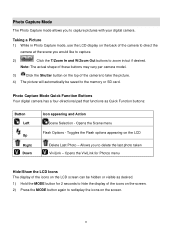
...Opens the Scene menu
Flash Options - Photo Capture Mode Quick Function Buttons Your digital camera has a four-directional pad that functions as desired. 1) Hold the MODE ...Note: The actual shape of these buttons may vary per camera model.
3)
Click the Shutter button on the screen.
11 Allows you to capture pictures with your digital camera. Opens the ViviLink for Photos menu
Hide/Show the LCD...
Camera Manual - Page 16

...set a delay between the time that the camera‟s shutter button is an optimal feature if you don‟t just want to take the picture but would also would like to be in front of the camera as desired.
1) Press the M (MENU)/SET.... 9) Remember that can be saved by movement of the camera while capturing the image.
1) Press the M (MENU)/SET button to open the menus for the current mode. 2) ...
Camera Manual - Page 24

... you capture an image with your camera, the image will include a time stamp with the date and time that this setting will be taken with your camera‟s date and time as desired. Date/Time Menu When you manually change the
setting or restore the camera‟s default factory settings. The date stamp will be saved by your camera until you to your previous mode...
Camera Manual - Page 25

... the desired option. 5) A selected option icon will be saved by your camera until you manually change the
setting or restore the camera‟s default factory settings. For each field in
the menu, use the UP and DOWN navigation buttons to set the time and date. 8) Press the MODE button to exit the menu and return to your...
Camera Manual - Page 26

... selected item 6) Press the LEFT or RIGHT button to conserve you manually change the
setting or restore the camera‟s default factory settings. The designated time represents when your camera will be saved by your previous mode. 8) Remember that this setting will appear on again with the power button before the next use the Auto Power...
Camera Manual - Page 27
...direction control buttons to highlight the menu options. If you manually change the
setting or restore the camera‟s default factory settings. While
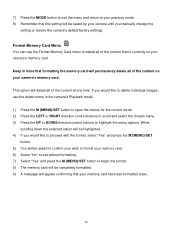
scrolling down the selected option will be highlighted. 4) If you ...all of the content at one time.
7) Press the MODE button to exit the menu and return to your previous mode. 8) Remember that this setting will be completely formatted. 9) A...
Camera Manual - Page 29

... View Easily navigate and select the image you wish to view. 4) Press the M (MENU)/SET button to enlarge the image full size. Photo Playback Mode Quick Function Buttons Your digital camera has a four-directional pad that appear in your camera will appear in a 3 X 3 matrix where you can use the direction buttons to scroll and...
Camera Manual - Page 34

... button again.
6) The video will see a red icon at the scene you to better set the camera display if
desired. Opens the Scene menu Opens the Light Exposure menu
Right Down
Opens the Video Playback Delete menu with your digital camera.
Taking a Video 1) While in Video Capture Mode use the LCD display on the...
Camera Manual - Page 43

... the window with the right and left navigation buttons.
The timestamp will not appear on photos taken.
To Set the Date and Time: 1) Highlight the "Date Setup" menu option. 2) Press the M (MENU)/SET button to set your camera‟s date and time as desired. Off - For each field in the
menu, use the UP and DOWN navigation buttons to...
Camera Manual - Page 47

... the icons to start playing the video. Video Playback Mode Quick Function Buttons Your digital camera has a four-directional pad that you would like to play, press the Shutter button...as Quick Function buttons.
When you find a video that functions as needed. the images on your camera will be displayed in Thumbnail View - Button Left
Up Right Down
Action Displays the PREVIOUS image
...
Camera Manual - Page 54

Camera Maintenance
The digital camera is a delicate device. Do not use you copy the images into the Pictures folder and the videos into your computer. Do not expose your computer. Optionally, select the files and choose
Copy from my camera to avoid damaging it. Transfer media from the Finder‟s Edit menu.
Then select a folder...
Similar Questions

Time/date On Vivitar X020
I use the Vivitar X020 for work and the reports require the pictures to be time/date stamped, if the...
I use the Vivitar X020 for work and the reports require the pictures to be time/date stamped, if the...
(Posted by eroomkd54 8 years ago)

Software Download Disc
Can Someone Send Me The Download Software Disc For A Vivitar Vivicam 5118 Camera, Ive Lost Mine And ...
Can Someone Send Me The Download Software Disc For A Vivitar Vivicam 5118 Camera, Ive Lost Mine And ...
(Posted by CROYLE2006 8 years ago)

Vivitar Camera Model F128
New camera, new batteries insrted correctly Will not turn on why. Thanks.
New camera, new batteries insrted correctly Will not turn on why. Thanks.
(Posted by bill35wh 9 years ago)

Sd Cards
I put my old sd card in the camera with about 80 pics on it and I can not get them to come up so I c...
I put my old sd card in the camera with about 80 pics on it and I can not get them to come up so I c...
(Posted by shastaprincess1 11 years ago)