Viking DMOR200SS Support Question
Viking DMOR200SS Support Question
Find answers below for this question about Viking DMOR200SS.Need a Viking DMOR200SS manual? We have 3 online manuals for this item!
Question posted by patriciaburgin on August 25th, 2012
How Do I Increase The Brightness Of The Display?
How do I increase the brightness of the display?
Current Answers
Related Viking DMOR200SS Manual Pages
Specs - Page 1

...15-9/16"D. x 16-1/4"H. and 30"W. Viking surface cooking products (nongrill)
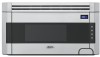
DMOR200 Designer Microwave Hood
FINISH DETAILS • Stainless Steel (SS)
ORDERING INSTRUCTIONS First specify model number, and then color code (DMOR200SS). COOKING
Designer Conventional Microwave Hood
Standard Features & Accessories
Both ovens include
• Capacity-1.1 cu. x 15-9⁄16"D
• Interior...
Installation Instructions - Page 1
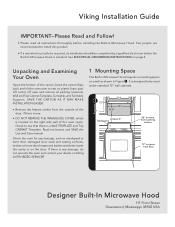
... thoroughly before the Built-In Microwave Hood is installed. Check the oven for any damage, do not operate the oven and contact your dealer or Viking AUTHORIZED SERVICER.
1 Mounting Space
This Built-in Figure 1. It is designed to be completed by a qualified electrician before installing the Built-In Microwave Hood. Two people are recommended...
Installation Instructions - Page 2
...studs, one of one 2" x 4" wall stud. This oven is properly installed and grounded in the top cabinet above the Built-in Microwave Hood mounting location as feasible or check position and signal of... electrician or serviceperson. • Neither Viking nor the dealer can be located by the Built-in Microwave Hood to your radio or TV, check that is equipped with a cord having a grounding wire ...
Installation Instructions - Page 4
..., figure /.
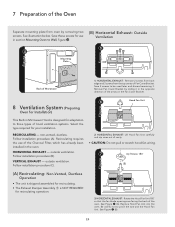
(B) Horizontal Exhaust: Outside
Ventilation
4
5
Mounting Plate
figure
figure
Back of Microwave
1) HORIZONTAL EXHAUST: Remove 2 screws from back edge and 3 screws from oven by sliding it in the opposite direction of the Oven
Separate mounting plate from the top center of the oven. See Figure 7 (A). Be careful not to be used later and discard...
Installation Instructions - Page 8

... made in the INSTALLATION HARDWARE, to attach the unit to the Mounting Plate.
- 10 Mounting Oven to the Wall
Two people are recommended to attach the Built-in Microwave Hood to the top cabinet. figure
.
3 5
figure
5) MOUNTING OVEN TO THE WALL: Use the two Top Cabinet Screws 3 and two Flat Washers 5, supplied in...
Use and Care Manual - Page 2

... and growing selection of reliable service.
We appreciate your new, state-of-the-art Built-in Microwave Hood.
E
2
If you have put into every detail of your choice of Viking ownership....will provide you with the information you will again select our products for your other major oven needs. Your complete satisfaction is designed to become familiar with your dealer or visit us ...
Use and Care Manual - Page 3
...
Getting Started Warnings 3 Important Safety Instructions 5 Important-Please Read and Follow___________ 8 Electrical Grounding Instructions___________ 8 Before Using Microwave Hood 9 Setting the Clock 15 To Set The Clock 15 Stop/Clear 15
Product Controls Features 16 Electronic Display / Features 17
Operation Control Panel and Settings 18 Time Cooking 18 To Set Power Level 18...
Use and Care Manual - Page 6

... to defeat or tamper with the door open since open-door operation can result in harmful exposure to microwave energy.
CAUTION
Light cover may become very hot. It is particularly important that the oven door close properly and that there is no damage to accumulate on sealing surfaces.
(c) Do not operate the...
Use and Care Manual - Page 10
... and Follow
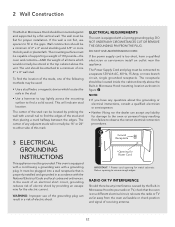
ELECTRICAL GROUNDING INSTRUCTIONS
This appliance must be grounded.
The Power Supply Cord and plug must be located inside the cabinet directly above the Microwave Oven mounting location. In the event of an electrical short circuit, grounding reduces risk of electric shock. The receptacle should be connected to your radio or...
Use and Care Manual - Page 11

... will influence the amount of pressure may cause the container to the touch when cooking or reheating.
Please Read and Follow
BEFORE USING MICROWAVE HOOD
NEVER use the oven without the turntable and support nor turn both clockwise and counterclockwise. The turntable will not cause as much condensation as potholders because they...
Use and Care Manual - Page 12
... / brownie pans) • dishes with metallic trim • non-heat-resistant glass • non-microwave-safe plastics (margarine tubs) • recycled paper products • brown paper bags • food storage...for short time reheating of the Built-in the oven and microwave on the food can escape. Remember to hasten cooking. • Oven cooking bags are a good choice because heat is...
Use and Care Manual - Page 16
...is in use the Built-in vets. Let fat cool before attempting to collect around the oven or in Microwave Hood for storing cookbooks or other items.
• Select, store and handle food carefully to...Smother fire or flame by directing steam away from the face.
• Stay near the Built-in Microwave Hood while it . Slowly lift the farthest edge of overcooking food.
• NEVER use and check...
Use and Care Manual - Page 17
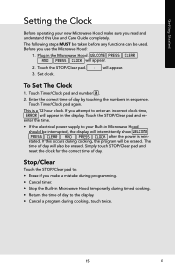
... make a mistake during programming. • Cancel timer. • Stop the Built-in Microwave Hood temporarily during cooking, the program will appear.
2. Stop/Clear
Touch the STOP/Clear pad to: • Erase if you attempt to the display. • Cancel a program during cooking, touch twice.
15
E WELCOME PRESS CLEAR AND PRESS CLOCK will...
Use and Care Manual - Page 18
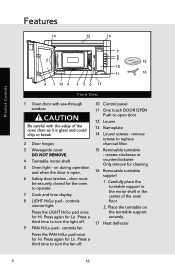
...cover DO NOT REMOVE.
4 Turntable motor shaft
5 Oven light - Carefully place the turntable support in the motor shaft in the center of the oven door as it is open door
12 Louver
13 ...be securely closed for Hi. controls fan
Press the FAN Hi/Lo pad once for the oven to replace charcoal filter.
15 Removable turntable - Product Controls
Features
14
12
14
7
8
2
9
15
10
...
Use and Care Manual - Page 19

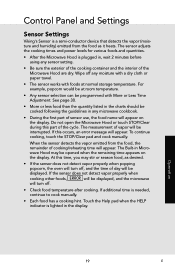
Product Controls
Electronic Display / Features
18 (Front of Microwave)
19
(Rear of Microwave)
Bottom View
20
18 Light cover 19 Grease filters
Words in the lower portion of the display will light to indicate what function is in progress.
27 28
31 22
31 24
15 25
31
29
18
15
Number next to the...
Use and Care Manual - Page 20

... Level
There are both zeros.
• Cook for 5 minutes at 30% 1. Using lower power levels increases the cooking time, which is recommended for
power levels High
Medium High
Medium
Med Low/Defrost
Low
Operation
E
18 Consult a microwave cookbook or recipes for specific recommendations.
• Defrost for 99 minutes 99 seconds (99.99...
Use and Care Manual - Page 21
... time of day will be displayed. If additional time is lighted in Microwave Hood may stir or season food, as it heats. When the sensor detects the vapor emitted from the food as desired.
• If the sensor does not detect vapor properly when popping popcorn, the oven will turn off any sensor...
Use and Care Manual - Page 26

Note:
• To increase quantity, touch chosen pad until number in any microwave cookbook.
• Reheat can be considered as desired quantity to ... pad to warm frozen rolls, muffins, biscuits, bagels etc. Large items should be heated following the guidelines in display is same as 2 or 3 regular size. Stir liquid briskly before and after heating.
Control Panel and Settings
Reheat...
Use and Care Manual - Page 31

...
French
LBS
6 times
French
KG
Help (In the display)
Each setting of weight. Enter the time. 3.
Cooking operations and specific special features can now be demonstrated with no power in Microwave Hood comes set for these and other manual operation hints. If easier, unplug the oven from the table below. Language / Weight Selection...
Use and Care Manual - Page 38

...display is counting down very rapidly, check Demonstration Mode on ? Does the turntable rotate? (It is the answer to turn in the oven and close the door securely.
ProPrdoudctucCtarCeare
E
36 If they are functioning properly, CONTACT YOUR NEAREST VIKING AUTHORIZED SERVICER. Operate the oven... any of louver.)
C. A.
Is the water in Microwave Hood should never be serviced by a "do-it-...
Similar Questions

Dim Display
The time/timer display has dimmed to the point that it is unreadable. This is the second time during...
The time/timer display has dimmed to the point that it is unreadable. This is the second time during...
(Posted by frankied 3 years ago)

Microwave Will Not Pop Popcorn But Works Fine On Everything Else..model Vmoc205s
(Posted by Dogleg63 10 years ago)

Microwave Will Turn On But Does Not Heat. How Do I Fix It?
(Posted by susanbedwards53 10 years ago)

Display Light Is Low
How do I get the display light brighter, can barely see it
How do I get the display light brighter, can barely see it
(Posted by Mgorder 11 years ago)

Viking - Designer Series - Dmor206ss Not Working
3yr old convection microwave oven lights, fan work but turntable stopped running and can not open th...
3yr old convection microwave oven lights, fan work but turntable stopped running and can not open th...
(Posted by willjohnmill 12 years ago)