Uniden UDW20553 Support Question
Uniden UDW20553 Support Question
Find answers below for this question about Uniden UDW20553.Need a Uniden UDW20553 manual? We have 3 online manuals for this item!
Question posted by ljneet on September 23rd, 2012
Do You Make Cables In A Longer Length For Outdoor Camera
The person who posted this question about this Uniden product did not include a detailed explanation. Please use the "Request More Information" button to the right if more details would help you to answer this question.
Current Answers
Related Uniden UDW20553 Manual Pages
English Owners Manual - Page 1

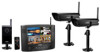
UDW20553 Video Surveillance System User's Manual
What's in the box?
Never use damaged products!
Need...Standard Time. Contact Uniden's... UDW20000 receiver with 7‑inch color display and remote control
UDWC25 wireless weatherproof camera
Accessory details are missing or damaged, contact our Customer Care Line immediately.
Visit our website for detailed business hours.
...
English Owners Manual - Page 2
... it to persons, including the following:
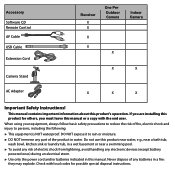
►► This equipment is NOT waterproof. Accessory Software CD Remote Control AV Cable USB Cable Extension Cord
Camera Stand
Receiver X X
X
X
One Per Outdoor Camera
X
Indoor Camera
X
X
AC Adapter
X
X
X
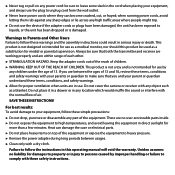
Important Safety Instructions! Never dispose of electric shock from lightning, avoid handling any batteries in this product...
English Owners Manual - Page 3
...other.
►► STRANGULATION HAZARD. Failure to follow these safety instructions.
If you and your parents or guardian to make sure that both the transmitter and receiver are working properly and are in direct sunlight for use the device if the ... SAVE THESE INSTRUCTIONS! Keep the adapter cords out of the reach of air. Do not cover the camera or receiver with a dry cloth.
English Owners Manual - Page 4
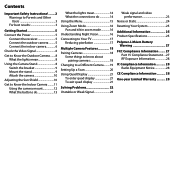
... 3 For best results 3
Getting Started 5
Connect the Power 5 Connect the receiver 5 Connect the outdoor camera ......... 5 Connect the indoor camera 6
Check the Video Signal 6
Get to Know the Outdoor Camera........ 8 What the lights mean 8
Using the Camera Stand 8 Switch the bracket 9 Mount the stand 9 Attach the camera 10
Adjusting the Sun Shield 10
Get to Know the Indoor...
English Owners Manual - Page 5

... button
AC Adapter
Power status lights
5 Connect the outdoor camera 1. Attach an antenna to the rear of each adapter to a 120 volt AC (standard indoor) power outlet, and press the Power button on the front of each camera
and connect an AC adapter to the camera's power input pigtail. (If necessary, connect the extension...
English Owners Manual - Page 6
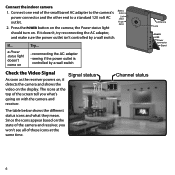
... is
controlled by a wall switch.
If it doesn't, try reconnecting the AC adapter,
and make sure the power outlet isn't controlled by a wall switch
Antenna Lens
POWER
LINK
Power
LINK
..., it
detects the camera and shows the
video on with the camera and
receiver.
Channel status
1
6 Connect the indoor camera
1. the Power status light
should turn on the camera; The icons at ...
English Owners Manual - Page 7
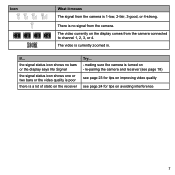
...the video quality is poor
there is a lot of static on the receiver
Try... --making sure the camera is no signal from the camera.
1
2
3
4
The video currently on avoiding interference
7 The video is 1-low,... or 4-strong.
Icon
What it means The signal from the camera is currently zoomed in.
There is turned on --re-pairing the camera and receiver (see page 18)
see page 23 for tips ...
English Owners Manual - Page 8
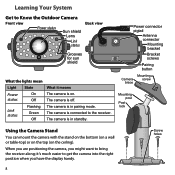
... the stand on the bottom (on a wall or table-top) or on the top (on . The camera is on the ceiling). The camera is in pairing mode. Learning Your System
Get to Know the Outdoor Camera
Front view
Power status
Sun shield Lens
Link status
Back view
Grooves for sun shield
What the lights...
English Owners Manual - Page 9
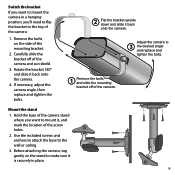
... 180° and slide it back onto the camera. Hold the base of the camera stand
where you want to mount the camera in place.
9 Before attaching the camera, tug gently on the side of the camera:
1.
Remove the bolts on the stand to make sure it is securely in a hanging position, you'll need to flip...
English Owners Manual - Page 10
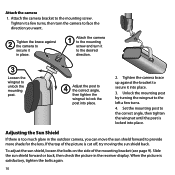
... in the outdoor camera, you can move the sun shield forward to the mounting screw and turn the camera to face the direction you want.
2 Tighten the brace against the bracket to secure it to ... picture is satisfactory, tighten the bolts again.
10 Tighten the camera brace up against the camera to secure it in place.
1 Attach the camera to provide more shade for the lens. When the picture is...
English Owners Manual - Page 11
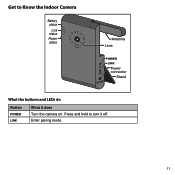
Enter pairing mode.
11 Get to turn it does Turn the camera on. Press and hold to Know the Indoor Camera
Battery status
Link status Power status
Antenna Lens
POWER
LINK
Power
LINK
connector
Stand
What the buttons and LEDs do
Button
POWER Link
What it off.
English Owners Manual - Page 12
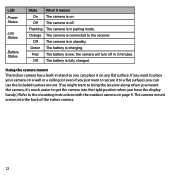
Orange The camera is charging. the camera will turn off . Using the camera mount
The indoor camera has a built-in standby. Off The camera is in stand so you can place it 's much easier to the mounting instructions with the outdoor camera on . Off The camera is off in pairing mode. Off The battery is on page 9. LED Power...
English Owners Manual - Page 13

...: link to Know the Receiver and Remote
Display
Antenna
Link status Signal status
Speakers
IR sensor
SELECT MENU/
DOWN LEFT
CAMERA OK ZOOM
POWER
OK
RIGHT UP
What the buttons do
Button
What it off. Get to the selected camera. Press and hold to turn it does
POWER
--Turn the receiver on.
English Owners Manual - Page 14
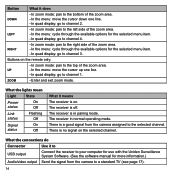
There is a good signal from the camera to a standard TV (see page 17).
14 RIGHT
--In zoom mode: pan to the right side of the zoom area. --In the menu: cycle through ...: pan to the left side of the zoom area. --In the menu: cycle through the available options for more information.)
Send the signal from the camera assigned to the selected channel.
English Owners Manual - Page 15
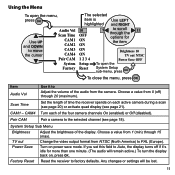
CAM4 Turn each of time the receiver spends on each active camera during a scan (see page 20) or activate quad display (see page 18).... (North America) to PAL (Europe). CAM1 -
Scan Time
Set the length of the four camera channels On (enabled) or Off (disabled). Choose a value from the camera. Pair CAM
Pair a camera to the selected channel (see page 21).
Any changes or settings will ...
English Owners Manual - Page 16
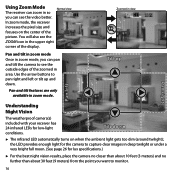
... arrow buttons to see the
ZOOM icon in zoom mode.
the LED provides enough light for the camera to capture clear images in deep twilight or under a very bright full moon. (See page 26...receiver can zoom in so
you can pan and tilt the camera to pan right and left
Pan right
Understanding Night Vision
The weatherproof camera(s) included with your receiver has 24 infrared LEDs for lux ...
English Owners Manual - Page 18
... a scan and leaves that came with your receiver are having trouble with the new one camera at a time. Make sure the camera is like introducing the camera and the receiver so they can 't control which camera the receiver will detect first.
18 If a channel is already assigned to the selected channel, the receiver overwrites that...
English Owners Manual - Page 20
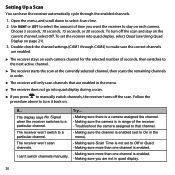
... receiver switches to select Scan time. 2.
To set to that are enabled.
►► The receiver stays on page 21). 3. Try...
--Making sure there is a camera assigned the channel. --Making sure the camera is in range of seconds, then switches to the next active channel.
►► The receiver starts the scan at the...
English Owners Manual - Page 22
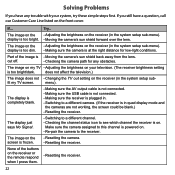
... channel the receiver is too bright/dark.
The display is completely blank.
--Making sure the AV output cable is not connected. --Making sure the USB cable is not connected. --Making sure the receiver is plugged in the system setup sub-menu). --Making sure the camera is at the right distance for any trouble with your television. (The...
English Owners Manual - Page 26
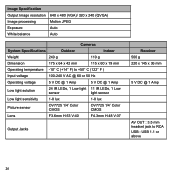
Image Specification Output Image resolution Image processing Exposure White balance
640 x 480 (VGA)/ 320 x 240 (QVGA) Motion JPEG Auto Auto
Cameras
System Specifications
Outdoor
Indoor
Weight
240 g
110 g
Dimension
175 x 64 x 42 mm
115 x 60 x 19 mm
Operating temperature -10° C (+14° F) to +50° C (122° F )
Input ...
Similar Questions

Trouble Trying To View My Uniden Camera #udw20553
I can't find the ,UID#DID CODESECURITY CODEcan you please help me, thank you
I can't find the ,UID#DID CODESECURITY CODEcan you please help me, thank you
(Posted by geeloko23wun6 3 years ago)

How Do I Program Uniden Wireless Security Cameras Udw20553
(Posted by ibqullo 9 years ago)

Uws1113
i have a mac pc and trying to download recording software for outdoor camera! it wil only open on a ...
i have a mac pc and trying to download recording software for outdoor camera! it wil only open on a ...
(Posted by gkounavis 10 years ago)

How Long Are The Power Cables For A Uniden Wireless Security Surveillance
system udw155
system udw155
(Posted by asdfdansim 10 years ago)

Another Camera
I would like to purchase another outdoor camera for my system. I'm having a hard time finding one. C...
I would like to purchase another outdoor camera for my system. I'm having a hard time finding one. C...
(Posted by vegasdrumtek 12 years ago)