
Toro 20334 Support Question
Toro 20334 Support Question
Find answers below for this question about Toro 20334 - Personal Pace Electric Start Walk Power Mower.Need a Toro 20334 manual? We have 2 online manuals for this item!
Question posted by jferickson on March 21st, 2012
Battery Box
I took out the battery box and now can now get it in far enough to secure the door. Please send diagram or directions for doing this.
Current Answers
Related Toro 20334 Manual Pages
Owner's Manual - Page 1
...20334--Serial No. 310000001 and Up Model No. 20334C--Serial No. 310000001 and Up Model No. 20352--Serial No. 310000001 and Up
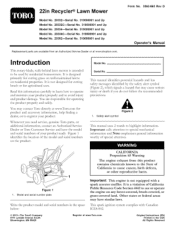
Operator's Manual
Replacement parts are responsible for operating the product properly and safel>
You may contact Toro directly...or grass-covered land.
Introduction
This rotary-blade, walk-behind lawn mower is designed primarily for agricultural uses.
Model No...
Owner's Manual - Page 2

...• Watch for walk-behind rotary lawn mowers and the B71.1 ...start the engine. Improperly using or maintaining this potential, comply with SAE J1940. General Operation
• Read, understand, and follow this class of lawn mower will be sure of your footing or balance. Exercise extreme caution when changing direction on all instructions on this symbol to potential personal...
Owner's Manual - Page 3
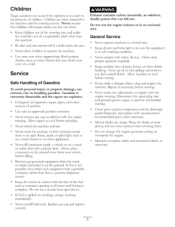
...mower off if a child enters the area.
Service
Safe Handling of a child. Extinguish all cigarettes, cigars, pipes, and other objects that may block your vehicle before storing. Remove gas-powered... away from your view of Gasoline
To avoid personal injury or property damage, use a nozzle lock...saw them . Allow machine to cool before starting . Never store the machine or fuel container ...
Owner's Manual - Page 4
....
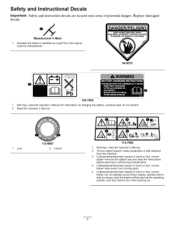
5. Cutting/dismemberment hazard of hand or foot, mower blade--do not discard. 2. Thrown object hazard--keep bystanders a safe distance
from the original machine manufacturer.
94-8072
0 81
104-7953 1. operate side to side on charging the battery; Cutting/dismemberment hazard of hand or foot, mower
blade--remove the ignition key and read the...
Owner's Manual - Page 5
...SG, SH, SJ, SL, or higher. contact an Authorized
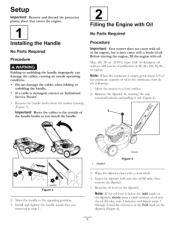
, Remove the handle _obs from the mower housing (Figure 3).
fill: 20 oz. (0.59 1), type: SAE 30 detergent oil with a clean ... oil level on the dipstick (Figure 4).
Before starting the engine, fill the engine with a bottle of oil in step I .
1.
i
G009550
Figure 3
2. Move the mower to the operating position. 3.
Move the handle to...
Owner's Manual - Page 6

... dipstick into the oil fill tube secure1>
Important: Change the engine oil after the first 5 operating hours; Air filter 10. Washout port (not shown) 13. Battery charger (electric-start handle
7. Important: Do not overfill the crankcase oil and run the engine. Blade control bar 3. Bag-on the dipstick reads Full. Handle knob (2)
6. Recoil...
Owner's Manual - Page 7
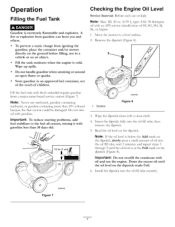
...static charge from igniting the gasoline, place the container and/or mower directly on the ground before filling, not in an approved fuel container...dipstick.
5. Wipe up spills. Store gasoline in a vehicle or on the dipstick reads Full. Important: To reduce starting problems, fuel stabilizer to a level surface.
2. Dipstick
009499
Figure 8
3.
Important:
Do not overfill the crankcase
oil...
Owner's Manual - Page 8
... (64 ram); 2-7/8inches (73
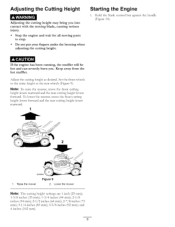
ram); 3-1/4 inches (83 ram); 3-5/8 inches (92 ram); Starting the Engine
1. and
4 inches (102 ram).
Hold the blade control bar against the handle (Figure 10).
Adjust the cutting height as the rear wheels (Figure 9). To lower the mower, move the front cutting height levers rearward and the rear cutting...
Owner's Manual - Page 9

... personal pace handle to the handle slowl>
Figure 13
Note: If the mower does not freely roll backward after several attempts, contact an Authorized Service Dealer.
Blade control bar
7
_/_'G009546
Figure 10
, Turn the ignition key (Figure 11) (electric-start models only) or pul the recoil start after self-propelling, stop walking, hold your sides, and the mower...
Owner's Manual - Page 10

... an Authorized
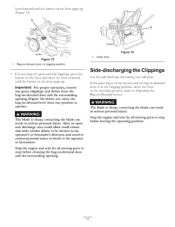
Recycling the Clippings
Your mower comes from the lawn.
23
A worn grass bag could...personal injury or death to be thrown in the operator's or bystander's direction and result in serious personal...mower immediately Service Dealer.
Stopping the Engine
To stop before bagging the clippings. Bagging the Clippings
Use the grass bag when you leave the mower (electric-start...
Owner's Manual - Page 11
...mower and the bag-on-demand lever is sharp; The blade is in the bagging position, move the lever to the recycling position (refer to the operator or bystanders. Also, an open rear discharge area could allow small stones and other similar debris to be thrown in the
operator's or bystander's direction... in serious personal injury.
lever from the
bag-on-demand
door and the surrounding...
Owner's Manual - Page 12
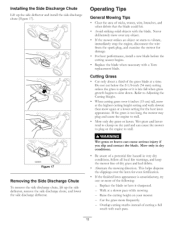
... best lawn appearance.
This helps disperse the clippings over aW object.
• If the mower strikes an object or starts to... stall. Overlap cutting swaths instead of the following: - then mow again at the highest cutting height setting and walk...fire hazard in dry conditions. Alternate the mowing direction. Be aware of sticks, stones, wire, branches, and...
Owner's Manual - Page 14

...Tipping Gasoline personal
the mower may cause...mower onto its side, with a hand pump; After performing the maintenance procedure(s), connect the spark plug wire to run dry through normal usage.
clean it sharpened (more frequently in dusty operating conditions. • Charge the battery for 24 hours (electric-start models only).
• Empty the fuel tank before repairs as directed...
Owner's Manual - Page 16

... initial1); This state lasts only a few minutes until the battery is a adhesive-backed covering that secures the battery compartment, pull out the batter); Raise the rear deflector and locate the battery compartment (Figure 23).
Battery 4. Charging the Battery
Service Interval: Every 25 hours
Electric-start models only
If the battery does not charge or the engine does not run...
Owner's Manual - Page 17
...2. Install the covering over the battery compartment• 7.
Tip the mower onto its side with a spare fuse in the fuse holder (Figure 24)•
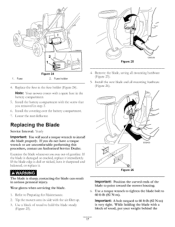
Note: Your mower comes with the air filter up... the blade.
1. While holding the blade with the screw that
6. Install the battery compartment you removed in serious personal injury. If the blade is damaged or cracked, replace it . 51
\
1...
Owner's Manual - Page 18
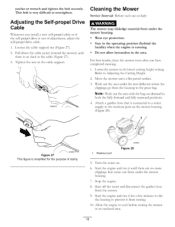
... the water on the cable support. the garden hose
, Start the engine and run it from the housing to cool before storing the mower in the area. Wash out the area under the mower housing.
, Stop the engine.
8. ratchet or wrench and tighten the bolt securely. Tighten the nut on .
6. Adjusting the Self-propel...
Owner's Manual - Page 19

... Remove the ignition key (electric-start models only). hTiportant: Route the cables to the outside of the handle knobs as directed by the engine manufacturer....start models only).
2.
Charge the battery for 24 hours, then unplug the
battery charger an store the mower in an unheated area. Charge the battery for 24 hours (electric-start the engine, it in your automobile. Removing the Mower...
Owner's Manual - Page 20

... Commercial Use)
The Toro GTS Starting Guarantee
A 3-Year Full Warranty (Not Applicable for Commercial Use)
22 in Recycler ¢
20 in Mulcher/Bagger Walk Power Mowers
Conditions and Products Covered
Items and...pulls:
- This warranty gives you specific legal rights, and you , is covered under "Lawn Mowers") or access our web site at your country, province, or state. Countries Other than ...
Parts Catalog - Page 2
... thread fine PFH: phillips flat head PPH: phillips pan head PPHTF: phillips pan head thread forming PRH: phillips round head PTH: phillips truss head PTO: power-take-off RH: right hand ROPS: roll-over protection system
RRB: rear roller brush SFH: slotted fillister head SHH: slotted hex head SHWH: slotted hex...
Parts Catalog - Page 10
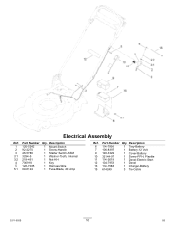
...-Wire
5:1 99-6124
1 Fuse-Blade, 40 Amp
Ref. Description
6 114-7936
1 Tray-Battery
7 106-8397
1 Battery-12 Volt
9 120-3329
1 Cover-Battery
10 32144-97
1 Screw-PPH, Plastite
11 114-2619
1 Decal-Electric Start
12 104-7953
1 Decal
13 114-1588
1 Charger-Battery
15 614249
3 Tie-Cable
3371-850B
10
D5 Part Number Qty. Part Number...
Similar Questions

Owners Manual For Toro 190 Cc Personal Pace Lawn Mower
(Posted by nelsontim1 9 years ago)

Toro Personal Pace Electric Starter Does Not Engage
(Posted by tejsmigg 9 years ago)

Toro 22 Recycler Personal Pace Wont Start
(Posted by chirielibir 10 years ago)

Electric Start Toro Law Mower Will Not Start Cold 20334
(Posted by pinoNtha 10 years ago)

Toro Self Propelled Lawn Mower Personal Pace Won't Pull The Mower 20332
(Posted by pksrsc 10 years ago)