
Toro 20334 Support Question
Toro 20334 Support Question
Find answers below for this question about Toro 20334 - Personal Pace Electric Start Walk Power Mower.Need a Toro 20334 manual? We have 2 online manuals for this item!
Question posted by jporoby6 on October 4th, 2014
What Year Is The Toro 20334 Made
The person who posted this question about this Toro product did not include a detailed explanation. Please use the "Request More Information" button to the right if more details would help you to answer this question.
Current Answers
Answer #1: Posted by TommyKervz on October 4th, 2014 2:47 PM
TommyKervz

Member since:
January 10th, 2013 Points: 17,776,813

Member since:
January 10th, 2013 Points: 17,776,813
Related Toro 20334 Manual Pages
Owner's Manual - Page 1
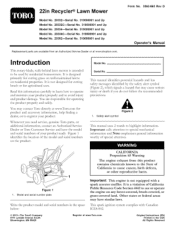
... Lawn Mower
Form No. 3363-863 Rev D
Model No. 20332mSerial No. 310000001 and Up Model No. 20332CmSerial No. 310000001 and Up Model No. 20334--Serial...Toro parts, or additional information, contact an Authorized Service Dealer or Toro Customer Service and have similar laws.
Introduction
This rotary-blade, walk-behind lawn mower is not equipped with Canadian ICES-002.
© 2011--The Toro...
Owner's Manual - Page 2

...drive system, if so equipped, before you to potential personal injury hazards. Only use accessories approved by the engine ...require extra caution. Read and understand the contents before starting .
• Do not put hands or feet near... when operating machine.
• See manufacturer's instructions for walk-behind rotary lawn mowers and the B71.1 specifications of slopes; You could result in...
Owner's Manual - Page 3
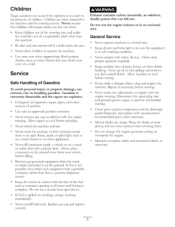
...starting . Service
Safe Handling of Gasoline
To avoid personal injury or property damage, use extreme care in an enclosed area. Use only an approved gasoline container.
Never store the machine or fuel container where there is an open device. Remove gas-powered... or add fuel with manufacturer's recommended parts, when necessar):
Mower blades are sharp. Ahvays place containers on a truck or ...
Owner's Manual - Page 5
...on the dipstick. i
G009550
Figure 3
2. Move the mower to the operating position. 3.
Dipstick
Figure 4
, Wipe the dipstick clean with oil. Before starting the engine, fill the engine with a clean cloth. ...remove the dipstick.
5. contact an Authorized
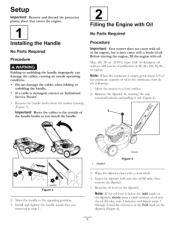
, Remove the handle _obs from the mower housing (Figure 3).
Setup
Important: Remove and discard the protective plastic sheet that ...
Owner's Manual - Page 6

with oil until
6. Handle knob (2)
6. Recoil start models only) Side discharge chute
3. change it yearly thereafter. Cutting height lever (4) 9. Bag-on the dipstick reads Full. Battery charger (electric-start handle
7. Important: Do not overfill the crankcase oil and run the engine. Product Overview
1
2
3
4 5 6 7 8
11
10 9
Figure 5
G009503
1. Handle 2. Spark plug
1
...
Owner's Manual - Page 7
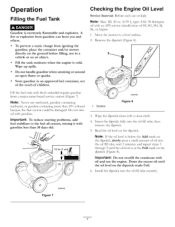
... of the reach of children. Store gasoline in a vehicle or on the dipstick. Move the mower to the fuel all season, mixing gasoline less than 10% ethanol because the fuel system could ...of SF, SG, SH, SJ, SL, or higher. 1. Fill the fuel tank with
1. Important: To reduce starting problems, fuel stabilizer to a level surface.
2. Do not handle gasoline when smoking or around an open flame or...
Owner's Manual - Page 8
...moving blade, causing injury.
Hold the blade control bar against the handle (Figure 10).
Lower the mower
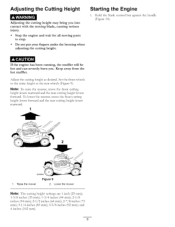
Note: The cutting height settings are 1 inch (25 ram);
1-3/8 inches (35 ram); 1-3/4 ... .
To lower the mower, move the front cutting height levers rearward and the rear cutting height levers forward. Raise the mower
Figure 9 2. and
4 inches (102 ram). Starting the Engine
1. Set ...
Owner's Manual - Page 9

... 10
, Turn the ignition key (Figure 11) (electric-start models only) or pul the recoil start after self-propelling, stop walking, hold your sides, and the mower will automatically keep pace with your hands on the upper handle and your elbows at your hands in place, and allow the mower to roll a couple of inches (centimeters) forward...
Owner's Manual - Page 10

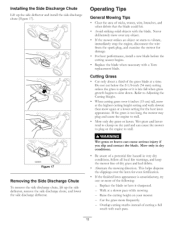
...personal injury or death to Operating the Bag-on the handle (Figure 14).
3. Important: When you leave the mower (electric-start models only). If the grass bag is on the mower and the bag-on-demand lever is attached to recycle the grass and leaf clippings back into the lawn... while the grass bag is in serious personal injury.
The blade is damaged, install a new Toro replacement bag.
Owner's Manual - Page 11
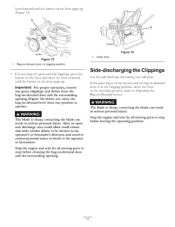
... the engine and wait for cutting very tall grass. If the grass bag is on the mower and the bag-on-demand lever is in bagging position)
For recycling the grass and leaf ...door
G009582
1. parts to be thrown in the
operator's or bystander's direction and result in serious personal injury.
lever forward until the button on -demand and the surrounding opening (Figure 16) before cleaning ...
Owner's Manual - Page 12
...blade at a slower pace while mowing. -
Alternate the mowing direction. If the finished lawn appearance is too long, the mower may plug and ..., follow all local fire warnings, and keep the mower free of the following: - Walk at a time. Do not cut below the 2-1/8-...the clippings over aW object.
• If the mower strikes an object or starts to stall.
• Mow only dry grass ...
Owner's Manual - Page 14

... for any maintenance procedure. never siphon. Stop the engine and wait for 24 hours (electric-start models only).
• Empty the fuel tank before repairs as directed and before performing any additional yearly maintenance
procedures. Tipping Gasoline personal
the mower may cause the fuel to the spark plug. replace it more frequently if the edge...
Owner's Manual - Page 15
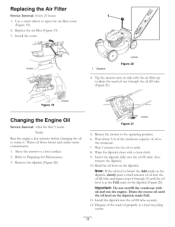
... filter (Figure 19). 3. Warm oil flows better and carries more contaminants. 1. Return the mower to settle. 8.
Pour about 3/4 of the crankcase capacib7 of the used oil out through 10... clean cloth. 9. Figure 19
Changing the Engine Oil
Service Interval: After the first 5 hours Yearly
Run the engine a few minutes before changing the oil to Preparing for the oil to the operating...
Owner's Manual - Page 16

...
Figure 23
3. Connect the charger to local codes. Replacing the Fuse
Electric-start
models only
CALIFORNIA Proposition 65 Warning
Battery
accessories chemicals
posts,
contain known
...mower wire harness located below the ignition key (Figure 22). Figure 22
G009555
2. Battery 4. Charge the battery for 24 hours initial1); Charging the Battery
Service Interval: Every 25 hours
Electric-start...
Owner's Manual - Page 17
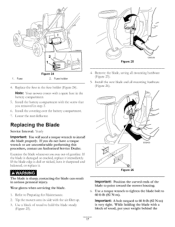
...Lower the rear deflector•
Replacing the Blade
Service Interval: Yearly
Important: You will need a torque wrench to Preparing for ... the fuse holder (Figure 24)•
Note: Your mower comes with a block of gasoline. Install the battery ... very tight. Examine the blade whenever you removed in serious personal injury.
Install the covering over the battery compartment• ...
Owner's Manual - Page 19

... the spark plug. 7. Charge the battery for 24 hours (electric-start the engine, it is the leading cause of hard starting. If you must store the mower in a heated area, you fold the handle.
To unfold the.... • Do not store the mower in an enclosure near an
open flame. • Allow the engine to cool before storing it.
, On the last refueling of the year, add fuel stabilizer to the fuel ...
Owner's Manual - Page 20

... refer to the Yellow Pages of your telephone directory (look under "Lawn Mowers") or access our web site at 866-214-9808 (Canadian customers)...Toro GTS Starting Guarantee
A 3-Year Full Warranty (Not Applicable for Commercial Use)
22 in Recycler ¢
20 in Mulcher/Bagger Walk Power Mowers
Conditions and Products Covered
Items and Conditions Not Covered
The Toro Company and its affiliate, Toro...
Parts Catalog - Page 1
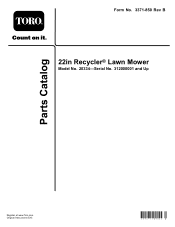
Form No. 3371-850 Rev B
22in Recycler® Lawn Mower
Model No. 20334-Serial No. 312000001 and Up
Parts Catalog
Register at www.Toro.com. Original Instructions (EN)
*3371-850* B
Parts Catalog - Page 3

... Assembly 4 Rear Bag Assembly 5 Engine and Blade Assembly 6 Front Wheel and Height-of-Cut Assembly 7 Transmission and Rear Wheel Drive Assembly 8 Handle Assembly 9 Electrical Assembly 10 Attachments and Accessories 11
© 2012-The Toro® Company
Contact us at www.Toro.com.
8111 Lyndale Avenue South Bloomington, MN 55420
3
Printed in the USA.
Parts Catalog - Page 10
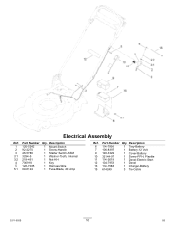
...
Ref. Description
6 114-7936
1 Tray-Battery
7 106-8397
1 Battery-12 Volt
9 120-3329
1 Cover-Battery
10 32144-97
1 Screw-PPH, Plastite
11 114-2619
1 Decal-Electric Start
12 104-7953
1 Decal
13 114-1588
1 Charger-Battery
15 614249
3 Tie-Cable
3371-850B
10
D5 Part Number Qty. Part Number Qty...
Similar Questions

Owners Manual For Toro 190 Cc Personal Pace Lawn Mower
(Posted by nelsontim1 9 years ago)

Toro Personal Pace Electric Starter Does Not Engage
(Posted by tejsmigg 9 years ago)

Toro 22 Recycler Personal Pace Wont Start
(Posted by chirielibir 10 years ago)

Electric Start Toro Law Mower Will Not Start Cold 20334
(Posted by pinoNtha 10 years ago)

Toro Self Propelled Lawn Mower Personal Pace Won't Pull The Mower 20332
(Posted by pksrsc 10 years ago)