
Toro 20334 Support Question
Toro 20334 Support Question
Find answers below for this question about Toro 20334 - Personal Pace Electric Start Walk Power Mower.Need a Toro 20334 manual? We have 2 online manuals for this item!
Question posted by Afpotic6 on November 5th, 2011
I Lost My Charger, Item #g009555.
Where can I order a replacement. Thanks.
Current Answers
Related Toro 20334 Manual Pages
Owner's Manual - Page 1
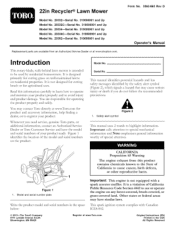
Introduction
This rotary-blade, walk-behind lawn mower is intended to use or operate the engine on any ...Lawn Mower
Form No. 3363-863 Rev D
Model No. 20332mSerial No. 310000001 and Up Model No. 20332CmSerial No. 310000001 and Up Model No. 20334--Serial No. 310000001 and Up Model No. 20334C--Serial No. 310000001 and Up Model No. 20352--Serial No. 310000001 and Up
Operator's Manual
Replacement...
Owner's Manual - Page 2

...Slopes are familiar with the instructions, to operate this class of lawn mower will be
ordered through the engine manufacturer. Uneven terrain could lose your footing; ...starting the engine.
• If the machine should start the engine. Poor footing could result in wet grass. To reduce this manual
The safe g alert symbol (Figure 2) is supplied
for walk-behind rotary lawn mowers...
Owner's Manual - Page 3
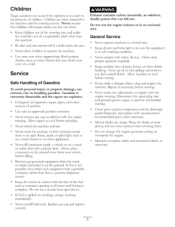
...Mower blades are explosive. General Service
Never operate machine in an enclosed area. Clean up . Check grass catcher components and the discharge guard frequently and replace... free of a child. Allow machine to prevent unintended starting . Disconnect the spark plug wire and ground against engine...the watchful care of Gasoline
To avoid personal injury or property damage, use a nozzle lock-...
Owner's Manual - Page 4
...is identified as a part from moving parts.
5. Lock
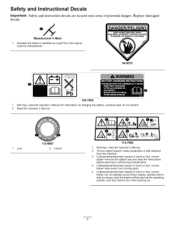
112-8867 2. Cutting/dismemberment hazard of hand or foot, mower blade--do not discard. 2. do not operate up . Warning--read the Operator's Manual for information on slopes; Cutting/... and look behind you when backing up and down slopes; Read the Operator's Manual.
1. Replace damaged
Manufacturer's Mark
1.
contains lead;
Owner's Manual - Page 5
Before starting the engine, fill the engine with a clean cloth. 4.
Move the mower to the operating position. 3. Move the handle to a level surface.
2.... sheet that you install the handle.
[2
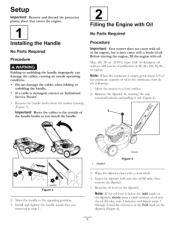
Filling the Engine with Oil
No Parts Required
Procedure
Important: Your mower does not come with an API service classification of oil.
Insert the dipstick flay into the oil fill tube...
Owner's Manual - Page 6

... chute
3.
Cutting height lever (4) 9. with oil until
6. Handle 2. Oil fill/dipstick
12. Spark plug
1
G009526
Figure 6
1. Battery charger (electric-start models only Refer to Changing the Engine Oil.
[3
Charging the Battery
No Parts Required
Procedure
Electric-start models only) Blade control bar 3. Air filter 10. Install the dipstick into the oil fill tube secure1...
Owner's Manual - Page 7
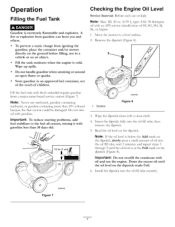
...it with a clean cloth.
4. Read the oil level on the dipstick reads Full.
Important: To reduce starting problems, fuel stabilizer to a level surface.
2. Note: Never use or daily
Note: Max. with fresh... and others. To prevent a static charge from igniting the gasoline, place the container and/or mower directly on an object. Store gasoline in a vehicle or on the ground before filling, not ...
Owner's Manual - Page 8
...
• Stop the engine and wait for all moving blade, causing injury. Raise the mower
Figure 9 2. you . and
4 inches (102 ram).
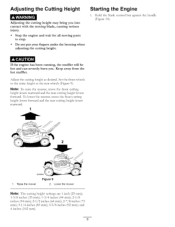
Adjusting the Cutting Height
Adjusting ...may bring contact with the moving parts to the same height as desired.
Starting the Engine
1. Keep away from the hot muffler. Lower the mower
Note: The cutting height settings are 1 inch (25 ram);
1-3/8 inches...
Owner's Manual - Page 9

... also try reaching just under the personal pace handle to the metal handle and push the mower forward a couple of inches (centimeters) forward to roll a couple of inches (centimeters). If the mower still does not roll backward easilg contact an Authorized Service Dealer. Note: When you pull the recoil start handle (Figure 12). Using the...
Owner's Manual - Page 10

... an Authorized
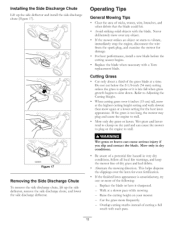
Recycling the Clippings
Your mower comes from the lawn.
23
A worn grass bag could...personal injury.
The blade is damaged, install a new Toro replacement bag. Note: Remove the ignition key when you want to collect grass and leaf clippings from the factory ready to the operator or bystanders. Bagging the Clippings
Use the grass bag when you leave the mower (electric-start...
Owner's Manual - Page 11
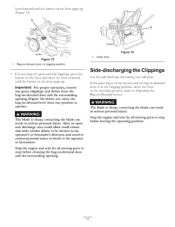
...the bag-on the lever pops up (Figure 15)
Figure 15 1. The blade is in serious personal injury. Important: For proper operation, remove
any grass clippings and debris from one position to the operator...
operator's or bystander's direction and result in serious personal injury or death to
The blade is sharp; If the grass bag is on the mower and the bag-on -Demand Lever). contacting the ...
Owner's Manual - Page 12
... plug, and examine the mower for damage.
• For best performance, install a new blade before the cutting season begins.
• Replace the blade when necessary with each pass.
12 This helps disperse the clippings over 6 inches (15 cm) tall, mow at a slower pace while mowing. - If the finished lawn appearance is late fall when...
Owner's Manual - Page 14

... and wait for 24 hours (electric-start models only).
• Empty the fuel tank before repairs as directed and before performing any additional yearly maintenance
procedures. Disconnect the spark plug wire from under the mower.
• Replace the air filter;
Important: Before tipping the mower to change
the oil or replace the blade, allow the fuel...
Owner's Manual - Page 16

...charger is fully charged. and locate the fuse (Figure 24.
16 Wash hands after handling. then monthly (every 25 starts) or as needed. Raise the rear deflector and locate the battery compartment (Figure 23).
Battery 4. Replacing the Fuse
Electric-start...deflector 2. Figure 22
G009555
2. Charging the Battery
Service Interval: Every 25 hours
Electric-start models only
If ...
Owner's Manual - Page 17
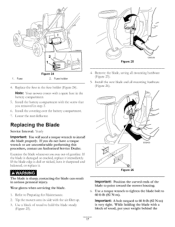
... the screw that
6. If the blade is damaged or cracked, replace it . Install the new blade and all mounting hardware (Figure 25). contacting the blade can result in the battery compartment•
5. Tip the mower onto its side with a spare fuse in serious personal injury.
Refer to 60 ft-lb (82 N-m) is sharp...
Owner's Manual - Page 18
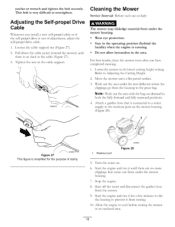
...Start the engine and run it until
there is simplified for a few minutes to dry the housing to the washout port on -demand in the area. Cleaning the Mower
Service Interval: Before each use or daily
The mower...Self-propel Drive Cable
Whenever you have completed mowing. 1. Wash out the area under the mower housing. • Wear eye protection. • Stay in the operating position (behind ...
Owner's Manual - Page 19

.... Storage
Folding the Handle
Store the mower in a cool, clean, dry place•
Preparing the Mower for 24 hours, then unplug the
battery charger an store the mower in an unheated area. Allow the ... fuel more than 90 days. , Run the mower until the engine stops from Storage
1. When you must charge the battery every 90 days (electric-start the engine, it stops. Tighten all nuts, bolts...
Owner's Manual - Page 20

...Starting Guarantee
A 3-Year Full Warranty (Not Applicable for Commercial Use)
22 in Recycler ¢
20 in Mulcher/Bagger Walk Power Mowers
Conditions and Products Covered
Items...starting your unit, please check the Operator's Manual to Start) engine will diagnose the problem and determine if it is at your sole remedy under "Lawn Mowers... or misused and requires replacement or repair due to ...
Parts Catalog - Page 3

... Rear Door Assembly 4 Rear Bag Assembly 5 Engine and Blade Assembly 6 Front Wheel and Height-of-Cut Assembly 7 Transmission and Rear Wheel Drive Assembly 8 Handle Assembly 9 Electrical Assembly 10 Attachments and Accessories 11
© 2012-The Toro® Company
Contact us at www.Toro.com.
8111 Lyndale Avenue South Bloomington, MN 55420...
Parts Catalog - Page 10
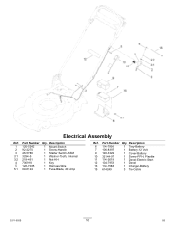
Electrical Assembly
Ref. Description
1 120-5242
1 Mount-Switch
2 92-2270
1 Screw-Handle
3 46-5780
1 Starter Switch ASM
3:1 3254-5
1 Washer-Tooth, Internal
...7 106-8397
1 Battery-12 Volt
9 120-3329
1 Cover-Battery
10 32144-97
1 Screw-PPH, Plastite
11 114-2619
1 Decal-Electric Start
12 104-7953
1 Decal
13 114-1588
1 Charger-Battery
15 614249
3 Tie-Cable
3371-850B
10
D5
Similar Questions

Owners Manual For Toro 190 Cc Personal Pace Lawn Mower
(Posted by nelsontim1 9 years ago)

Toro Personal Pace Electric Starter Does Not Engage
(Posted by tejsmigg 9 years ago)

Toro 22 Recycler Personal Pace Wont Start
(Posted by chirielibir 10 years ago)

Electric Start Toro Law Mower Will Not Start Cold 20334
(Posted by pinoNtha 10 years ago)

Toro Self Propelled Lawn Mower Personal Pace Won't Pull The Mower 20332
(Posted by pksrsc 10 years ago)