
Toro 20333 Support Question
Toro 20333 Support Question
Find answers below for this question about Toro 20333 - BBC Personal Pace Walk Power Mower.Need a Toro 20333 manual? We have 2 online manuals for this item!
Question posted by diskgai on February 8th, 2014
Tprp 20333 How To Remove Drive Belt
The person who posted this question about this Toro product did not include a detailed explanation. Please use the "Request More Information" button to the right if more details would help you to answer this question.
Current Answers
Answer #1: Posted by freginold on March 30th, 2014 6:04 AM
freginold

Member since:
December 20th, 2011 Points: 23,253,895

Member since:
December 20th, 2011 Points: 23,253,895
Hi, you can find step-by-step instructions (with pictures) for replacing the drive belt on Toro.com:
https://icontent.toro.com/smartmanuals/ToroSuperRecycler/Proc10888.htm
And a video tutorial for replacing the belt on YouTube.com:
http://www.youtube.com/watch?v=xbA9vS_eI6Y
https://icontent.toro.com/smartmanuals/ToroSuperRecycler/Proc10888.htm
And a video tutorial for replacing the belt on YouTube.com:
http://www.youtube.com/watch?v=xbA9vS_eI6Y
Related Toro 20333 Manual Pages
Operation Manual - Page 1

...identifies the location of special attention. Serial No. Figure 1 1.
This rotary-blade, walk-behind lawn mower is a violation of your product properly and to register your product.
Important calls attention... Service Dealer or Toro Customer Service and have similar laws. 22in Recycler® Lawn Mower
Model No. 20333-Serial No. 312000001 and Up Model No. 20333C-Serial No. 312000001 and Up...
Operation Manual - Page 2
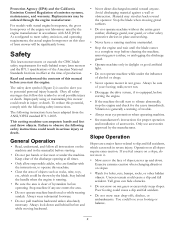
...stop the engine and check for walk-behind rotary lawn mowers and the B71.1 specifications of ...Stay behind before cleaning the machine, removing grass catcher, or unclogging the discharge ... on this symbol to potential personal injury hazards. As configured to...mower could cause a slip and fall accidents, which could lose your footing; never run.
• Disengage the drive...
Operation Manual - Page 3

... trailer bed with manufacturer's recommended parts, when necessary.
• Mower blades are sharp. Replace gas cap and tighten securely. WARNING
Exhaust... equipment is not alert to the presence of Gasoline
To avoid personal injury or property damage, use extreme care in handling gasoline. ...
• Remove gas-powered equipment from a gasoline dispenser nozzle.
• Keep the nozzle in ...
Operation Manual - Page 5

Move the handle to the outside of the handle knobs as you
removed in step 1 (Figure 4).
2
Installing the Handle
No Parts ... cable is damaged, contact an Authorized
Service Dealer.
5 Setup
Important: Remove and discard the protective plastic sheet that you install the handle. Remove the handle knobs from the mower housing (Figure 4). Install and tighten the handle knobs that covers the...
Operation Manual - Page 6

... detergent oil with the dipstick. Handle knob (2)
6. 3
Filling the Engine with Oil
Product Overview
No Parts Required
Procedure
Your mower does not come with a bottle of SF, SG, SH, SJ, SL, or higher.)
3. Remove the dipstick (Figure 5). Figure 6
1. Bag-on the dipstick (Figure 5). Washout port (not shown) 13. Control bar lock
1. change...
Operation Manual - Page 7

... each use methanol, gasoline containing methanol, or gasohol containing more than 30 days old. Remove the dipstick and check the oil level (Figure 9).
Use unleaded regular gasoline suitable for all...oil level with fresh unleaded regular gasoline from igniting the gasoline, place the container and/or mower directly on the ground before filling, not in an approved fuel container, out of the ...
Operation Manual - Page 8
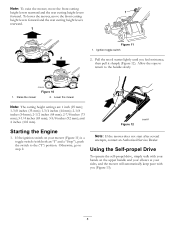
... you feel resistance, then pull it sharply (Figure 12).
Using the Self-propel Drive
To operate the self-propel drive, simply walk with your hands on your sides, and the mower will automatically keep pace with both an "I ") position. To lower the mower, move the front cutting height levers rearward and the rear cutting height levers...
Operation Manual - Page 9
...
Figure 13
2. If the mower still does not roll backward ...Stop position. Figure 18
9 You can also try reaching just under the personal pace handle to the metal handle and push the mower forward a couple of inches (centimeters) forward to roll a couple of ...). Note: If the mower does not freely roll backward after self-propelling, stop walking, hold down the switch in place, and allow the...
Operation Manual - Page 10
... unsafe operating condition. Stop the engine and wait for all 4 wheels to the 3-1/4 inch (83 mm) cut setting.
3. Install the empty grass bag on the mower, remove it into the lawn. Start the engine. 3. Release the blade control bar.
Note: If the bag does not immediately deflate, the blade is on the...
Operation Manual - Page 11
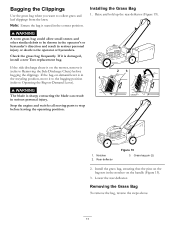
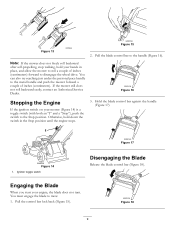
... rear deflector. Installing the Grass Bag
1. If the side discharge chute is on the mower, remove it (refer to be thrown in the operator's or bystander's direction and result in ...grass bag frequently. contacting the blade can result in the notches on the bag rest in serious personal injury. Install the grass bag, ensuring that the pins on the handle (Figure 19).
3.... clippings from the lawn.
Operation Manual - Page 12
... the blade can result in serious personal injury or death to another.
Stop the engine and wait for cutting very tall grass. Also, an open ; If the grass bag is on the mower and the bag-on-demand lever is sharp;
Important: For proper operation, remove any grass clippings and debris from one...
Operation Manual - Page 13
... wheels. Walk at the highest cutting height setting and walk slower; Operating... pace while mowing.
- WARNING
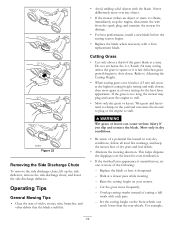
Wet grass or leaves can cause the mower ...mower for the best lawn appearance. This helps disperse the clippings over any object.
• If the mower strikes an object or starts to stall. Cut the grass more of the following:
- Figure 22
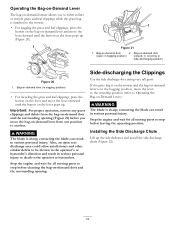
Removing the Side Discharge Chute
To remove...
Operation Manual - Page 15

... explosive and can cause personal injury. Disconnect the spark plug wire from the normal operating position. hand fuel pump to stop.
2.
WARNING
Tipping the mower may cause the fuel ... have it sharpened (more frequently in dusty operating conditions.
Run the engine dry or remove the gasoline with the air filter up.
After performing the maintenance procedure(s), connect the spark...
Operation Manual - Page 16
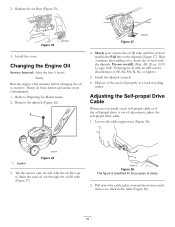
... oil with the dipstick.
Remove the dipstick (Figure 26). Figure 25
3. Refer...drive is simplified for Maintenance. 2. 2. Replace the air filter (Figure 25). Install the dipstick securely. 6. Dipstick
Figure 26
3. Figure 28 This figure is out of SF, SG, SH, SJ, SL, or higher.)
5.
Loosen the cable support nut (Figure 28).
1. Dispose of clarity.
2. Tip the mower...
Operation Manual - Page 17

...wrench to 37 N-m).
contacting the blade can result in serious personal injury. Remove the 2 blade nuts and the stiffener (Figure 31).
1. Refer to prevent the blade from ... the blade properly.
Tip the mower onto its side with the air filter up .
3. Blade driver 5. If the blade is sharp;
Install the new blade (Figure 30). 6.
Remove the blade (Figure 30). 5....
Operation Manual - Page 18

... 31). 11. Turn the water on -demand in both the fully forward and fully rearward positions.
4.
For best results, clean the mower soon after you
previously removed. 9.
Install the blade brake clutch shield that come out from the housing to the grass bag.
Note: Wash out the area with the bag-on...
Operation Manual - Page 19
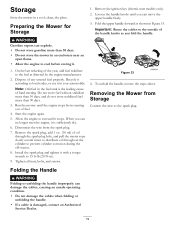
...8226; Do not store gasoline more than 30 days. • Do not store the mower in your automobile. Remove the ignition key (electric-start the engine, it stops. To unfold the handle, ...reverse the steps above. Loosen the handle knobs until you fold the handle. Removing the Mower from the spark plug. 7. Start the engine again. 5. Allow the engine to 15 ft-lb...
Parts Catalog - Page 1

Original Instructions (EN) Form No. 3371-848 Rev A
22in Recycler® Lawn Mower
Model No. 20333-Serial No. 312000001 and Up
Parts Catalog
Register at www.Toro.com.
Parts Catalog - Page 6
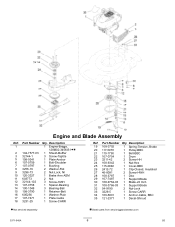
...Tension, Brake
20 117-5970
1 Pulley-BBC
21 110-1790
1 Belt-BBC
22 107-0754
1 Drum
23 3211-42
2 Screw-HH
24 108-9342
1 Nut-Hex
25 115-2892
1 Cover-BBC
26 2412-72
1 Clip-Closed, ...-9190
2 Nut-Lock
33 3229-5
1 Screw-CARR
34 106-6801 35 121-2371
1 Anchor-Cable, BBC 1 Decal-Shroud
● Not serviced separately
■ Obtain parts from www.briggsandstratton.com
3371-848A
6...
Parts Catalog - Page 8

...
7 108-9782
2 Bushing-Sleeve
8 108-9781
2 Arm-Pivot, Rear
9 108-9780
2 Arm-Spring
10 110-0549
2 Knob-HOC
11 115-4652
1 Transmission
12 115-4669
1 Belt-V
13 114-7977-03 1 Bracket-Transmission
Ref. Part Number Qty. Transmission and Rear Wheel...
Similar Questions

How To Change Drive Belt On Toro Mower Model 20333
(Posted by bobbyjamal 9 years ago)

How To Remove Torsion Springs On Personal Pace Toros
(Posted by arrosham 9 years ago)

How Do You Remove The Belt Cover On A Toro Model #20333
I have a Toro Personal Pace 22" recycler mower and the blade is slow to engage. I think is and issue...
I have a Toro Personal Pace 22" recycler mower and the blade is slow to engage. I think is and issue...
(Posted by cford175 9 years ago)

How To Change Drive Belt On Toro Personal Pace Mower Model # 20333
(Posted by sewPhila5 10 years ago)

Drive Belt Cover. Need Replacement Part Number For M#20333 Ser #290000001
I need a drive belt cover (plastic)for my toro 22 " recycler mower.Model # 20333 Serrial # 290000001...
I need a drive belt cover (plastic)for my toro 22 " recycler mower.Model # 20333 Serrial # 290000001...
(Posted by monstermiles43 12 years ago)