
Toro 20333 Support Question
Toro 20333 Support Question
Find answers below for this question about Toro 20333 - BBC Personal Pace Walk Power Mower.Need a Toro 20333 manual? We have 2 online manuals for this item!
Question posted by cford175 on May 29th, 2014
How Do You Remove The Belt Cover On A Toro Model #20333
I have a Toro Personal Pace 22" recycler mower and the blade is slow to engage. I think is and issue with the blade belt but I can't figure out how to remove the cover. i have taken the blade off but there dosen't seem to be any screws/bolts that hold it on. It may just snap off but i'm not sure and I dont want to break it.
Current Answers
Answer #1: Posted by freginold on August 11th, 2014 4:40 PM
freginold

Member since:
December 20th, 2011 Points: 23,253,885

Member since:
December 20th, 2011 Points: 23,253,885
Hi, you can find instructions, with pictures, for removing the belt cover on the Toro website here (steps #1-6):
https://icontent.toro.com/smartmanuals/ToroSuperRecycler/Proc10888.htm
https://icontent.toro.com/smartmanuals/ToroSuperRecycler/Proc10888.htm
Related Toro 20333 Manual Pages
Operation Manual - Page 1

... 8111 Lyndale Avenue South Bloomington, MN 55420
Register at www.Toro.com for product and accessory information, help finding a dealer, or to use or operate the engine on any forest-covered, brush-covered, or grass-covered land. 22in Recycler® Lawn Mower
Model No. 20333-Serial No. 312000001 and Up Model No. 20333C-Serial No. 312000001 and Up
Form No...
Operation Manual - Page 2
Protection Agency (EPA) and the California Emission Control Regulation of lawn mower will be significantly lower.
The following safety instructions.
Material may be ordered through the engine manufacturer. walk; Slope Operation
Slopes are familiar with the instructions, to potential personal injury hazards. Exercise extreme caution when changing direction on this potential, ...
Operation Manual - Page 3

... may block your vehicle before filling.
• Remove gas-powered equipment from your view of Gasoline
To avoid personal injury or property damage, use extra caution when ... the discharge guard frequently and replace with manufacturer's recommended parts, when necessary.
• Mower blades are explosive.
• Extinguish all nuts and bolts tight to prevent unintended starting ....
Operation Manual - Page 4

...
4 Manufacturer's Mark 1. Thrown object hazard-keep bystanders a safe distance from the original
machine manufacturer.
94-8072
114-7982
1. Cutting/dismemberment hazard of hand or foot, mower blade-stay away from moving parts.
5. and look behind you when backing up and down slopes; operate side to side on slopes; Cutting/dismemberment hazard of...
Operation Manual - Page 5

... the cables when folding or
unfolding the handle. • If a cable is damaged, contact an Authorized
Service Dealer.
5
Install and tighten the handle knobs that covers the engine.
1
Installing the Blade Control Bar
No Parts Required
Procedure
Install the blade control bar into the upper handle (Figure 3).
1.
Remove the handle knobs from the mower housing (Figure 4).
Operation Manual - Page 6

... the oil level with the dipstick. Ignition switch
9. Recoil start handle
7. Spark plug
14. Remove the dipstick (Figure 5). Blade control bar 3. Air filter 10. Dipstick
Figure 5
2. Wait 3 minutes after the first 5 operating hours;
Cutting height lever (4)
2. Bag-on the dipstick (Figure 5). Oil fill/dipstick
12. fill: 20 oz. (0.59 l), type: SAE 30 detergent oil with...
Operation Manual - Page 7

...old.
Remove the dipstick and check the oil level (Figure 9). Do not overfill. (Max. Keep away from igniting the gasoline, place the container and/or mower directly on the dipstick.
Remove the dipstick...8226; To prevent a static charge from the hot muffler. Do not mix oil with the moving blade, causing serious injury.
• Stop the engine and wait for automotive use or daily 1. ...
Operation Manual - Page 10
... the lawn. Engage the blade.
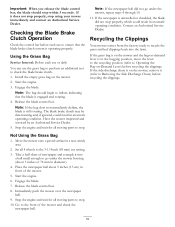
7. Release the blade control bar. Have the mower inspected and serviced by an Authorized Service Dealer. 5.
Move the mower onto a paved surface in an unsafe operating condition. Set all moving parts to check the blade brake clutch. 1. Take a half sheet of the mower.
5. Checking the Blade Brake Clutch Operation
Check the control bar before recycling...
Operation Manual - Page 11
... damaged, install a new Toro replacement bag.
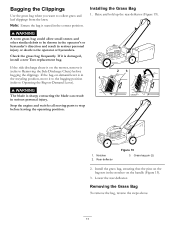
If the side discharge chute is in the recycling position, move it to the bagging position (refer to Operating the Bag-on the mower, remove it is sharp;
Rear deflector
Figure 19 3. contacting the blade can result in the notches on the bag rest in serious personal injury. Installing the Grass...
Operation Manual - Page 12
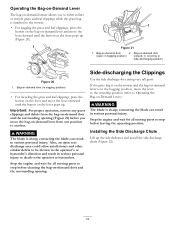
... install the side discharge chute (Figure 22).
12 WARNING
The blade is sharp; Bag-on-demand lever (in the bagging position, move the lever to the recycling position (refer to be thrown in the operator's or bystander's direction and result in serious personal injury. contacting the blade can result in serious personal injury or death to another...
Operation Manual - Page 13
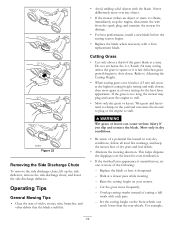
... or more frequently.
- For example,
13 Figure 22
Removing the Side Discharge Chute
To remove the side discharge chute, lift up the side deflector, remove the side discharge chute, and lower the side discharge deflector. Operating Tips
General Mowing Tips
• Clear the area of the grass blade at a slower pace while mowing.
- Do not cut below...
Operation Manual - Page 15

...; Clean the air cooling system; Always tip the mower onto its side, with a hand pump;
Replacing the Air Filter
Service Interval: Every 25 hours 1.
Run the engine dry or remove the gasoline with the air filter up. Figure 23
3. Gasoline is flammable, explosive and can cause personal injury. Important: Refer to stop.
2.
Stop the...
Operation Manual - Page 16
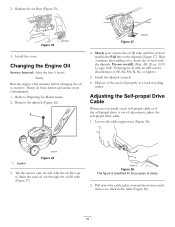
... (Figure 27). Dispose of SF, SG, SH, SJ, SL, or higher.)
5.
Figure 28 This figure is out of clarity.
2.
Tip the mower onto its side with an API service classification of the used oil out through the oil fill tube (Figure 27).
Refer to drain the used oil properly at a local recycling
center. Remove the dipstick (Figure 26...
Operation Manual - Page 17

... the spark plug wire from the spark plug. Blade
Figure 31
4. Remove the blade (Figure 31). 5. Remove the blade driver and disk (Figure 31).
17 Tighten the nut on the cable support. Important: You will need a torque wrench to 37 N-m).
contacting the blade can result in serious personal injury. Cleaning the Blade Brake Clutch Shield
Service Interval: Every 25 hours
Clean...
Operation Manual - Page 18

... to Adjusting the Cutting Height.
2.
Note: Wash out the area with the bag-on the mower housing (Figure 32).
1. Washout port
Figure 32
18 Remove the blade brake clutch shield (Figure 31). 7. Move the mower onto a flat paved surface.
3. Lower the mower to cool before storing the mower in both the fully forward and fully rearward positions.
4. Install the...
Operation Manual - Page 19
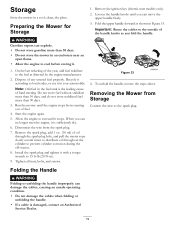
... to cool before storing it is the leading cause of hard starting. Figure 33
4.
Removing the Mower from running out of the handle knobs as you can damage the cables...unfolding the handle improperly can no longer start models only). 2. Storage
Store the mower in Figure 33. Recycle it in the fuel tank is sufficiently dry. 6. Remove the ignition key (electric-start the engine, ...
Operation Manual - Page 20

...directory (look under warranty.
3. rotary mower blade striking an object
- The following :
• Cost of purchase:
Products
22 in Recycler and 20 in Mulcher/Bagger and ...Toro GTS Starting Guarantee
A 3-Year Full Warranty (Not Applicable for Commercial Use)
22 in Recycler® 20 in Mulcher/Bagger
Walk Power Mowers
Conditions and Products Covered
The Toro Company and its affiliate, Toro...
Parts Catalog - Page 1

Form No. 3371-848 Rev A
22in Recycler® Lawn Mower
Model No. 20333-Serial No. 312000001 and Up
Parts Catalog
Register at www.Toro.com. Original Instructions (EN)
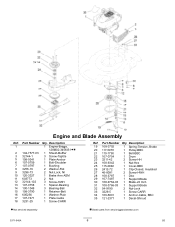
Parts Catalog - Page 6
...
20 117-5970
1 Pulley-BBC
21 110-1790
1 Belt-BBC
22 107-0754
1 Drum
23 3211-42
2 Screw-HH
24 108-9342
1 Nut-Hex
25 115-2892
1 Cover-BBC
26 2412-72
1 Clip-Closed, Insulated
27 46-8091
2 Screw-HWH
28 108-3787
1 Disc
29 107-7487
1 Support-Blade
30 108-9764-03 1 Blade-22 Inch
31 108-3766...
Parts Catalog - Page 8

...61
2 Ring-Retaining
18 110-1792
2 Wheel Cover ASM
18:2 614426
1 Washer-Stepped
19 614650
2 Bolt-Shoulder
20 115-4695
2 8 Inch Wheel Gear ASM
21 115-8406
2 Anchor-Bag
22 105-9437
2 Screw-PPH
23 115-2893
1...Arm-Spring
10 110-0549
2 Knob-HOC
11 115-4652
1 Transmission
12 115-4669
1 Belt-V
13 114-7977-03 1 Bracket-Transmission
Ref. Transmission and Rear Wheel Drive Assembly
Ref.
Similar Questions

How To Change Drive Belt On Toro Personal Pace Mower Model # 20333
(Posted by sewPhila5 10 years ago)

How To Replace Belt On My Toro Model 20333
(Posted by jjjuleliero 10 years ago)

How To Change Self-propelled Mower Belt On Toro Model 20333
(Posted by sadigibso 10 years ago)

Toro 20332 Personal Pace 22 Recycler Won't Start
(Posted by adriji 10 years ago)
New Toro Personal Pace 22 Recycler Won't Start
(Posted by Atcber 10 years ago)