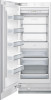
Thermador T30IF800SP Support Question
Thermador T30IF800SP Support Question
Find answers below for this question about Thermador T30IF800SP.Need a Thermador T30IF800SP manual? We have 1 online manual for this item!
Question posted by Anonymous-159115 on June 18th, 2016
Positioning Aid
we are trying to install the integrated panel for our freedom columns. The manual says to use the positioning aid to mark drill holes. We can't find the positioning aid!
Current Answers
Answer #1: Posted by BusterDoogen on June 18th, 2016 12:00 PM
BusterDoogen

Member since:
October 30th, 2011 Points: 28,565,427

Member since:
October 30th, 2011 Points: 28,565,427
Go to page 19-21 for the positioning aid photo & instructions for use.
I hope this is helpful to you!
Please respond to my effort to provide you with the best possible solution by using the "Acceptable Solution" and/or the "Helpful" buttons when the answer has proven to be helpful. Please feel free to submit further info for your question, if a solution was not provided. I appreciate the opportunity to serve you!
Related Thermador T30IF800SP Manual Pages
Installation Manual - Page 4

... dispenser 31 Attaching the cover strips 32 Adjusting the door opening angle 33
4 Preparing the door panels 19 5. Loading the appliance door 19 6. Removing the installation
support part 19 7. Adjusting the door spring 23 Special installation 24
Changing over the door hinges 24 Removing/changing over the sealing mat 27 Side-by -Side...
Installation Manual - Page 5
... a result of this appliance only for its intended purpose. Proper installation is completely installed and secured per installation instructions. See the Owner's Manual for local inspector's use by qualified installers.
Note:
This is used to draw the user's attention to improper installation is required. NOTE
Installation of not observing this warning.
, CAUTION:
This indicates that...
Installation Manual - Page 6

... the wall, the floor and overhead cabinet/fixtures before the appliance is less than 6" (160 mm). During installation ensure that the installation enclosure is visible, a side panel must be used.
Individual appliance at the same time.
Use the Heater Kit for Side-by -Side
When dimensioning the partition for model 4, note the thickness...
Installation Manual - Page 7

...no possibility of installing the appliance in a stable position is to use a suitable ... make sure that the installation enclosure is strongly recommended the top panel of the ice maker,...installation enclosure is very heavy:
Refrigerator 24" approx. 310 Ibs/140 kg
Refrigerator 30" approx. 350 Ibs/158 kg
Freezer 18"
approx. 255 Ibs/115 kg*
Freezer 24"
approx. 300 Ibs/135 kg*
Freezer...
Installation Manual - Page 8

... 2.0 Ampere 2.0 Ampere 3.5 Ampere
4.0 Ampere
4.5 Ampere
2.0 Ampere 2.0 Ampere
For the installation position of the equipment grounding conductor may require a seperate ground.
Connecting the water
, CAUTION:
... 30" Freezer 18" (incl. Never ground the appliance to follow these instructions can be behind the appliance. Do not use an extension cord. IceMaker) Freezer 24" ...
Installation Manual - Page 9
...(229 mm)
12" (305 mm)
15" (381 mm)
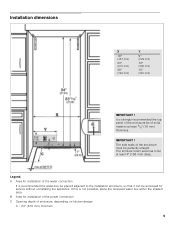
IMPORTANT !
The furniture return area has to the installation enclosure, so that it can be of enclosure, depending on kitchen design C = 24" (610 mm) minimum
... straight. It is strongly recommended the top panel of the enclosure be accessed for service without uninstalling the appliance. B Area for installation of the enclosure must be at least ...
Installation Manual - Page 10

... the work surfaces. Other required accessories
Ice maker installation kit 1/4" OD copper line For connecting appliances which require water, e.g. Can be used for standard height door panels without fittings): 13/32" (10 mm). Other
Stepladder Dolly, hand truck Hammer drill for drilling holes in wall or floor Bits according suitable for an...
Installation Manual - Page 11

...for attaching an edge protection to the installation enclosure walls (see "Installation dimensions".
3. Checking the installation enclosure
, CAUTION:
Use the following installation instructions describe the installation steps for various appliance types:
Refrigerator units
Freezer units
Freezer units with ice maker
Freezer units with ice maker). Do not...
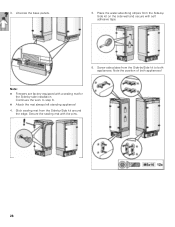
Installation Manual - Page 12

...position, the appliance can be taken before proceeding to prevent it in from tipping.
12 Note:
Do not raise up the appliance via the side panels! Risk of damage to a suitable installation location with the manual sections.
5. Special installation... pin, see "Adjusting the door opening angle".
1. Note:
Always use the appliance dolly from appliance side
Minimum height 86"/2185 mm
Do ...
Installation Manual - Page 13

...and damage! Always wear safety glasses and other necessary protective devices or apparel when installing or working with dowels and screws:
Not recommended for fastening with dowels. The ...tip angle, e.g. Important notes for use in the area which has not had time to secure the appliance. Attaching the anti-tip-brackets
, WARNING:
Risk of the installation enclosure!
1. Be sure screws ...
Installation Manual - Page 16
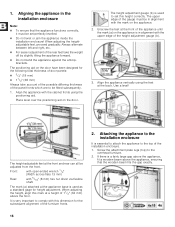
... of door panels: 3/4" (19 mm) 11/2" (38 mm) Always take the weight off by slightly tilting the appliance forward.
Do not bend the appliance against the anti-tipbrackets. The mark (a) attached at a height of the installation enclosure.
1. The height-adjustable feet at the back. Place level over the positioning aid on the...
Installation Manual - Page 19

... and tools/Optional accessories". Note: Store the positioning aids, there will be found in order to shut off valve closed.
4. Loading the appliance door
When attaching the door panels, it is recommended to load the door storage compartments in an installation step later.
19 Preparing the door panels
Important note:
When performing any work step...
Installation Manual - Page 20
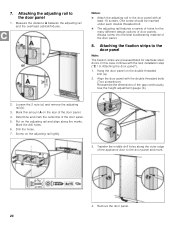
... doors. 7. Attaching the adjusting rail to the door panel
Note:
The fixation strips are pre-assembled for the many different design options of the door panel. 4.
Determine and mark the centerline of the appliance door to the door panel with the next installation step ("C / 9. Screw on the double threaded bolt (a).
2. Transfer the middle drill holes along the...
Installation Manual - Page 21
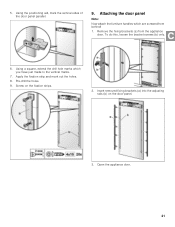
Using the positioning aid, mark the vertical sides of the door panel parallel.
9. Attaching the door panel
Note:
Now attach the furniture handles which you have just made to the vertical marks.
7. To do this, loosen the bracket screws (b) only.
6. Open the appliance door.
21 Using a square, extend the drill hole marks which are screwed from the appliance door. Screw on the...
Installation Manual - Page 22
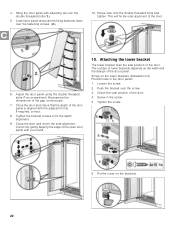
... side alignment. Predrill holes in the screw.
5. Check the side position of the door.
6. Tighten the screw.
6. Hang the door panel with your hand.
10. Correct by gently tapping the edge of the open door panel with adjusting rail over the double threaded bolts (1.).
5. 4. Put the cover on the lower brackets (Installation kit). Screw nuts...
Installation Manual - Page 24
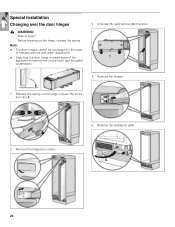
... door hinges cannot be exchanged in the case
of injury! Release the spring on the back (put the pallet underneath).
3. Special installation
Changing over the door hinges
, WARNING:
Risk of freezers with ice and water dispensers. Switching the door hinge is made easier if the
appliance is stored here on the...
Installation Manual - Page 27
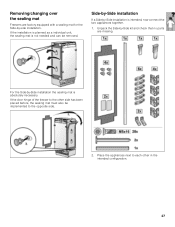
... sealing mat is absolutely necessary.
If the door hinge of the freezer to the opposite side.
2.
Place the appliances next to each other side has been placed before, the sealing mat must also be removed. For the Side-by-Side installation the sealing mat is not needed and can be implemented to...
Installation Manual - Page 28
... tape.
6. Continues the work to both appliances! Secure the sealing mat with a sealing mat for
the Side-by-side installation.
Note: Freezers are factory equipped with the pins.
28 Note the position of both appliances. Place the water-absorbing stripes from the Side-by -Side kit around the edge. Unscrew the base...
Installation Manual - Page 29
Screw the hinge halves in the Side-by-Side kit to the upper side of the appliance and screw the installation aids to both appliances.
8. Push the appliances together at the top with Water pump pliers (A).
13. Pull the appliances together at the front as far as ...
Installation Manual - Page 30
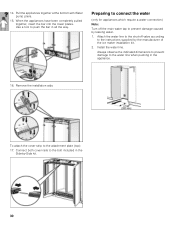
...Use a tool to the instructions supplied by the manufacturer of the ice maker installation kit.
2. Attach the water line to the shut-off the main water tap to the bolt included in the Side-by leaking water.
1.
Always observe the indicated dimensions to prevent damage to the attachment plate (top):
17.
Install...plates. 14. Remove the installation aids. Preparing to connect the ...
Similar Questions

Parts Diagram For Thermador T30if800sp And An Ice Maker That Will Not Stop
1) Where can I find a detailed parts diagram? A small plastic clip that holds the top right corner o...
1) Where can I find a detailed parts diagram? A small plastic clip that holds the top right corner o...
(Posted by weldesigns 5 years ago)

Thermador T18id80nlp/17 Freezer Not Dispensing Ice
The ice maker makes ice but it does not dispense the cubes.
The ice maker makes ice but it does not dispense the cubes.
(Posted by akouroupos 7 years ago)

How To Clean Drain
I have a side by side fridge and freezer KBUIT4870A02. It make snow and ice after changing for new d...
I have a side by side fridge and freezer KBUIT4870A02. It make snow and ice after changing for new d...
(Posted by mphan97069 8 years ago)

