Sony VPCL212FX Support Question
Sony VPCL212FX Support Question
Find answers below for this question about Sony VPCL212FX.Need a Sony VPCL212FX manual? We have 8 online manuals for this item!
Question posted by domineaux on September 14th, 2011
Screw Spacing Wall Mount
What is the spacing screws that secure the computer to the wall mount?
Current Answers
Related Sony VPCL212FX Manual Pages
Safety Information - Page 2

... identical to current retail versions.
2 Use of such software is governed by third parties. Record the model and serial numbers in the space provided here, and keep in a secure location. Refer to this product. reserves the right to make any modification to the model and serial numbers when you call your Sony...
User Guide - Page 10
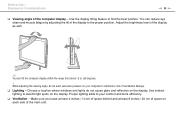
... excessive pressure on the display. Make sure you leave at least 4 inches / 10 cm of space behind and at least 8 inches / 20 cm of mechanical damage. ❑ Lighting - You can... tilt the computer display within the range from about -5 to eliminate a risk of space on the display. Use indirect lighting to the proper position. Use the display tilting feature to your ...
User Guide - Page 21

... the peripheral devices from the desktop type to the computer or personal injuries. While your computer is within the range of supported weight of your computer so as not to break the frame and cause the main unit to fall from the wall, resulting in damage to the wall-mount type, make sure that...
User Guide - Page 22

Getting Started > Setting Up Your Computer
To set up the computer for mounting
1 Gently face down your computer on a soft cloth to avoid damage to the screen frame.
2 Remove the four screws and take the foot stand off the computer. n 22 N
When facing down your computer, be sure to place it on a flat surface. !
User Guide - Page 23

Getting Started > Setting Up Your Computer
3 Remove the 19 screws (1) from the back of the foot stand and take off the mounting base plate (2). Be sure to keep the removed screws for future use. n 23 N
!
User Guide - Page 25

Be sure to tighten the screws with adequate torque.
6 Secure your wall mount attachment to your computer with your computer. Do not use the screws attached to mount your mounting system to the computer.
7 Follow the instructions described in step 3.
! Getting Started > Setting Up Your Computer
n 25 N
5 Flip over the mounting base plate (4) and screw it onto the back of...
User Guide - Page 64

... N
To connect in CATV mode (Option 2)
1 Connect the two metal hooks on a 75-ohm/300-ohm RCA transformer cable (1) to the screw-type grips at your cable service access (wall outlet) (2).
2 Connect one end of the RCA transformer cable (1). Connect the other end to the transformer end of the TV coaxial cable...
User Guide - Page 116

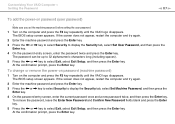
... logo disappears. The password can be up to 32 alphanumeric characters long (including spaces).
4 Select Password when Power On under Security and press the Enter key. 5 Change the setting from Disabled to Enabled.... not appear, restart the computer and try again.
2 Press the < or , key to select Security to select Exit, select Exit Setup, and then press the Enter key. At the confirmation prompt,...
User Guide - Page 117
...Setup, and then press the Enter key. The password can be up to 32 alphanumeric characters long (including spaces).
5 Press the < or , key to select Exit, select Exit Setup, and then press the Enter... the machine password and press the Enter key.
3 Press the < or , key to select Security to display the Security tab, select Set Machine Password, and then press the Enter key.
4 On the password entry ...
User Guide - Page 154

... select Shrink Volume. 4 Enter the size of the partition to be created in Enter the amount of space to shrink in MB and click Shrink. 5 Right-click Unallocated and select New Simple Volume. 6 Follow...recovering your computer system. 1 Click Start, Control Panel, System and Security, and Create and format hard disk partitions under Administrative
Tools. 2 If the User Account Control window appears, ...
VPCL2 Series Hard Disk Drive Replacement Instructions - Page 1
... from exposed circuitry when possible.
This slight difference does not affect the accuracy of the notebook computer.
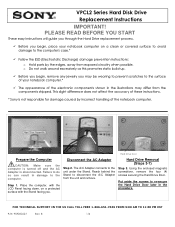
Using the enclosed magnetic screwdriver, remove the four (4) screws securing the Hard Drive Door.
Place the computer, with the LCD Panel facing down, on a clean or covered surface to avoid damage to disconnect the A/C Adapter...
VPCL2 Series Hard Disk Drive Replacement Instructions - Page 2
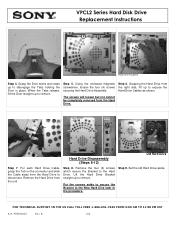
... aside. Step 8. Lift the Hard Drive Bracket straight up to expose the Hard Drive Cables as shown. Using the enclosed magnetic screwdriver, loosen the four (4) screws securing the Hard Drive Assembly.
Step 6. Remove the Hard Drive from the Hard Drive to disengage the Tabs holding the Door in the procedure. Step 9. When...
VPCL2 Series Hard Disk Drive Replacement Instructions - Page 3
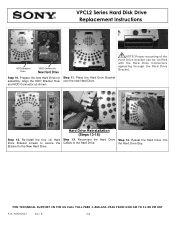
Place the Hard Drive Bracket assembly.
Reseat the Hard Drive into
Drive Bracket screws to secure the Cables to the New Hard Drive.
FOR TECHNICAL SUPPORT IN THE US...Instructions
Old Hard Drive
DriveDrive HDD Bracket Hole
HDD Connector
New Hard Drive
NOTE! Proper mounting of the Hard Drive bracket can be verified with the Hard Drive Connectors appearing through the Hard Drive Bracket. ...
VPCL2 Series Optical Disk Drive Replacement Instructions - Page 1
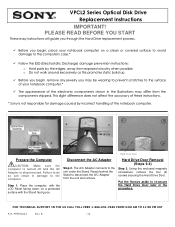
... damage caused by the edges, away from the unit and remove.
Hard Drive Door Removal (Steps 3-4)
Step 3. Using the enclosed magnetic screwdriver, remove the four (4) screws securing the Hard Drive Door. B
1/4 Step 1. Reach behind the Stand to the surface of the electronic components shown in the procedure. PLEASE READ BEFORE YOU START...
VPCL2 Series Optical Disk Drive Replacement Instructions - Page 2
...
P/N 989202624
Rev.
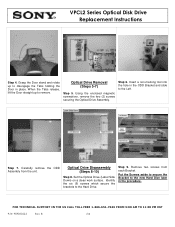
Set the Optical Drive (Label Side Down) on a clean work surface. Using the enclosed magnetic screwdriver, remove the two (2) screws securing the Optical Drive Assembly.
Put the Screws aside to secure the Bracket to remove. When the Tabs release, lift the Door straight up to disengage the Tabs holding the Door in...
VPCL1 Series Hard Disk Drive Replacement Instructions - Page 1
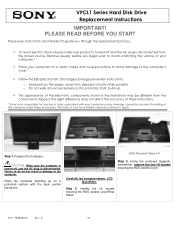
...different from the components shipped. Using the enclosed magnetic screwdriver, remove the two (4) screws securing the HDD access cover. Carefully lay computer down .
Remove jewelry before you begin ... plug is not responsible for any loss of these procedures. Step 2.
Identify the (4) screws securing the HDD access cover/Rear Stand. The appearance of your computer or any damage caused...
VPCL1 Series Hard Disk Drive Replacement Instructions - Page 2
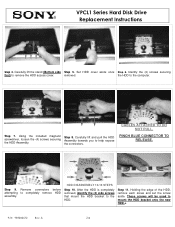
... the HDD. After the HDD is completely removed, identify the (4) side screws that mount the HDD bracket to completely remove HDD
HDD DISASSEMBLY 10-15 STEPS
Step 10...screws securing
first) to help expose
the HDD Assembly. Using the included magnetic screwdriver, loosen the (4) screws securing
Step 8. CABLES ATTACHED TO DO NOT PULL. These screws will be used to the computer. the HDD to mount ...
VPCL1 Series Hard Disk Drive Replacement Instructions - Page 3
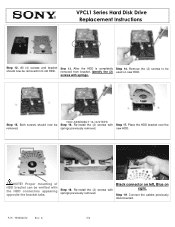
... new HDD. Connect the cables previously disconnected. removed from old HDD. Step 18.
VPCL1 Series Hard Disk Drive Replacement Instructions
Step 12. new HDD. Proper mounting of HDD bracket can be Step 16.
All (4) screws and bracket Step 13. After the HDD is completely Step 14.
Re-install the...
VPCL1 Series Optical Disk Drive Replacement Instructions - Page 2

Step 4. securing the ODD Assembly.
Step 8. Step 9.
Locate ODD manual eject hole.
Once ODD is completely removed, identify the (5) side screws that mount the HDD brackets to mount the HDD brackets onto the new HDD. Use these brackets to connector continue to eject via eject hole.
Holding the edge of the HDD, remove each screw and...
VPCL1 Series Optical Disk Drive Replacement Instructions - Page 3
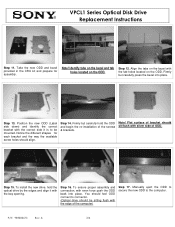
... way the available screw holes should sit flush with the edge of ODD.
Notice the different shapes for assembly.
Manually eject the ODD to secure the new ODD to.... Step 16. You should feel ODD connect to connector. (Optical drive should be mounted. Flat surface of the screws & brackets. Step 15.
VPCL1 Series Optical Disk Drive Replacement Instructions
Step 11. Firmly...
Similar Questions

I Have A Sony Vpcl212fx. It Was Working Fine. Now Won't Power Up. Suggestion?
I have a sony vpcl212fx. It was working fine but now won't power up. Any suggestions?
I have a sony vpcl212fx. It was working fine but now won't power up. Any suggestions?
(Posted by jniederman 7 years ago)


Is This Wall Mountable
I wanted to know if this is wall mountable? If so what vesa size is it?
I wanted to know if this is wall mountable? If so what vesa size is it?
(Posted by tntruc 12 years ago)