Sony CMT-EX1 Support Question
Sony CMT-EX1 Support Question
Find answers below for this question about Sony CMT-EX1 - Micro Hi Fi Component System.Need a Sony CMT-EX1 manual? We have 1 online manual for this item!
Question posted by krondan on August 26th, 2014
Disc Tray
The disc tray, doesn't operate properly, how can be fixed the disc tray?!?
Current Answers
Related Sony CMT-EX1 Manual Pages
Operating Instructions - Page 1

Refer to them whenever you call upon your Sony dealer regarding this product.
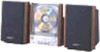
CMT-EX1
©1999 Sony Corporation Serial No. Record the serial number in the space provided below.
Model No.
3-867-450-13(1)
Compact Component System
Operating Instructions
Owner's Record
The model and serial numbers are located on the rear of the system.
Operating Instructions - Page 2

...user to the presence of important operating and maintenance (servicing) instructions in order to comply with limits for a digital device pursuant to operate this equipment in the literature accompanying...is classified as close to the point of electric shock to radio communications. Except for proper grounding and, in cabinet. NOTICE FOR THE CUSTOMERS IN THE U.S.A. Increase the separation ...
Operating Instructions - Page 3

... the power in standby mode 8
Basic Operations
Playing a CD 9 Listening to the radio 10
The CD Player
Playing the CD tracks in random order -- Shuffle Play 12
Programing the CD tracks -- Daily Timer 18
3 Repeat Play 14
Using the CD display 15
Optional Components
Connecting audio components 20 Listening to the sound of Contents...
Operating Instructions - Page 5

... cords to the other terminal. Note Keep the antenna away from battery leakage.
When the remote no longer operates the system, replace both batteries with new ones. To connect optional component See "Optional Components" on the glass cover of CD player The CD player cover is more shock resistant and able to a wall...
Operating Instructions - Page 7

...). Each time you want appears in the display. To tune in step 3. 2 Press +/- (or TUNING +/- continued
7 If the unit is stored. The station is not operated for more than 16 seconds, the preset number disappears and the unit returns to the status of stations: - 20 for FM, 10 for a stereo program...
Operating Instructions - Page 9
... CD, use the optional adaptor.
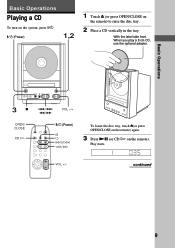
?/1
Z
NX x .m M>
3x
./> m/M
VOL -/+
OPEN/ CLOSE
CD H
"/1 (Power)
S s l/L j/J
To lower the disc tray, touch Z(or press OPEN/CLOSE on the remote) again.
3 Press NX (or CD H on the system, press ?/1. VOL +/- Basic Operations
Basic Operations
Playing a CD
To turn on the remote). Play starts. "/1 (Power)
1,2
1 Touch Z (or press OPEN/CLOSE...
Operating Instructions - Page 10
... play .
Tips
• You can switch from another source to lower the disc tray.
• Do not push strongly on the system, press "/1.
Furthermore, do... +/-
10 Press VOL +/-.
Touch Z with your finger, as this may damage the player.
• The disc tray will not operate if you touch Z while wearing gloves. Listening to resume play starts automatically (One Touch Play).
• If...
Operating Instructions - Page 11

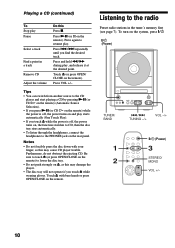
... press +/- (or TUNING +/- PRESET
TUNED STEREO
MHz
3 Press l/L to restore the stereo effect. There will be no stereo effect, but the reception will improve.
Basic Operations
1 Press TUNER/BAND repeatedly until
the band you press the button, the band changes as follows: FM y AM
AUTO
TUNED STEREO
MHz
2 Press TUNING MODE...
Operating Instructions - Page 15
...r Clock
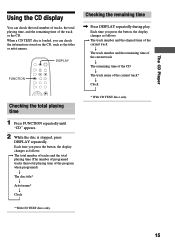
Checking the total playing time
1 Press FUNCTION repeatedly until
"CD" appears.
2 While the disc is loaded, you can check the total number of tracks, the total playing time, and the remaining time... of the program when programed)
r The disc title*
r Artist name*
r Clock
* With CD TEXT discs only.
* With CD TEXT discs only.
15 The CD Player
Using the CD display
You ...
Operating Instructions - Page 17

...
You can fall asleep to 100 minutes). Radio Data System (RDS) is not properly received, the station name may not work properly if the station you press DISPLAY, the display changes as follows: t AUTO t ... of time after the CD finishes playback (up in is not transmitting the RDS signal properly or if the signal is the Radio Data System?
SLEEP
, Press SLEEP repeatedly to music...
Operating Instructions - Page 18

... .
To wake up to the radio, preset the radio stations first (see page 10). • Tape: Make the same setting on the timer
of the component connected to
play. • CD: Place a CD. Daily Timer
You can use the Daily Timer. To cancel the Sleep Timer function Press SLEEP repeatedly until...
Operating Instructions - Page 19

... step 5. At the selected time, the system turns on automatically and the assigned music source begins playback. To check the setting / To use an optional component
connected to the TAPE jacks as follows:
t TUNER y TAPE* T t CD PLAY T
If you want appears.
It is not necessary to indicate "TIMER OFF".
To cancel...
Operating Instructions - Page 20

... deck or a tape deck
To the DIGITAL IN jack of the MD deck
To the audio input of each component. To listen to match the color of the connected MD deck or tape deck, press... for analog recording
Make sure to the sound of the plugs and the connectors.
Optional Components
Connecting audio components
To enhance your system, you can record from CD into the MD deck digitally by connecting an optional ...
Operating Instructions - Page 21
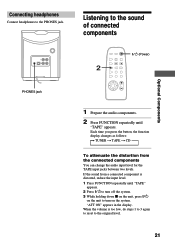
If the sound from the connected components You can change the audio input level for the TAPE input jacks between two levels. Listening to turn off the system.... until "TAPE"
appears. 2 Press ?/1 to turn on the unit to the sound of connected components
?/1 (Power)
2
Optional Components
PHONES jack
1 Prepare the audio components.
2 Press FUNCTION repeatedly until
"TAPE" appears.
Operating Instructions - Page 22

...to the AM antenna terminal. You can also use the TV antenna instead.
1 Prepare the recording component for
recording.
2 Press FUNCTION repeatedly until
"CD" appears.
3 Start recording.
4 Press CD... antenna. Recording a CD on an MD/a tape
For the operations of the connected components, refer to the instructions of each component.
4 2
Connecting external antennas
Remove the rear cover and connect...
Operating Instructions - Page 23

... glass. To disconnect the cord (mains lead), pull it out by qualified personnel before operating it is not to be changed only at the qualified service shop.
• When you... is off, the system begins charging for an extended period of time. Dusty or dirty - Optional Components/Additional Information
Important
If you move the system, remove the CD.
On placement
• Make sure...
Operating Instructions - Page 24

...vinyl LPs.
• Do not expose the CD to direct sunlight or heat sources such as audio racks, TV stands and toys.
Remove the CD and leave the system turned on again. These ...Set the clock and timer settings again.
Should any problem using this occur, the system will not operate properly. Move the system away from the center out.
First, check that the AC power cord is...
Operating Instructions - Page 25

... cannot be read. • The CD was not placed in the tray.
OVER -" is too weak.
Adjust the antenna.
• The signal strength is displayed. • By pressing M, the last track on the disc has been exceeded. A stereo FM program is scratched. You should set...occur, reset the system as the preset stations, clock, and timer are cleared. Place a CD vertically in the disc tray properly.
Operating Instructions - Page 26

...RMS power, with no more
CD player section
System Laser Laser output
Frequency response
Compact disc and digital audio system
Semiconductor laser (λ=780 nm) Emission duration: continuous
Max. 44.6 µ... 20,000 Hz; Specifications
Amplifier section
For the U.S. model
AUDIO POWER SPECIFICATIONS
POWER OUTPUT AND TOTAL HARMONIC DISTORTION: With 4 ohm loads both channels driven, from 250 ...
Operating Instructions - Page 28

See Hooking up
D, E, F, G Daily Timer 18 Display 6, 15 DSG (Dynamic Sound
Generator) 16
H, I, J, K Hooking up
optional components 20 the antennas 5, 22 the speaker 4
L
Listening to the radio 10 the sound of connected components 21
M
Manual Tuning 7, 11
N
Normal Play 9
O
One Touch Play 10, 11
P, Q
Playing a CD 9 tracks in random order (Shuffle Play) 12...
Similar Questions

Sony Cd Cmt-ex1
sony player skips and plays the same part of the song over and over
sony player skips and plays the same part of the song over and over
(Posted by grantmorlock 1 year ago)

Sony Mini Hi-fi Component System Mhc-ec98p
I'm looking for subwoofer or connector that clips into the back of stereo for subwoofer I've searche...
I'm looking for subwoofer or connector that clips into the back of stereo for subwoofer I've searche...
(Posted by Jacobknight82 5 years ago)

How To Fix Sony Mini Hi-fi Component System Ec909ip Radio That Says Protect
(Posted by bertale 10 years ago)

How Do I Turn The Bass Up On The Sony Micro Hi-fi Component System
(Posted by Jadedkapu 10 years ago)

Sony Cmt-mx500i - Micro Mini Hi Fi Component System-headphones?
can headphones be plugged into the Sony CMT-MX500i Micro Mini Hi Fi Component Systrm?if so,what size...
can headphones be plugged into the Sony CMT-MX500i Micro Mini Hi Fi Component Systrm?if so,what size...
(Posted by lbarry920 11 years ago)