Sony CMT-EX1 Support Question
Sony CMT-EX1 Support Question
Find answers below for this question about Sony CMT-EX1 - Micro Hi Fi Component System.Need a Sony CMT-EX1 manual? We have 1 online manual for this item!
Question posted by 03tokamaklocus on October 30th, 2022
Clock Display
How do I set the clock display?
Current Answers
Answer #1: Posted by Kiwii on October 31st, 2022 7:03 AM
Kiwii

Member since:
January 2nd, 2022 Points: 94,600

Member since:
January 2nd, 2022 Points: 94,600
Kindly refer to page 5 of this manual : https://manualmachine.com/sony/cmtex1/1191971-operating-instruction/
Hope it helps! Please don't forget to click "Accept this Answer" button if it was of some help. Thank you!
Related Sony CMT-EX1 Manual Pages
Operating Instructions - Page 1

CMT-EX1
©1999 Sony Corporation
Model No. Refer to them whenever you call upon your Sony dealer regarding this product. Serial No. 3-867-450-13(1)
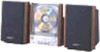
Compact Component System
Operating Instructions
Owner's Record
The model and serial numbers are located on the rear of the system. Record the serial number in the space provided below.
Operating Instructions - Page 3

... the CD display 15
Optional Components
Connecting audio components 20 Listening to the sound of Contents
Getting Started
Step 1: Hooking up to music
- Sleep Timer 17 Waking up the system 4 Step 2: Setting the time ...13
Playing the CD tracks repeatedly -- Daily Timer 18
3 Table of connected
components 21 Recording a CD on an MD/a tape 22 Connecting external antennas 22
Additional...
Operating Instructions - Page 5

... The CD player cover is more shock resistant and able to prevent noise.
4 Reinstall the rear cover.
Set up the AM loop antenna, then connect it is scratched.
To connect optional component See "Optional Components" on the glass cover of time, remove the batteries to avoid possible damage from the speaker cords to...
Operating Instructions - Page 6

... before you have made a mistake, start over from step 1. • The built-in clock shows the time in the display
while the power is used for other models. The day indication flashes after "CLOCK SET" flashing. repeatedly until the clock display appears.
to set the hour then press
ENTER. To show the time You can use the...
Operating Instructions - Page 7

...
3 Press TUNING MODE repeatedly until
"MANUAL" appears in step 3. 2 Press +/- (or TUNING +/- The frequency indication changes and scanning stops when the system tunes in the display. "TUNED" and "STEREO" (for a stereo program) appear.
To tune in the station and continue from step 4.
6 Press +/- When you want to select the preset number...
Operating Instructions - Page 8

...tune in standby mode
You can lower the power consumption to the Power Saving Mode and the clock display disappears. To reset the interval, repeat the same procedure. Saving the power in any AM station..., all the AM preset stations are retained for European model)
The AM tuning interval is factory-set in the standby mode.
The unit switches to a minimum (Power Saving Mode) and save energy...
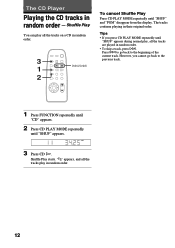
Operating Instructions - Page 12
... cannot go back to the previous track.
1 Press FUNCTION repeatedly until
"CD" appears.
2 Press CD PLAY MODE repeatedly
until "SHUF" and "PGM" disappear from the display.
Press l to go back to the beginning of the current track. SHUF
3 Press CD H. The CD Player
Playing the CD tracks in their original order.
Operating Instructions - Page 13
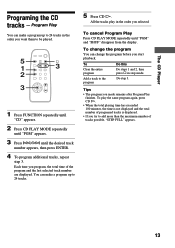
... a track to add more than the maximum number of the program and the last selected track number are displayed. Program Play
You can make a program up to be played.
5
s
1
3
2
3
1 ... MODE repeatedly
until "PGM" appears.
3 Press l/L until "PGM" and "SHUF" disappear from the display.
To change the program
You can change the program before you made remains after Program Play finishes. To...
Operating Instructions - Page 14
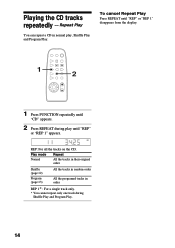
... until
"CD" appears.
2 Press REPEAT during Shuffle Play and Program Play.
14 To cancel Repeat Play
Press REPEAT until "REP" or "REP 1" disappears from the display.
1 2
1 Press FUNCTION repeatedly until "REP"
or "REP 1" appears.
Repeat Play
You can repeat a CD in order
REP 1* : For a single track only.
* You cannot repeat only...
Operating Instructions - Page 15
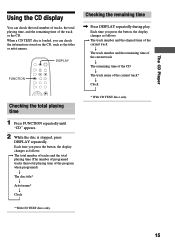
... playing time, and the remaining time of the program when programed)
r The disc title*
r Artist name*
r Clock
* With CD TEXT discs only.
* With CD TEXT discs only.
15 Each time you press the button, the display changes as follows: t The total number of tracks and the total playing time (The number of...
Operating Instructions - Page 16

...as follows: SURR ON y SURR OFF
When SURROUND is ON, "DSG" lights up in the display. DSG
SURROUND
, Press DSG.
Selecting the surround effect
You can enjoy the encompassing effects of ...."
, Press SURROUND. Other Features
Generating a more powerful sound. Each time you press the button, the display changes as follows: t DSG 1 t DSG 2 t DSG OFF
When DSG is ON, "SURR" lights up in the...
Operating Instructions - Page 18

... in a preset radio station
(see page 10). • Tape: Make the same setting on the timer
of the component connected to music at a preset time. Daily Timer
You can use the Daily Timer. to select the time you have set the clock. To change the remaining time Press SLEEP repeatedly to adjust the sound...
Operating Instructions - Page 19

... turns on automatically and the assigned music source begins playback.
To check the setting / To use an optional component
connected to turn off the system.
Press +/- "DAILY" lights up in the display. * Select "TAPE" to use the timer Press TIMER SELECT to set the hour, then press ENTER. Other Features
4 Press +/-
repeatedly until "TIMER...
Operating Instructions - Page 20

... the small rear cover first.
Connecting an MD deck for analog recording
Make sure to the instructions of the plugs and the connectors. Optional Components
Connecting audio components
To enhance your system, you can record from CD into the MD deck digitally by connecting an optional cable (not supplied). Connecting an MD deck...
Operating Instructions - Page 21
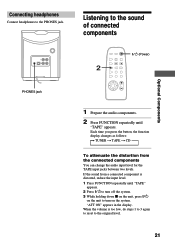
... you press the button, the function display changes as follows: t TUNER t TAPE t CD
To attenuate the distortion from a connected component is too low, do steps 1 to 3 again to reset to the original level.
21 Listening to the sound of connected components
?/1 (Power)
2
Optional Components
PHONES jack
1 Prepare the audio components.
2 Press FUNCTION repeatedly until "TAPE"
appears...
Operating Instructions - Page 22

....
75-ohm coaxial cable (not supplied)
AM antenna Connect a 6- feet) insulated wire to 15- You can also use the TV antenna instead.
1 Prepare the recording component for
recording.
2 Press FUNCTION repeatedly until
"CD" appears.
3 Start recording.
4 Press CD H. to the AM antenna terminal.
to 50- Refer to the instructions of each...
Operating Instructions - Page 23

...Subject to direct sunlight. Subject to vibrations - On safety
• The glass over the display window on during use. On installing
When you connect an external antenna, connect the ground ...wire and the AM antenna to bear more weight than ordinary glass.
Optional Components/Additional Information
Important
If you move the system, remove the CD. Never pull the cord...
Operating Instructions - Page 24

...or paste on it as audio racks, TV stands and toys. General
There is no improvement, locate the speaker system further away from the TV set. Set the clock and timer settings again. The remote does not... solution.
There is severe hum or noise. • A TV or VCR is placed in the display.
• A power failure occurred.
If you have any questions or problems concerning your system, please...
Operating Instructions - Page 25

... disappear.
to return to the factory settings. Tuner
Severe hum or noise ("TUNED" or "STEREO" flashes in the display).
• Remove the FM antenna from the
stand.
The system is dirty. You should set them again. The CD will not...described above occur, reset the system as the preset stations, clock, and timer are cleared. A stereo FM program is not received in program or shuffle mode.
Operating Instructions - Page 28

See Hooking up
D, E, F, G Daily Timer 18 Display 6, 15 DSG (Dynamic Sound
Generator) 16
H, I, J, K Hooking up
optional components 20 the antennas 5, 22 the speaker 4
L
Listening to the radio 10 the sound of connected components 21
M
Manual Tuning 7, 11
N
Normal Play 9
O
One Touch Play 10,... Source Selection 10, 11 Automatic Tuning 7, 11
B Batteries 5
C CD player 9, 12 Clock setting 6 Connecting.
Similar Questions

Sony Cd Cmt-ex1
sony player skips and plays the same part of the song over and over
sony player skips and plays the same part of the song over and over
(Posted by grantmorlock 1 year ago)

How To Fix Sony Mini Hi-fi Component System Ec909ip Radio That Says Protect
(Posted by bertale 10 years ago)

How Do I Turn The Bass Up On The Sony Micro Hi-fi Component System
(Posted by Jadedkapu 10 years ago)

Sony Cmt-mx500i - Micro Mini Hi Fi Component System-headphones?
can headphones be plugged into the Sony CMT-MX500i Micro Mini Hi Fi Component Systrm?if so,what size...
can headphones be plugged into the Sony CMT-MX500i Micro Mini Hi Fi Component Systrm?if so,what size...
(Posted by lbarry920 11 years ago)

Sony Mp3 Players Compatible With Sony Mini Hi-fi Component System Mhc-ec691
*what sony mp3 players are compatible with sony mini hi-fi component system mhc-ec691 *(not walkman ...
*what sony mp3 players are compatible with sony mini hi-fi component system mhc-ec691 *(not walkman ...
(Posted by faxol 11 years ago)