Sony CMT-CP1 Support Question
Sony CMT-CP1 Support Question
Find answers below for this question about Sony CMT-CP1 - Micro Hi Fi Component System.Need a Sony CMT-CP1 manual? We have 2 online manuals for this item!
Question posted by andrewwilson171 on August 18th, 2011
Adjusting The Eq On The Cmt-cp1.
How do I adjust the EQ on the CMT-CP1? I am sure that when I first purchased the system there was a way to do this with the remote, adjusting both bass & treble. This in addition to just activating the DSG.
Thanks.
Andrew
Current Answers
Related Sony CMT-CP1 Manual Pages
Operating Instructions - Page 1
Record the serial number in the space provided below. CMT-CP1 Serial No. CMT-CP1
©1998 by Sony Corporation
Model No. Refer to them whenever you call upon your Sony dealer regarding this product. 3-865-909-14(1)
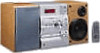
Micro HiFi Component System
Operating Instructions Owner's Record
The model and serial numbers are located on the rear of the system.
Operating Instructions - Page 3
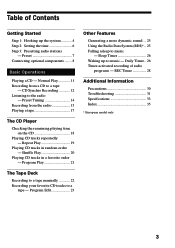
... time 6 Step 3: Presetting radio stations
- Preset Tuning 14 Recording from a CD to a tape
- Repeat Play 19
Playing CD tracks in a favorite order -- REC Timer 28
Additional Information
Precautions 30 Troubleshooting 31 Specifications 33 Index 35
* European model only
3 Normal Play 11 Recording from the radio 15 Playing a tape 17
The CD...
Operating Instructions - Page 5
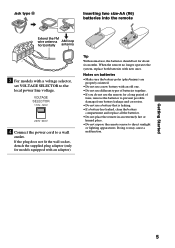
..., detach the supplied plug adaptor (only for about six months. Notes on batteries • Make sure the battery poles (plus/minus) are
properly oriented. • Do not use a new battery...a malfunction. VOLTAGE SELECTOR
110V~120V
220V~240V
4 Connect the power cord to a wall
outlet. When the remote no longer operates the system, replace both batteries with an adaptor). e
EE e
Tip With normal use a...
Operating Instructions - Page 7

... select the preset number that time, "TUNED" and "STEREO" (for stereo programs only) appear.
AUTO
PGM STEREO
FM1005 TUNED
MHz
5 Press MEMORY on the remote. "TUNER" appears. The station is tuned in stations and preset them.
1
2
A
bB
x
m
M
X
z
?/1
+ - This section explains how to preset
other stations.
7 continued Scanning stops automatically when a ...
Operating Instructions - Page 8
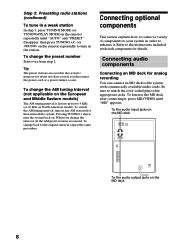
... recording You can connect an MD deck to the system with each component for details.
Be sure to match the color-coded pins to the original interval, repeat the same procedure. To the audio input jacks on the MD deck
To the audio output jacks on .
Pressing TUNING + down, turn off the system.
Connecting...
Operating Instructions - Page 9
...
>
m
M
PHONES jack
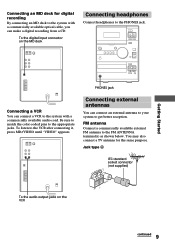
Connecting a VCR
You can make a digital recording from a CD. Be sure to match the color-coded pins to the PHONES jack. You may also connect a TV antenna for ... appears.
To listen to the FM ANTENNA terminal(s) as shown below. Jack type A
To the audio output jacks on the MD deck
Connecting headphones
Connect headphones to the appropriate jacks.
A
bB
x
...
Operating Instructions - Page 10
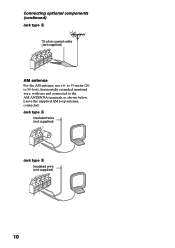
Connecting optional components (continued) Jack type B
75-ohm coaxial cable (not supplied)
ANTENNA
FM75Ω U AM U
AM antenna For the AM antenna, use a 6- Leave the supplied AM loop ...
Operating Instructions - Page 11
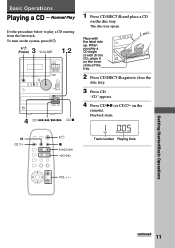
When you play a CD starting from the first track.
A
u
x
.
>
m
M
4 CD .m/>M CD x
X CD H
?/1
x l/L j/J
1 Press CD EJECT A and place a CD
on the
remote). The disc tray opens. "CD" appears.
4 Press CD u (or CD H on the disc tray. To turn on the inner circle of the tray. EJECT CD
A
u
. ...
Operating Instructions - Page 12

...
12
The CD will automatically start playing (Automatic Source Selection).
• "NO DISC" appears in a track
Remove or replace the CD Adjust the volume
Do this
Press CD x (or x on the remote). Both Type I (normal) and Type II (CrO2) tapes can be used. To turn on the disc tray. During playback, press...
Operating Instructions - Page 14
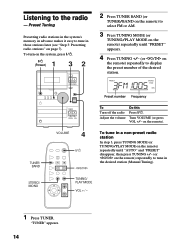
... to tune in the desired station (Manual Tuning).
To turn on the remote). "TUNER" appears.
14 Listening to display the preset number of the desired ...station. PRESET
STEREO
3FM1005 TUNED
MHz
Preset number Frequency
To Turn off the radio Adjust the volume
Do this Press ?/1. STEREO/ MONO
TUNING/ PLAY MODE
VOL + / -
1 Press TUNER. Turn ...
Operating Instructions - Page 15
...continued
15 Press this button again to restore the broadcast to stereo.
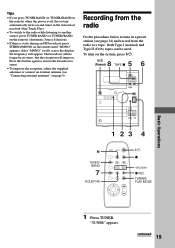
• To improve the reception, adjust the supplied antennas or connect an external antenna (see page 14) and record from the radio
Do the...used. Tips
• If you press TUNER BAND (or TUNER/BAND on the remote) when the power is off, the system automatically turns on and tunes in stereo, but the reception will improve.
Operating Instructions - Page 16
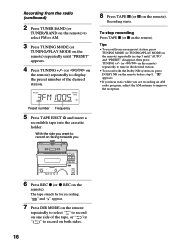
... the desired station. • To record with the Dolby NR system on, press DOLBY NR on the remote before step 8. ";" appears. • If you hear static while you are recording an AM radio program, adjust the AM antenna to record on facing towards you want to improve the reception.
To stop recording...
Operating Instructions - Page 18

... track or the entire CD.
Each time you press this
Press TAPE x (or x on the remote).
Fast-forward or rewind
With the tape stopped, press TAPE M (or J on the remote) or TAPE m (or j on the remote). the tape
Adjust the volume Turn VOLUME (or press VOL +/- The CD Player
Checking the remaining playing time...
Operating Instructions - Page 22
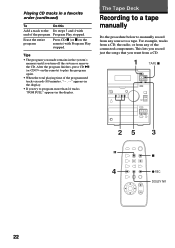
...Add a track to the Do steps 3 and 4 with Program Play stopped.
This lets you record just the songs that you turn off the system or remove the CD. The Tape Deck
Recording to a...Do the procedure below to manually record from any of the connected components. After the program finishes, press CD u (or CD H on the remote) with end of the programmed tracks exceeds 100 minutes appears in...
Operating Instructions - Page 23
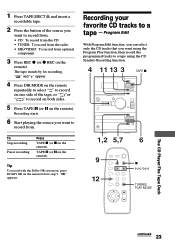
....
6 Start playing the source you want to a tape using the Program Play function, then record the programmed tracks to
record from optional
component
3 Press REC z (or z REC on the remote). 1 Press TAPE EJECT A and insert a
recordable tape.
2 Press the button of the tape, or " "or " " to a tape - ";" appears.
1,2 5,7 6
9 12
x l/L
TUNING/ PLAY MODE...
Operating Instructions - Page 27
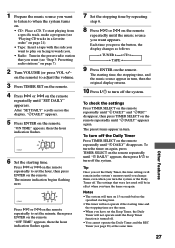
... "SET DAILY" scrolls across the display, "c DAILY" appears.
5 Press ENTER on the remote) to set the Sleep Timer, the Daily
Timer will be in the system's memory until ...remote repeatedly until "c DAILY" disappears.
Tip Once you have set the hour, then press ENTER on the remote
repeatedly until you change them, even when you turn .
Press l or L on the remote repeatedly to adjust...
Operating Instructions - Page 31
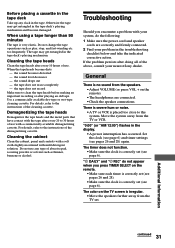
... the TV screen is irregular. •Move the speakers farther away from the speakers. •Adjust VOLUME (or press VOL + on the remote.
•Make sure each timer is correctly set (see pages 26 and 28).
•Make sure the clock is correctly set (see page 6). too frequently.
The timer does not function. •...
Operating Instructions - Page 33
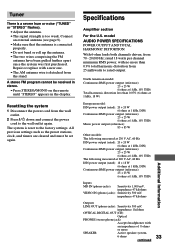
...8226; Press STEREO/MONO on the remote until "STEREO" appears in the display...; Adjust the antenna. • The signal strength is reset to the factory settings.
model
AUDIO POWER...+ 23 W (6 ohms at 1 kHz, 10% THD)
Additional Information
Inputs MD IN (phono jacks): Sensitivity 1,000 mV,
...purchased. The system is too weak. Connect
an external antenna (see page 9). • Make sure that ...
Operating Instructions - Page 34
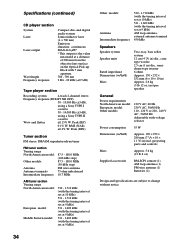
...lb 6 oz)
Supplied accessories
RM-SCP1 remote (1) AM loop antenna (1) FM wire ...
Wavelength Frequency response
Compact disc and digital audio system Semiconductor laser (λ = 780 ...Speaker system Speaker units
Rated impedance Dimensions (w/h/d) Mass
Two-way, bass reflex system 12 cm (4 3/4 in) dia., cone ...120 V or 220 - 240 V AC , 50/60 Hz Adjustable with 7 mm aperture. 780 - 790 nm 2 Hz -...
Operating Instructions - Page 35
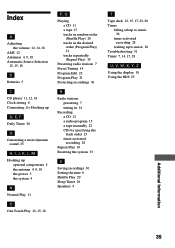
... F Daily Timer 26
G Generating a more dynamic
sound 25
H, I, J, K, L, M Hooking up
optional components 8 the antenna 4, 9, 10 the power 5 the system 4
N Normal Play 11
O One Touch Play ...31 Tuner 7, 14, 15, 28
U, V, W, X, Y, Z
Using the display 18 Using the RDS 25
Additional Information
35 Index
A Adjusting
the volume 12, 14, 18 AMS 12 Antennas 4, 9, 10 Automatic Source Selection
12, 15, 18
B ...
Similar Questions

Cmt-cp1
Hello,My CMT-CP1 doesn't keep radio station in memory. Is there a battery for it somewhere
Hello,My CMT-CP1 doesn't keep radio station in memory. Is there a battery for it somewhere
(Posted by Anonymous-152341 8 years ago)

How Do I Turn The Bass Up On The Sony Micro Hi-fi Component System
(Posted by Jadedkapu 10 years ago)

Sony Cmt-mx500i - Micro Mini Hi Fi Component System-headphones?
can headphones be plugged into the Sony CMT-MX500i Micro Mini Hi Fi Component Systrm?if so,what size...
can headphones be plugged into the Sony CMT-MX500i Micro Mini Hi Fi Component Systrm?if so,what size...
(Posted by lbarry920 11 years ago)

Cmt-cp1 Remote Control Doesn't Work Any More
Where i can find a new remote control. mine dosen't work any more and it is the only way to presele...
Where i can find a new remote control. mine dosen't work any more and it is the only way to presele...
(Posted by brunoxper 11 years ago)

Hallo Neu Sony Cmt-cp1 Disc Cd
(Posted by thomasklemend81 12 years ago)