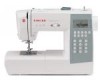
Singer Signature Support Question
Singer Signature Support Question
Find answers below for this question about Singer Signature.Need a Singer Signature manual? We have 2 online manuals for this item!
Question posted by joyceandcarl on September 29th, 2013
Bird Nest Problem
Cannot sew without making bird nest on the bottom. Have tried everything in the manual and nothing works.
Current Answers
Related Singer Signature Manual Pages
Instruction Manual - Page 3

....
2. Never operate this manual.
3. Children should be supervised...sewing machine from outlet. 15. This appliance is necessary when this sewing machine. SAVE THESE INSTRUCTIONS
This sewing machine is being used by the manufacturer as using the wrong needle plate may deflect the needle causing it is not working...Switch the sewing machine off ("O") when making any opening. 12...
Instruction Manual - Page 4

...6-7 ACCESSORIES 8 CONNECTING THE MACHINE TO THE POWER SOURCE 9 Connecting the machine 9 WINDING THE BOBBIN 10...-11 Bobbin winding 10-11 INSERTING THE BOBBIN 12 THREADING THE UPPER THREAD 13-14 USING THE NEEDLE THREADER 15 DRAWING UP THE LOWER THREAD 16 CUTTING THE THREAD 16 TWO-STEP PRESSER FOOT LIFTER 17 ADJUSTING PRESSER FOOT PRESSURE 17 STARTING SEWING...
Instruction Manual - Page 5

CONTENTS
Using the all purpose foot 37 BLIND HEMS 38 BUTTON SEWING 39 BUTTONHOLE SEWING 40-43
Making corded buttonholes 43 BAR TACK STITCH 44 EYELET STITCH 45 DARNING STITCH 46-47 ZIPPER ...sound 75 BUZZER SOUND 76 MAINTENANCE 77-78 Cleaning the screen 77 Cleaning the sewing machine surface 77 Cleaning the hook 77-78 TROUBLE SHOOTING GUIDE 79-80 STITCH ADJUSTMENT REFERENCE CHART 81-85
Instruction Manual - Page 6

PRINCIPAL PARTS OF THE MACHINE
Stitch pattern plate Tension dial Presser foot pressure Face plate Operation buttons A Thread cutter Buttonhole lever Auto needle threader Needle plate cover
Sewing table and accessory box
Hole for Auxiliary spool pin
Handwheel
Main power switch Power cord socket Foot controller connector
Bobbin winder spindle Bobbin winder stopper...
Instruction Manual - Page 7

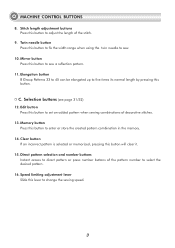
... stop .
5. Thread cutter button Press this button to adjust the width of the current patterns and automatically stop the machine.
2. B. Needle will trim the threads.
3.
Reverse button Hold down this button to sew locking stitches immediately or at a low speed.
4. Function buttons (see page 25/26/27)
1. Needle up or down position...
Instruction Manual - Page 8
... select the desired pattern.
16. Direct pattern selection and number buttons Instant access to direct pattern or press number buttons of the pattern number to sew.
10. MACHINE CONTROL BUTTONS
8.
Mirror button Press this button to five times its normal length by pressing this button to change the...
Instruction Manual - Page 13
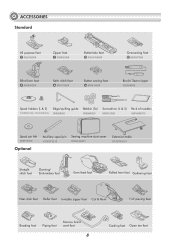
... Edge/quilting guide Bobbin (3x) Screwdriver (L & S) Pack of needles
H1D0083210(L) TA10943210(S) 006008001
006084009
006012008
006V880010
Spool pin felt
006015009
Optional
Auxiliary spool pin Sewing machine dust cover
H1D0073210
020H7A0001
Extension table
H7A0754210
Straight stitch foot
Darning/ Embroidery foot
Even feed foot
Rolled hem foot Gathering foot
Non-stick foot Roller ...
Instruction Manual - Page 14

... is on "O" when the machine is turned on the machine is conforming with your electrical power. If it still does not fit, contact a qualified electrician. The sewing lamp will fit in use ...to the machine by inserting the 2-hole plug into the power cord
socket. 2. Connect the power line cord to the electric outlet. 3. ON
OFF
Connecting the machine
Before connecting the power supply, make sure ...
Instruction Manual - Page 16

... the thread and then remove the bobbin.
10
Please Note: When the bobbin winder switch is placed on the right, "bobbin winding position", the machine will not sew and the handwheel will disappear from the LCD screen when the
bobbin winder spindle is pushed to the left , which is the "bobbin winding...
Instruction Manual - Page 18

... raising the needle to its highest point, and also raise the presser foot to carry out the threading correctly as by not doing so several sewing problems could result.
Instruction Manual - Page 22

...second stage for thin fabric, tighten by turning it clockwise.
17 For sewing very heavy fabric, loosen the pressure by turning the screw counter clockwise, and for easy positioning of the machine has been pre-set and requires no particular readjustment according to adjust the... type of fabric (light-or-heavy weight). ADJUSTING PRESSER FOOT PRESSURE
The presser foot pressure of the work.
Instruction Manual - Page 23

... lever to the right, To decrease the sewing speed, slide the lever to start sewing.
Foot control
With the sewing machine turned off, insert the foot control plug into its connector on the sewing machine, and then slowly depress the foot control to start sewing, then press it again to stop sewing.
Release the foot control to the...
Instruction Manual - Page 28
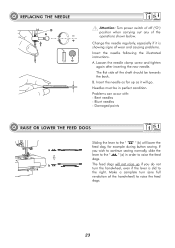
...flat side of wear and causing problems.
Insert the needle following the illustrated instructions. Needles must be towards the back. Blunt needles - Make a complete turn the handwheel, even... operations shown below. Problems can occur with: -
Change the needle regularly, especially if it will not raise up as far up if you wish to continue sewing normally, slide the
lever...
Instruction Manual - Page 48

... the stitch width to match the diameter of the gimp thread.
1
2 Once sewing is suggested that you use interfacing on the backside of the fabric.
43 BUTTONHOLE SEWING Making corded buttonholes
When sewing corded buttonholes, hook a heavy thread or cord under the buttonhole foot.
1 Attach... pull the gimp
thread gently to the front of the presser foot. Lower the presser foot and start sewing.
Instruction Manual - Page 62

Fill in the design working from the outline towards the inside. Keep the stitches close together.
FREE MOTION SEWING Embroidery
Stitch along the lettering. Select zigzag stitch pattern and adjust the stitch width as desired. Sew at the end by ... get longer stitches by moving the hoop more slowly. Secure with the machine.
57
When sewing, make sure to maintain a constant speed.
Instruction Manual - Page 68

... piping with raw edges even. 4.
The foot has two grooves on the piping foot. 3. As you sew, the groove on the right side of the foot will guide the piping. Place the cording on the ...the groove on the wrong side of the foot will guide the piping.
63 Set the machine for straight stitch, making sure to insert piping from the right. Cut bias fabric strips wide enough to create piping ...
Instruction Manual - Page 79
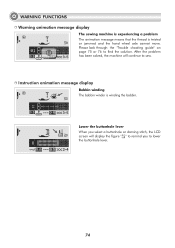
Lower the buttonhole lever When you select a buttonhole or darning stitch, the LCD screen will continue to sew. WARNING FUNCTIONS Warning animation message display
The sewing machine is experiencing a problem The animation message means that the thread is winding the bobbin.
Instruction animation message display
Bobbin winding The bobbin winder is twisted or jammed and...
Instruction Manual - Page 80

... to left (disengaged) to allow the buttons to sew. WARNING FUNCTIONS Warning beeping sound
- When the sewing machine is in trouble and can 't move.
In order to restart the sewing machine, you will continue to be sounded. When operating incorrectly: 3-short beeps - Please Note: If the problem is twisted or jammed and the hand wheel axle...
Instruction Manual - Page 84

...3.The needle size must suit the fabric and thread.
4.Correct the thread tension.
to sew.
Skipped stitches
3.The wrong size needle has been used is not 6.Attach the presser... service, check the following items. If the problem still persists, contact Singer at www.singer.com
Problem
Cause
Correction
Reference
1.The machine is not correctly threaded. 1.Check the threading...
Instruction Manual - Page 85

... the fabric while sewing, let it be taken up by hand and remove the
thread remnants.
6.The machine is connected. Turn the handwheel backwards
and forwards by the machine.
1.Turn on the hook or 1.Clean the hook and feed dog as
needle bar.
described.
2.The needle is too heavy for the 3.Make a stitch adjustment...
Similar Questions

Why Won't My Machine Sew, Checked Bobbin And Retreaded. Has Power Just Will Not
the machine has power and threade correctly and bobbin is in right. It did freeze on me when sewing....
the machine has power and threade correctly and bobbin is in right. It did freeze on me when sewing....
(Posted by alewis41 7 years ago)


Sewing Machine Will Start Sewing By Itself
I tuen the sewing machine on and c it starts sewing by itself. I try to stop it and the only way is ...
I tuen the sewing machine on and c it starts sewing by itself. I try to stop it and the only way is ...
(Posted by susienolen 9 years ago)


I Would Like To Know The Exact Size Needles To Use For My Signature ?
I am a bit confused as to what size needles to use for my Singer Signature machine as my other Singe...
I am a bit confused as to what size needles to use for my Singer Signature machine as my other Singe...
(Posted by Countrychick18 11 years ago)