Get support for Singer Promise II 1512

Singer Promise II 1512 Support Question

Singer Promise II 1512 Support Question

Find answers below for this question about Singer Promise II 1512.
Need a Singer Promise II 1512 manual? We have 1 online manual for this item!
Question posted by cathmuse2 on September 1st, 2023
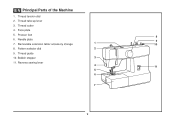
Bobbin Compartment

I removed pieces of the bobbin compartment and di not find instructions on how to reassemble it. Help!!!

Current Answers

Answer #1: Posted by SonuKumar on September 1st, 2023 11:32 AM
This answer was accepted by the poster of the original question.
SonuKumar

Member since:
May 9th, 2021

Points: 16,627,790
1,100
points
Locate the bobbin compartment door. It is the small door on the front of the machine, below the needle plate.

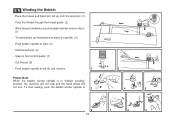
Open the bobbin compartment door.

Locate the bobbin case. It is the small, plastic case that holds the bobbin.

Remove the bobbin case from the bobbin compartment.

Reassemble the bobbin case by inserting the bobbin into the case, with the thread coming off the right side of the bobbin.

Make sure that the thread is threaded through the groove in the bobbin case.

Slide the bobbin case back into the bobbin compartment.

Close the bobbin compartment door.

Here are some additional tips:

Make sure that the bobbin is inserted into the bobbin case correctly. The thread should be coming off the right side of the bobbin.

Make sure that the thread is threaded through the groove in the bobbin case. This will help to prevent the thread from becoming tangled.

If you are having trouble reassembling the bobbin compartment, you can refer to the instruction manual for your sewing machine.

I hope this helps! Let me know if you have any other questions.


Please respond to my effort to provide you with the best possible solution by using the "Acceptable Solution" and/or the "Helpful" buttons when the answer has proven to be helpful.

Regards,
Sonu
Your search handyman for all e-support needs!!

Related Singer Promise II 1512 Manual Pages

Instruction Manual - Page 2

... the off ("O") when making any adjustments in the instruction manual. 11. Never operate the appliance with same type rated 10 watts (110-120V area) or 15 watts (220-240V area). Keep ventilation openings of the sewing machine and foot controller free from the electrical outlet when removing covers, lubricating, or when making any other...
Instruction Manual - Page 6

... ...15 Accessories ...16 Threading the Machine Winding the Bobbin ...18 Inserting the Bobbin ...20 Threading the Upper Thread ...22 Raising the Bobbin Thread ...24 Thread Tension...26 Sewing How to Choose Your Pattern ...28 Sewing Straight Stitch ...30 Reverse Sewing/ Removing the Work/ Cutting the Thread 32 Blind Hem ...34 Sew 4-step Buttonholes ...36 Sewing on Buttons ...38 Free Motion...
Instruction Manual - Page 9

Pattern selector dial 2 9. Thread tension dial 2. Thread cutter 4. Face plate 5. Presser foot 8 6. Reverse sewing lever 4 11 5 6 7 9 Thread guide 10. Thread take-up lever 3. Needle plate 9 7. Bobbin stopper 3 11. EN Principal Parts of the Machine 1. Removable extension table/ accessory storage 1 10 8.
Instruction Manual - Page 11

Bobbin winding spindle 14. Spool pins 15. Power and light switch 17. Main plug socket 18. Presser foot lifter 20. Foot speed control 21. Handwheel 16. Bobbin thread guide 19. Power cord 11 EN Principal Parts of the Machine 12. Handle 13.
Instruction Manual - Page 13

... (230V area). The foot control must be used with the appropriate polarized outlet. (2) Attention: Unplug power cord when machine is equipped with a polarized plug which must be used with a polarized plug (one way. Sewing light Press main switch (A) to install the proper outlet. If it does not fit fully in use . Do...
Instruction Manual - Page 16

Zipper foot c. Spool pin felt (2x) h. they are not supplied with this machine; Blind hem foot p. Satin stitch foot q. Button sewing foot e. Quilting foot m. Bobbin (3x) k. Overcasting foot n. L-screwdriver f. Pack of needles (3x) i. Buttonhole foot d. Seam ripper/ brush g. Darning/ Embroidery foot 16 EN Accessories Standard accessories (1) 1 a. Hemmer ...
Instruction Manual - Page 18

..., the machine will not sew and the hand wheel will not turn. Pass the thread through the thread guide. (2) - Wind thread clockwise around bobbin winder tension discs. (3) - Step on spindle. (4) - Thread bobbin as illustrated and place on foot control pedal. (7) - To start sewing, push the bobbin winder spindle to left (9) and remove. Cut thread. (8) - Push bobbin spindle to...
Instruction Manual - Page 20

... power switch to off ("O") before inserting or removing the bobbin. 20 Pull the bobbin case tab (a) and remove the bobbin case. 3. EN Inserting the Bobbin When inserting or removing the bobbin, the needle must be fully raised. 1. Insert the bobbin so that the thread runs in a clockwise direction (arrow). 4. Hold the bobbin case with one hand. Insert it into the...
Instruction Manual - Page 22

...thread cutter. (8) 22 Trim thread to the rear beyond the needle eye. Start by not doing so several sewing problems could result. - Place the thread and Spool pin felt (a) onto the spool pin. (3) - ...slightly begins to descend. EN Threading the Upper Thread This is a simple operation but it is helpful to hold the thread between the spool and thread guide. - Now pass thread behind the ...
Instruction Manual - Page 24

..., check to make sure the thread is not trapped by the hinged cover or the Removable Extension Table. 1 Gently pull on the upper thread to bring the bobbin thread up through the needle plate hole. (2) Lay both threads to the back under the presser foot. (3) 2 3 24 Turn the handwheel (1) towards you (counterclockwise...
Instruction Manual - Page 26

..., turn the dial to the next number down. Turn dial to adjust it. Lower thread tension The bobbin tension has been set correctly at the factory, so you will be less than for all sewing will always obtain a nicer stitch and less fabric puckering when the upper thread appears on the bottom...
Instruction Manual - Page 28

Pattern Selector Dial b. The pattern selector dial may be turned in either direction. Reverse Sewing Lever 28 a b a. EN How to Choose Your Pattern To select a stitch, simply turn the pattern selector dial (a).
Instruction Manual - Page 30

EN Sewing Straight Stitch To begin sewing, set the machine for straight stitch. (1) Place the fabric under the presser foot with the fabric edge lined up with the desired seam guide line on the needle plate. (2) Lower the presser foot lifter, and then step on the foot controller to start sewing. (3) 1 2 3 30
Instruction Manual - Page 32

... secure the beginning and the end of the face plate and into thread cutter (B). Release the lever and the machine will sew forward again. (1) A Removing the Work Turn the handwheel toward you (counterclockwise) to bring the thread take up lever to its highest position and the needle begins to cut. (3) ...
Instruction Manual - Page 34

...edge of the hem extending about 7 mm. (1/4") to the right side of the fabric to sew blind hems. Always make a sewing test first. Begin sewing so the needle swings off the left . EN Blind Hem For hems, curtains, trousers, skirts...of hem to the left edge of the folded fabric. 1 Start to sew slowly on the fold, making sure the needle touches slightly the folded top to the desired width and press....
Instruction Manual - Page 36

... that the buttonhole center line marked on the fabric aligns with the center of button and add 0.3cm (1/8") for stretch or knit fabrics. Always test sew a buttonhole on fabric (a). 3. Follow the 4-step sequence changing from both ends towards the middle. Take off the all purpose foot and attach the buttonhole foot...
Instruction Manual - Page 38

... manually. If a shank is required, place a darning needle on top of the 1 2 button and sew. (4) For buttons with about 10 stitches. (3) Bring the thread tails to check if the needle goes ... hole of the button without hitting the button. Slowly sew on the button with 4 holes, sew through the back two holes. 3 4 38 EN Sewing on Buttons Install the darning plate. (1) Change the ...
Instruction Manual - Page 40

...darning/ embroidery foot will help guide you as you sew, in a meandering fashion to create small curving lines to coordinate sewing speed and movement of ... without the sewing machine internal feed system. EN Free Motion Darning, Stippling * The darning/ embroidery foot is an optional accessory not included with your machine. (1) Darning: Install the darning plate. (2) Remove the presser foot...
Instruction Manual - Page 46

leathers and vinyls. SINGER® 2045 Semi-ball point needle, scarfed. 9 (70) to 18 (110). For best sewing results always use the same thread on natural woven fabrics for double knits. Medium weight fabrics-cotton duck, woolen, heavier knits, Use polyester threads on ...
Instruction Manual - Page 55

... size must suit the fabric and thread. 4. Remove the upper thread and bobbin case, turn the handwheel backwards and forwards by the machine. 1. The bobbin case is not inserted correctly. 2. The needle...Select a better quality thread. 2. Remove bobbin case, thread and insert correctly. 3. Do not pull on the fabric while sewing, let it be taken up by hand and remove the thread. Clean the hook and...

Similar Questions

Singer Futura Quartet Seqs 6700 Sewing Machine
how to set my singer futura quartet seqs 6700 sewing machine to sew. A distance more than one inch a...
(Posted by johour2194 3 years ago)
I Get E7 Error Message On My Singer Model 7258 Sewing Machine. There Is No Refe
Error message E7 is up on my Singer Stylist model 7258 sewing machine. It is not working at all. I t...
(Posted by ebellamybellamy9 5 years ago)
I Have A Heavy Duty Singer Sewing Machine (model 4432)
stopped sewing after bobbin replacement?
(Posted by sueisforme 9 years ago)
Beeping From Singer Sewing Machine Stylist Ii 5625
My sewing machine will beep and stop sewing after three inches of sewing. I have taken it to be repa...
(Posted by arusheria 9 years ago)
Ask a New Question
Use the box below to post a new question about this Singer product .
Points & Prizes
  • You can earn points for nearly everything you do on HelpOwl.com
  • You can trade in those points for gift cards at leading retailers such as Amazon.com and Walmart
  • It's that simple!
See How it Works
Create a Free Account

Singer Manuals

Find free Singer Promise II 1512 manuals and user guides available at ManualOwl.com. Try out our unique manual viewer allowing you to interact with manuals from directly within your browser!

Singer Reviews

View thousands of Singer user reviews and customer ratings available at ReviewOwl.com.

Contact Information

Complete Singer customer service contact information including steps to reach representatives, hours of operation, customer support links and more from ContactHelp.com.

Scoreboard Ratings

See detailed Singer customer service rankings, employee comments and much more from our sister site.